sábado, marzo 10, 2012

Export Outlook Notes to Document or Text Files

Export Outlook Notes to Document Files

There are a lot of people who want a free way to export their Outlook notes to separate document files. Here is a step by step method of exporting those notes. It may seem tricky, but it really is simple and should take all of 5 minutes to complete. The actual export happens so quickly you will be astonished. The notes will be exported into Word or text documents with the same name as the notes.

Please understand that Windows does not allow many special characters in file names, so you will need to manually remove any special characters like <.>:"/\|?* from your note name before the conversion. The following device names are also restricted from use as file names by Windows and should not be the name of a note: CON, PRN, AUX, NUL, COM1, COM2, COM3, COM4, COM5, COM6, COM7, COM8, COM9, LPT1, LPT2, LPT3, LPT4, LPT5, LPT6, LPT7, LPT8, and LPT9. To help you out, the code I provided will automatically replace any "/" or "\" characters with a "-". The rest is up to you to rename manually or you may alter the code to convert even more restricted characters or names.

  • Create a folder on the root (main part) your C: drive named "Notes". It isimportant that this folder be on the root of the C: drive.
  • Open Outlook.
  • After Outlook opens, click on the top bar of the Outlook window next to the name Microsoft Outlook.
  • Press ALT-F11 which will open Outlook's Visual Basic window. If it does not open, be sure you clicked on the top bar of the Outlook window and press ALT-F11 again.
  • On the top toolbar, click on Insert and Module. You should see a new window pane open labeled Project1, Module1.
  • Copy the code you find listed below in this article and paste it in the Module1 window pane. If you wish to export to a document that can be opened in Word (rich text format), use the NotesToRTF code. If you wish to export to text files, use the NotesToText code.
  • On the top toolbar, click on Run and then click on "Run Sub/Userform".
  • A window will pop up asking you to select the folder where your notes are located. For most people, this will simply be your normal Notes folder. Select the Notes folder and then select OK. [More advanced users may select different note folders they may have created, following these steps over and over until all their notes are exported.]
  • The Notes will quickly be exported at this point. "Running" will appear next to "Microsoft Visual Basic" window name at the top of the screen and disappear when the notes are exported. You may see it flash for a second if you have just a few notes. For hundreds or thousands of notes, it will take longer. Wait for "Running" to go away and you may proceed.
  • Close the Microsoft Visual Basic window.
  • Close Outlook. You will receive a popup window asking if you want to save the VBA project. Answer No.
  • Look in the Notes folder on the C: drive to find your notes.

If you received a "Run time error", click End and then check the following:

  • Did you use a restricted character or name in a note?
  • Did you REALLY name the folder Notes in the ROOT of the C: drive?
  • Fix the folder name and then go back to the Microsoft Visual Basic window and click on Run and then "Run Sub/Userform" again.
  • The code is proven and should work every time when you follow the directions. If it still fails, I suspect you may have a corrupted Outlook data file. There are many Hub pages that address how to fix the problem. Simply search for "scanpst" and follow he directions listed in the page.

NotesToRTF Code

Sub NotesToRTF()

Set myNote = Application.GetNamespace("MAPI").PickFolder

For cnt = 1 To myNote.Items.Count

noteName = Replace(Replace(myNote.Items(cnt).Subject, "/", "-"), "\", "-")

myNote.Items(cnt).SaveAs "c:\notes\" & noteName & ".rtf", OlSaveAsType.olRTF

Next

End Sub


NotesToText Code

Sub NotesToText()

Set myNote = Application.GetNamespace("MAPI").PickFolder

For cnt = 1 To myNote.Items.Count

noteName = Replace(Replace(myNote.Items(cnt).Subject, "/", "-"), "\", "-")

myNote.Items(cnt).SaveAs "c:\notes\" & noteName & ".txt", OlSaveAsType.olTXT

Next

End Sub

[de http://emperorcrusher.hubpages.com/hub/Export-Outlook-Notes-to-Document-Files]

Ejecutar una macro cuando se abre Outlook

An Outlook Visual Basic for Applications (VBA) macro can use this event procedure to initialize itself when Outlook starts.

Example
This Microsoft Outlook Visual Basic for Applications example displays a welcome message to the user and maximizes the Outlook explorer window when Outlook starts.
Private Sub Application_Startup()
    MsgBox "Welcome, " & Application.GetNamespace("MAPI").CurrentUser
    Application.ActiveExplorer.WindowState = olMaximized
End Sub

1. Launch Outlook.
2. Set your security to Medium or Low (sounds like you did.)
3. Press Alt + F11 on your keyboard
4. If you do not see a module when the Visual Basic editor launches:
    *Expand the folder labeled Microsoft Outlook Objects in the Project Explorer Window.
    *Double click ThisOutlookSession
5. If the module is blank:
    *click the Object dropdown at the top of the module window (it reads General)
    *Select Application
    *Select Startup from the Procedure dropdown (it reads Item Send)
You should now have a code window like this:

CODE

Private Sub Application_ItemSend(ByVal Item As Object, Cancel As Boolean)
End Sub
_____________________________________________________________________
Private Sub Application_Startup()
End Sub

Write your code in the Application_Startup() routine.

[de http://www.tek-tips.com/viewthread.cfm?qid=1276053]

lunes, febrero 13, 2012

Como utilizar WhatsApp en Windows


WhatsApp en un PC : Manual para instalar WhatsApp en el ordenador

Cracklock–El Túnel del tiempo para aplicaciones Windows


Cracklock

Esta utilidad permite protegerse del virus más polimórfico y perjudicial del fin de siglo, el que se hace llamar "El virus del trigésimo día". Este ataca tanto a los mejores como a los peores Sharewares al introducirles, al momento de instalación un error que les impide funcionar más allá de un tiempo determinado, frecuentemente 30 días. Cracklock está a la vanguardia en la lucha contra este mortal virus que muy pocos antivirus han podido combatir.

Cracklock es además una herramienta que los desarrolladores pueden usar para verificar en sus productos el problema del año 2000, conocido por sus siglas en inglás "Y2K". Esto sin tener que cambiar la fecha de a computadora y evitándose así potenciales problemas y efectos colaterales.

Eventualmente, sería posible utilizar Cracklock, para cambiar le fecha de expiración del período de prueba de, por ejemplo, 30 días, de algún determinado software. Sin embargo, debe tenerse en cuenta, que utilizar un software, pasado el período de prueba, podría ser ilegal en algunos países.

YouWave–Emulador de Android para Windows


YouWave

Esta aplicación permite utilizar cualquier aplicación para Android, Android Market, desde Windows.

domingo, febrero 05, 2012

Configurar correo Hotmail como POP3 en Android

La configuración de una cuenta Hotmail en un teléfono móvil se puede lograr configurando una cuenta POP3 de Hotmail en dicho programa.

En la opción de Cuentas (Accounts), disponible al oprimir la tecla menú en el celular, seleccionar Añadir nueva Cuenta.

Luego especificar la dirección de Hotmail, y seleccionar la opción POP3. Se puede seleccionar si es la cuenta predeterminada o no.

Los datos de configuración de correo de entrada Hotmail son los siguientes:

Servidor POP3: pop3.live.com
Conexión segura POP3: no
Puerto POP3: 995
Utilizar SSL para POP3: sí

Para los datos de correo de salida SMTP:

Servidor SMTP: smtp.live.com
Autentificación SMTP: sí
Contraseña SMTP: (la de la cuenta de mail)
Puerto SMTP: 25
Utilizar SSL para SMTP: sí
Usar STARTTLS: sí

martes, enero 31, 2012

Resumen de llamadas hechas con SkyPe


Debido a mi trabajo, en muchas oportunidades debo hablar con mis clientes por SkyPe y a la vez utilizar alguna herramienta de control remoto para tomar control de sus equipos.

Las llamadas pueden ser breves o prolongadas, y a veces varias en el día, con distintos clientes.

Las horas dedicadas en estas tareas son una parte de la factura que les presento regularmente.

Hasta hora, lo que hacía era anotar lo más prolijamente posible en un cuaderno o en una planilla de cálculo. La otra alternativa, cuando no tomaba nota debido a mi falta de constancia, era revisar los logs de SkyPe, tarea que result bastante tediosa y lleva su tiempo.

Hasta que descubrí un programa que resuelve mis necesidades y que además es freeware. Se trata de SkyPeLogViewer de NirSoft. En este mismo sitio, encontrarán una gran cantidad de utilidades y programas, que seguramente le simplificarán la vida a más de un usuario de PCs.

Tiene una gran cantidad de opciones, como ser ver los mensajes de texto (chat), llamadas entrantes, llamadas salientes, etc. pudiéndose elegir cualquier combinación de ellas.

Es posible seleccionar un conjunto de líneas de la grilla en que muestra los datos y copiarlas y pegarlas en Excel para hacer las totalizaciones y/o análisis necesarios.

Muy, muy recomendable.

De Imágenes de Blogger

¿Cómo se puede apagar un equipo cuando se está conectado a través de Escritorio remoto?


Cuando se está conectado a una estación de trabajo a través de Escritorio remoto, en el menú Inicio no parece la opción  "Apagar equipo", si no la opción "Desconectar". Pero lo que usted realmente quiere hacer es apagar el máquina, reiniciar, hibernar, o suspender.

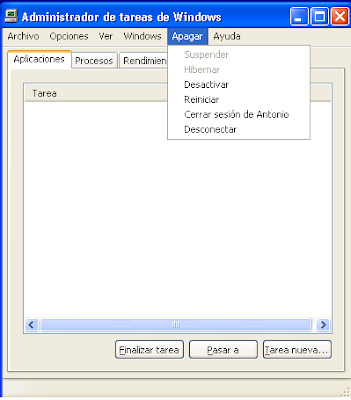
En Windows XP, se puede ejecutar el Administrador de tareas y seleccionar la opción de "Apagar" en el menú, y seleccionar la opción deseada. No incluye la opción "Apagar".


Otro manera es hacer click en el escritorio y presionar Alt + F4. Esta alternativa funciona tanto en Windows XP como en Windows 7.

Aparecerá el diálogo las opciones que permitirán apagar el equipo.

En Windows XP:


En Windows 7:


Si ambos equipos tienen Windows 7, puede utilizar las teclas Ctrl-Alt-Fin en la máquina remota. En la esquina inferior derecha de la pantalla, aparece un botón con un icono similar el de prender / apagar, y una flecha. Haciendo click en la flecha, Aparecen las opciones de Reiniciar, Hibernar y Apagar.

sábado, enero 21, 2012

Microsoft Windows 7 no viene con Hyperterminal


Se puede copiar el Hyperterminal de otra PC que tenga WIndows XP.
Los archivos de la instalación de XP que hay que copiar son los siguientes:

1. C:\Program Files\Windows NT\HYPERTRM.EXE
2. C:\Windows\Help\HYPERTRM.CHM
3. C:\Windows\Help\HYPERTRM.HLP
4. C:\Windows\System32\hypertrm.dll

En WIndows 7, crear una carpeta dentro de C:\Program Files\  que se llame "HyperTerminal", y copiar allí los 4 archivos.
Finalmente crear un acceso directo a "C:\Program Files\HyperTerminal\HYPERTRM.EXE" en el menú de Inicio o en el Escritorio.

martes, septiembre 06, 2011

Prueba .pptx


Una vez que ya tenés la presentación en Docs, cliqueá donde dice Compartir (arriba a la derecha) y luego en Publicar/Insertar, verás (abajo) Reproductor de la presentación, configuralo de acuerdo a tus necesidades y luego copiá el código que aparece para pegarlo posteriormente en la pestaña HTML del Editor de Blogger o bien en la columna lateral en un gadget HTML/Javascript.


Scribd: