Send Anywhere is a file sharing application that takes an easy, quick, and unlimited approach to file sharing. Cloud sharing or storage services often offer a promise of unlimited file storing and sharing but their speeds and usability is compromised. Send Anywhere is for anyone wanting to share quality content, quickly, from any device to anyone in the world.
viernes, diciembre 14, 2018
jueves, noviembre 22, 2018
martes, noviembre 20, 2018
IP Webcam

https://play.google.com/store/apps/details?id=com.pas.webcam
Esta aplicación permite configurar una celular una cámara de red (por ejemplo: http://192.168.0.9:8080/
La imagen de la cámara, tanto trasera como delantera, puede ser vista por cualquier usuario de la red.
Para que sea visible desde Internet se debe redireccionar un puerto de la IP Pública a la IP de la cámara.
viernes, noviembre 16, 2018
domingo, noviembre 04, 2018
The 10 Best Online Whiteboards with Realtime Collaboration
De: https://getvoip.com/blog/2016/09/14/online-whiteboard-collaboration/
| AwwApp | Realtime Board | Whiteboard Fox | Web Whiteboard | Conceptboard | Tiwddla | Groupboard | Scribblar | Ziteboard | Limnu | |
| Free Plan | Yes | Yes | Yes | Yes | Yes | Yes | Yes | No | Yes | Free Trial |
| Basic Plan Price | $10/mo | $35/mo | N/A | N/A | $28.50/mo | $14/mo | $9.90/mo | $14/mo | $8/mo | $5/mo |
| Free Plan Board Limit | One Board | 3 | Unlimited | Unlimited | 50 | 1 | 1 | N/A | 3 | 15 |
| Free Plan Guest Limit | Unlimited, Draw Only | 3 draw, unlimited view | Unlimited | Unlimited | Unlimited | Unlimited | 5 | N/A | Unlimited | Unlimited |
| Basic Plan Board Limit | 10 | Unlimited | N/A | N/A | Unlimited | 1 | 2 | 5 | Unlimited | 300 |
| Basic Plan Guest Limit | Unlimited, View or Draw | Unlimited | N/A | N/A | Unlimited | Unlimited | Unlimited | 5 | Unlimited | Unlimited |
| Slack Integration | DIY | Yes | DIY | DIY | DIY | DIY | DIY | DIY | Yes | Yes |
| Undo Function | Yes | Yes | Yes | Yes | Yes | Yes | No | Yes | Yes | Yes |
| Duplication | No | Yes | No | No | Yes | Yes | No | Yes | Yes | No |
| Multiple Ink Colors | Yes | Yes | Yes | Yes | Yes | Yes | Yes | Yes | Yes | Yes |
| Multiple Pen Widths | Yes | Yes | No | Yes | Yes | Yes | Yes | Yes | Yes | Yes |
| Clear Entire Board | Yes | No | Yes | No | No | Yes | Yes | Yes | Yes | No |
| Text Support | Yes | Yes | Yes | Yes | Yes | Yes | Yes | Yes | Yes | Yes |
| Post-It/Sticky Notes | No | Yes | No | Yes | Yes | Yes | No | No | Yes | Yes |
| Built in Chat | No | Yes | No | No | Yes | Yes, voice | Yes | Yes | No | No |
| Image Embed | Yes | Yes | Yes | Yes | Yes | Yes | Yes | Yes | Yes | Yes |
| File Embed | No | Yes | No | No | Yes | Yes | No | Yes | Yes | No |
| Export Board | No | Yes | Yes | Yes | Yes | Yes | No | Yes | Yes | Yes |
jueves, noviembre 01, 2018
domingo, octubre 21, 2018
Sincronizar dos carpetas en la red–ROBOCOPY
Una alternativa es utilizar la opción “Espejo” (MIRROR) de ROBOCOPY.
Los comandos necesarios se pueden incluir en un .archivo .bat y programar la ejecución de ese .bat con con Programador de Tareas, para que se ejecute con la frecuencia o intervalos que se desee.
En la sintaxis de Robocopy se deberan usar las opciones /MIR y /E que indican que “espeje” ambas carpetas, todos sus archivos y subcarpetas.
Ej:
robocopy \\computerA\FolderA \\computerB\FolderB /E /MIR
Incluirlo en un archivo .bat file, y en el Programado de Tareas programarlo para que se ejecute la sincronización en los momentos en que se dese.
Documentación de robocopy: https://technet.microsoft.com/en-us/library/cc733145(v=ws.11).aspx
How to Create a Backup Script using ROBOCOPY Command
From: https://www.sevenforums.com/tutorials/187346-robocopy-create-backup-script.html
![]() Information
Information
There are many paid and free software solutions available to backup critical data and files on a computer system. Many users, however, are unaware of an inbuilt Windows 7 command called ROBOCOPY (Robust File Copy) that allows users to create simple or highly advanced backup strategies.
In its simplist form, ROBOCOPY can be likened to an extension of XCOPY on steroids. Some of the more important features that make ROBOCOPY an attractive backup alternative are:
- multi-threaded copying
- mirroring or synchronisation mode between the destination and source
- automatic retry and copy resumption
http://technet.microsoft.com/en-us/library/cc733145(WS.10).aspx
and also here:
http://www.theether.net/download/Mic...s/robocopy.pdf
or by simply typing robocopy /? at a cmd window prompt.
![]() Note
Note
ROBOCOPY is a FOLDER copier, not a FILE copier - the source and destination syntax arguments in ROBOCOPY can only be folder names.
 Creating a BACKUP strategy
The easiest way to use the ROBOCOPY command to create a backup strategy is by creating a batch (.BAT) file. A batch file is a simple text file, that when executed, runs several commands one after the other.
Step 1
Click  and in the search box, type notepad. Select Notepad to open up a new blank Notepad document.
Step 2
Type the ROBOCOPY commands into the Notepad document, save it as a .BAT file, and then execute it.
In the example below, I have 3 folders (Data1, Data2, and Data3) containing some data that I wish to backup. One folder is located on E: drive and the other two are located on F: drive. I wish to back these up as follows:
Data1 folder on E: backup to a folder called Backups on G: (external USB drive)
Data2 folder on F: backup to a folder called Backups on G: (external USB drive)
Data3 folder on F: backup to a folder called Backups on Q: (network storage drive)
The general format of the ROBOCOPY command is:
Code:
robocopy <source> <destination> <options>
In the empty Notepad document, the simplist form of the command would look like this:
Code:
robocopy E:\Data1 G:\Backups\Data1
robocopy F:\Data2 G:\Backups\Data2
robocopy F:\Data3 Q:\Backups\Data3
pause
![]() Tip
Tip
If source or destination paths contain spaces in them, enclose these in double quotes e.g. "C:\My Data\My Music"
Only the source
- E:\Data1
- F:\Data2
- F:\Data3
- G:\Backups\Data1
- G:\Backups\Data2
- Q:\Backups\Data3
![]() Tip
Tip
The PAUSE command at the bottom of the .BAT file allows the cmd window to stay open after it has completed to allow me to see the output from ROBOCOPY.
If I save the .BAT file to my Desktop, and run it by double-clicking it, then a cmd window is opened and the .BAT file executes the three ROBOCOPY commands as shown below.

The same information is repeated for every ROBOCOPY line in the .BAT file.
In order to utilise some of the powerful functionality in ROBOCOPY, I need to utilise some options in the ROBOCOPY command line. In this next example I want to edit my existing backup strategy such that:
- All sub-folders within my data folders are backed up, even if they are empty.
- The backup only copies newer files to my existing backup - this means a faster backup time.
- The percentage progress counter for copying is not shown - this neatens the overall appearance of the ROBOCOPY information, and creates a smaller log file.
- The information normally echoed to the cmd window is saved to a log file that I can examine at a later stage.
Code:
robocopy E:\Data1 G:\Backups\Data1 /e /mir /np /log:backup_log.txt
robocopy F:\Data2 G:\Backups\Data2 /e /mir /np /log+:backup_log.txt
robocopy F:\Data3 Q:\Backups\Data3 /e /mir /np /log+:backup_log.txt
pause
Where:
/e = copy all sub-folders, even empty ones
/mir = mirror (check the files in the destination, and only copy newer files)
/np = no progress counter
/log: = create a logfile
![]() Tip
Tip
Note the use of the /log+: option in the 2nd and 3rd line of the .BAT file. This option ensures that the results of the 2nd and 3rd ROBOCOPY are appended to the log file created in the 1st ROBOCOPY line, meaning I only need one log file to capture all the information I backup.
The log file is always saved to the same folder as the .BAT file - in my case, the folder is saved to my Desktop.
Since the output from ROBOCOPY is written to the log file, the cmd window will not display the output from ROBOCOPY. If I wish to have this information written to both the log file and the cmd window for visual tracking of the backup process, then I can add the /tee option to each line in the .BAT file, as shown below.
Code:
robocopy E:\Data1 G:\Backups\Data1 /e /mir /np /tee /log:backup_log.txt
robocopy F:\Data2 G:\Backups\Data2 /e /mir /np /tee /log+:backup_log.txt
robocopy F:\Data3 Q:\Backups\Data3 /e /mir /np /tee /log+:backup_log.txt
pause
This is an example of the typical output to the the log file - it looks exactly the same as what is echoed to the cmd window.
Code:
-------------------------------------------------------------------------------
   ROBOCOPY     ::     Robust File Copy for Windows
-------------------------------------------------------------------------------
  Started : Sun Sep 18 23:35:01 2011
   Source : E:\Data1\
     Dest : G:\Backups\Data1\
    Files : *.*

  Options : *.* /S /E /COPY:DAT /PURGE /MIR /R:1000000 /W:30
------------------------------------------------------------------------------
                    2 E:\Data1\
------------------------------------------------------------------------------
               Total    Copied   Skipped  Mismatch    FAILED    Extras
    Dirs :         1         0         1         0         0         0
   Files :         2         0         2         0         0         0
   Bytes :   442.1 k         0   442.1 k         0         0         0
   Times :   0:00:00   0:00:00                       0:00:00   0:00:00
   Ended : Sun Sep 18 23:35:01 2011
Since one of the data folders I am backing up is being copied across a network, I want to ensure that any possible network outages do not cause some critical files to be skipped in the backup. To do this, I can make use of the /z option in the 3rd line of my .BAT file (backup to my network storage) as shown below.
Code:
robocopy E:\Data1 G:\Backups\Data1 /e /mir /np /tee /log:backup_log.txt
robocopy F:\Data2 G:\Backups\Data2 /e /mir /np /tee /log+:backup_log.txt
robocopy F:\Data3 Q:\Backups\Data3 /e /mir /np /z /tee /log+:backup_log.txt
This option implements a "retry" for the copying. If I were part way through the copying process, and I lost connection with the network, then ROBOCOPY would automatically restart the copying at the point of failure once the network connection was re-established. It would retrying a million times every 30 seconds (the default settings shown in the image above). The only drawback with this option, is that it can significantly increase the backup time.
ROBOCOPY also has the ability to perform faster multi-threaded copying by simply using the option /mt. I can choose the number of threads to use by specifying a number between 1 and 128 after the /mt option, or if I just specify /mt without a number then the it will use 8 threads by default. In the example below, I use 4 threads to copy to my USB drive, and 8 threads (no number) to copy to my network drive.
Code:
robocopy E:\Data1 G:\Backups\Data1 /e /mir /np /tee /mt:4 /log:backup_log.txt
robocopy F:\Data2 G:\Backups\Data2 /e /mir /np /tee /mt:4 /log+:backup_log.txt
robocopy F:\Data3 Q:\Backups\Data3 /e /mir /np /z /tee /mt /log+:backup_log.txt
Below is a template that you can use to create your own backup strategy using ROBOCOPY. Simply copy and paste the lines into a blank text document, and then edit as appropriate.
Code:
rem --- Edit the lines below to create your own backup strategy
rem --- The /mir option has been left out for safety sake
rem --- Add more lines for each new folder requiring backup
rem --- Specified 4 threads to use for multi-threaded copying
rem --- The results of the backup can be found in my_backup_log.txt
robocopy <source> <destination> /e /np /tee /mt:4 /log:my_backup_log.txt
robocopy <source> <destination> /e /np /tee /mt:4 /log+:my_backup_log.txt
robocopy <source> <destination> /e /np /tee /mt:4 /log+:my_backup_log.txt
pause
![]() Tip
Tip
The can automate your backup's by using the Windows 7 Task Scheduler to run the .BAT file at specific times.
For more information please refer to this tutorial by Orbital Shark:
Task Scheduler - Create New Task
I hope this brief tutorial helps you access the power and simplicity of ROBOCOPY to create some effective backup strategies.
lunes, octubre 08, 2018
Air Explorer
https://www.airexplorer.net/es/
Accede a todas tus nubes
desde un solo programa

Básico
1 cuenta por nube
No encripta
Funciones de sincronización
5 descargas simultáneas
5 subidas simultáneas
Sin limitador de velocidad
Sin contraseña para entrar
Gratis
domingo, octubre 07, 2018
CLOUDBUCKIT
CloudBuckit is a simple desktop application that connects all your favorite cloud storages, FTP and WebDAV servers in one place.
Available on Windows


Duplicati
Duplicati 2.0
Free backup software to store encrypted backups online
For Windows, macOS and Linux

Many Backends
Duplicati works with standard protocols like FTP, SSH, WebDAV as well as popular services like Microsoft OneDrive, Amazon Cloud Drive & S3, Google Drive, box.com, Mega, hubiC and many others.

Features
Backup files and folders with strong AES-256 encryption. Save space with incremental backups and data deduplication. Run backups on any machine through the web-based interface or via command line interface. Duplicati has a built-in scheduler and auto-updater.

Free software
Duplicati is free software and open source. You can use Duplicati for free even for commercial purposes. Source code is licensed under LGPL. Duplicati runs under Windows, Linux, MacOS. It requires .NET 4.5 or Mono.

Strong encryption
Duplicati uses strong AES-256 encryption to protect your privacy. You can also use GPG to encrypt your backup.

Built for online
Duplicati was designed for online backups from scratch. It is not only data efficient but also handles network issues nicely. E.g. interrupted backups can be resumed and Duplicati tests the content of backups regularly. That way broken backups on corrupt storage systems can be detected before it’s too late.

Web-based user interface
Duplicati is configured by a web interface that runs in any browser (even mobile) and can be accessed - if you like - from anywhere. This also allows to run Duplicati on headless machines like a NAS (network attached storage).
viernes, septiembre 28, 2018
Accesos WebDAV
https://community.cryptomator.org/t/webdav-urls-of-common-cloud-storage-services/75
This is a list of the most common WebDAV URLs you need to enter into the iOS and Android app if you want to connect to your cloud storage service.
Cloud Storage Service
URL
1&1 Online-Speicher (DSL)
https://sd2dav.1und1.de
1&1 Online-Speicher (Webhosting)
https://webdav.office.1und1.de
blaucloud
https://{username}.blaucloud.de/remote.php/webdav
Box
https://dav.box.com/dav
Cubby
https://webdav.cubby.com
freenetcloud
https://webmail.freenet.de/webdav
GMX MediaCenter
https://webdav.mc.gmx.net
HiDrive
https://webdav.hidrive.strato.com
IDrive
https://dav.idrivesync.com
MagentaCLOUD
https://webdav.magentacloud.de
Mail.Ru
https://webdav.cloud.mail.ru
Nextcloud
https://{host}/{path}/remote.php/dav/files/{username}
ownCloud
https://{host}/{path}/remote.php/webdav
pCloud
https://webdav.pcloud.com
Seafile (self-hosted)
https://{host}/{path}/seafdav
STACK
https://{username}.stackstorage.com/remote.php/webdav
Strato HiDrive
https://webdav.hidrive.strato.com
Syncwerk (formerly Seafile.de)
https://app.syncwerk.com/seafdav
WEB.DE Online-Speicher
https://webdav.smartdrive.web.de
wölkli
https://cloud.woelkli.com/remote.php/webdav
Yandex.Disk
https://webdav.yandex.com
Mailbox.org
https://dav.mailbox.org/servlet/webdav.infostore/
jueves, septiembre 27, 2018
Connecting Securely to Microsoft OneDrive with WebDAV and WinSCP
https://winscp.net/eng/docs/guide_microsoft_onedrive
Connecting Securely to Microsoft OneDrive with WebDAV
With WinSCP you can easily upload, manage or backup files on your Microsoft OneDrive cloud storage over WebDAV protocol.
Before starting you should have the latest version of WinSCP installed.
Find out your “OneDrive customer ID”:
- In your web browser, login to your OneDrive.
- After you log in, your URL should be like:
https://onedrive.live.com/?id=root&cid=ABCDEFGHIJKLMNOP
TheABCDEFGHIJKLMNOPpart is your “customer ID”. Select it and copy it to the clipboard.
Start WinSCP. Login dialog will appear. On the dialog:
- Make sure New site node is selected.
- On the New site node, select WebDAV protocol and TLS/SSL Implicit encryption.
- Enter
d.docs.live.netinto the Host name box. - Enter your Microsoft account username/email into the User name box.
- Enter your Microsoft account password into the Password box.
- Press the Advanced button to open Advanced site settings dialog and go to Environment > Directories page.
- Paste your “OneDrive customer ID” into the Remote directory box and add a slash in front of it, i.e. like
/ABCDEFGHIJKLMNOP. - Submit the Advanced site settings dialog with the OK button.
- Save your site settings using the Save button.
- Login using the Login button.
Further reading
- Guide to uploading files to server;
- Guide to automating operations (including upload).
Guides: https://winscp.net/eng/docs/guides
Useful Scripts: https://winscp.net/eng/docs/scripts
domingo, septiembre 16, 2018
miércoles, septiembre 12, 2018
How to connect to a remote SQL Server
De: https://www.sqlshack.com/how-to-connect-to-a-remote-sql-server/
Comentarios: El puerto que usé en el Firewall es el 1433, TCP (no UDP). No hice nada con el puerto 1434.
No fue necesario agregar una regla Custom para abrir el Firewall para el programa MSSQL$SQLEXPRESS.
En SQL Server Network Configuration, se configuró, donde 999.222 etc. es la IP Pública

Adicionalmente, en IPAll dejar TCP Synamic Portes en blanco, NO 0 (cero) y en TCP Port 1433

Artículo original
n this article, we will explain step by step how to connect remotely to a SQL Server Express instance. Remote access is the ability to get access to a SQL Server from a remote distance in order to manipulate data which are located on that SQL Server.
There are two types of adjustments which must be set before connecting to the remote SQL Server. These settings are important because without them the connection to the remote SQL Server will not be able to be successfully created
Configuration settings:
- The SQL Server instance to allow the protocol being requested
- Allow access through the Window Firewall
In order to allow access to SQL Server instance, we have to enable TCP/IP protocol which is not enabled by default. TCP/IP (Transmission Control Protocol/Internet Protocol) is a set of protocols developed to allow networked computers to share resources over the network. It was developed by DARPA under the ARPANET in the early 1970s.
In order to establish a successful remote connection is to set up appropriate ports through the Window Firewall. In SQL Server there are two types of instances. First is a default instance and the second is a named instance. To connect to the default instance of Database Engine, or named instance that is the only instance installed on the machine, the TCP port 1433 is the only port that you need to specify.
But if you have multiple name instances installed on your machine, to connect with one of them, we must provide a port number which corresponding to appropriate instance name. By default named instance used dynamic port, which means that every time when the Database Engine starts new port number is assigned. Because of that it is difficult to configure Windows Firewall to enable access.
In order to resolve this problem, there is a SQL Browser service, which provide the TCP port number that corresponds to the named instances. The SQL Browser services use UDP port 1434. Now we met with the basic matters relating to remote connection, let’s continue with the setup procedure.
Enabling TCP/IP protocol
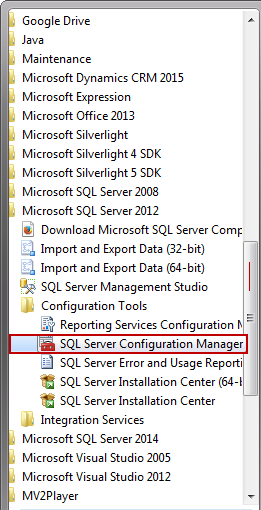
The first step is to enable TCP/IP protocol on the SQL Server service. Open the SQL Server Configuration Manager in the Configuration Tools folder under the Microsoft SQL Server folder:
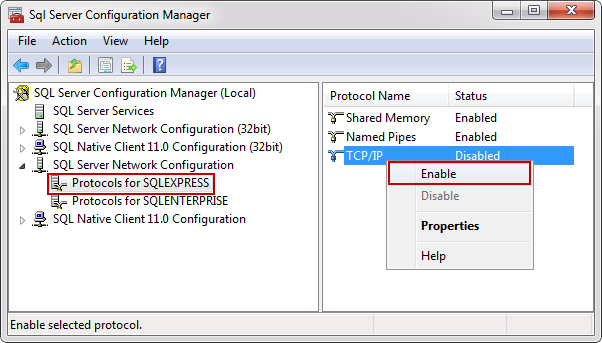
From the SQL Server Network Configuration node, select the Protocols item for the appropriate SQL Server. In the details pane, right click the TCP/IP item and select the Enable option:
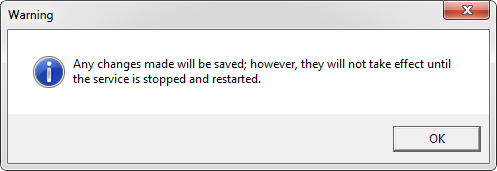
After this step the Warning box pop up in which informs us that changes that are made won’t take effect until the next time service is started.
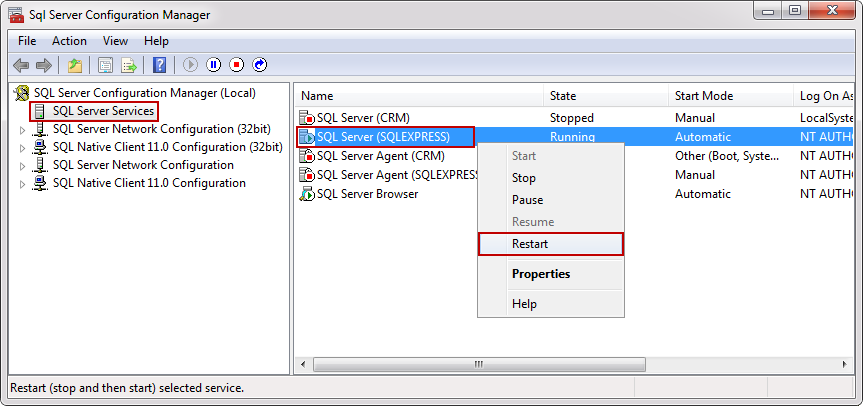
In order for the changes take effect, from console pane, select the SQL Server Services and from the details pane, right click the SQL Server (SQLEXPRESS) database engine instance and click the Restart option:
Now the service started with TCP/IP enabled, but still can’t connect remotely until we configure the Windows Firewall.
Configuring Windows Firewall
From the Control Panel choose Windows Firewall and click the Advanced settings or just type wf.msc in Search program and files from the Start menu:
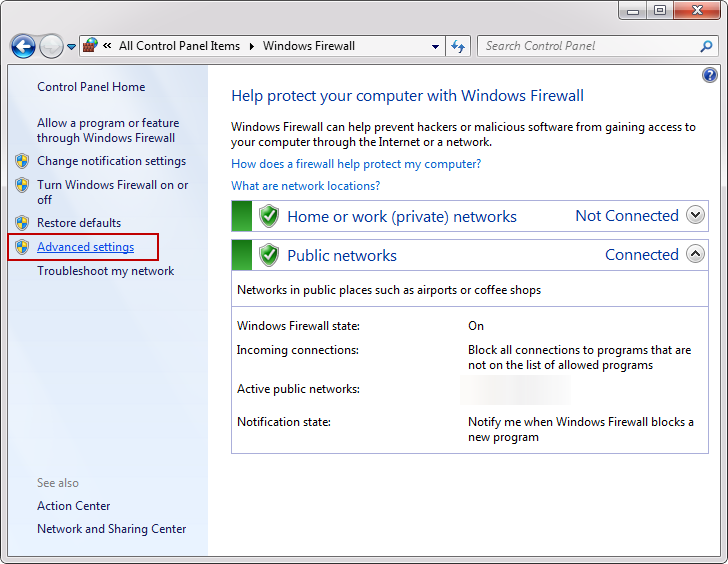
- Inbound Rules: You can allow or block traffic attempts to access the computer that matches certain criteria in the rule. By default inbound traffic is blocked, to allow traffic to access computer, you need to create inbound rule.
- Outbound Rules: You can allow or block traffic originating from specifying computer creating rules. By default outbound traffic is allowed, so you need to create the rule that block outbound traffic.
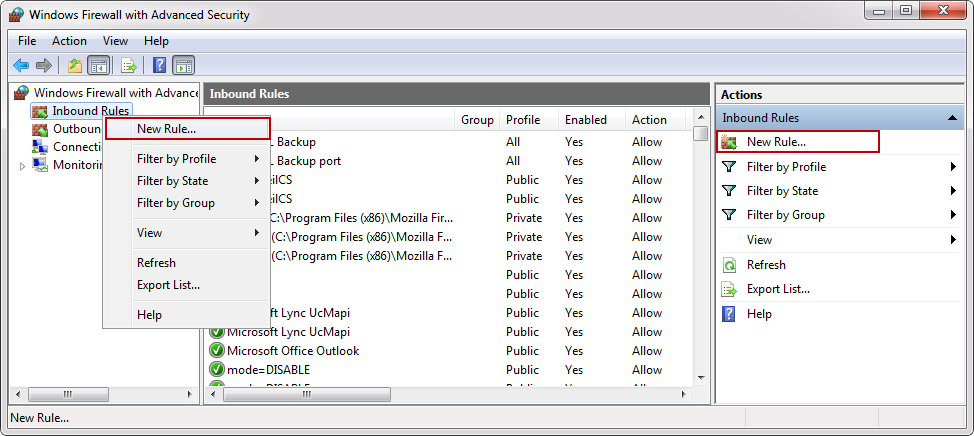
In the Windows Firewall with Advanced Security, click the Inbound Rules from the left pane, right click Inbound Rules and select the New Rule or from the Actions pane click the New Rule:
On which you will click, it’s up to you. In both case the New Inbound Rule Wizard will appear. Under the Rule Type choose Port and click the Next button:
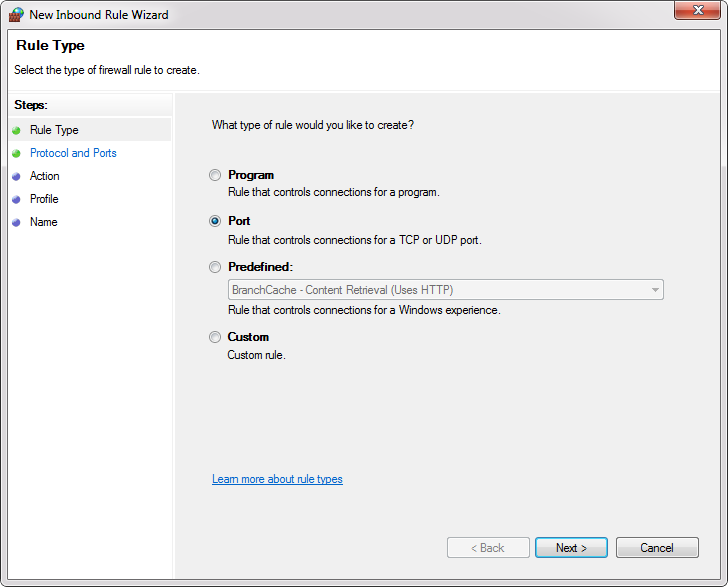
From this link you can more informed of all rule types which are shown in the image above.
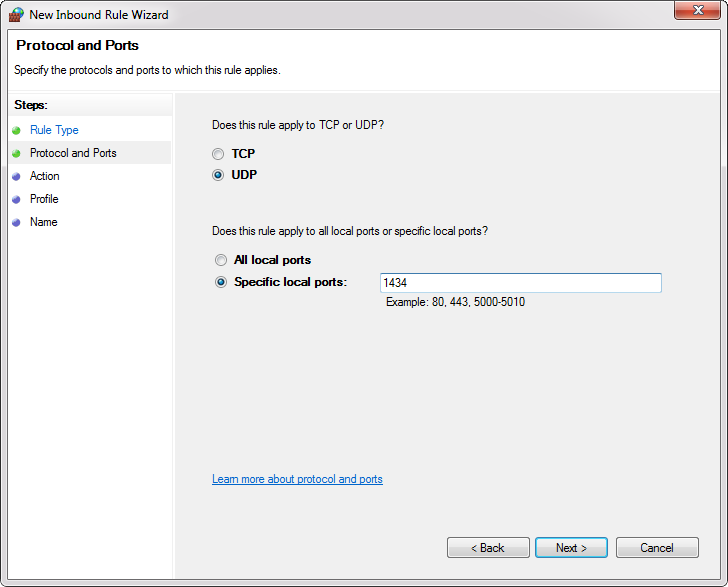
In the Protocols and Ports there are a several options that you can choose, depending on which type of protocols you select.
If you are wondering what is the difference between the TCP and UDP protocols you can find from this link.
As we mentioned at the beginning of the article TCP is used for the default instance and named instance if is the only instance installed on the machine and default port is 1433.
- All local ports: Rule applies on all ports from the selected protocol.
- Specific local ports: In the text box you specify a port or set of ports to which the rule applies.
For this example, select the UDP protocol and in the Specific local ports enter port number 1434. To proceed with the settings SQL Browser services, click the Next button:
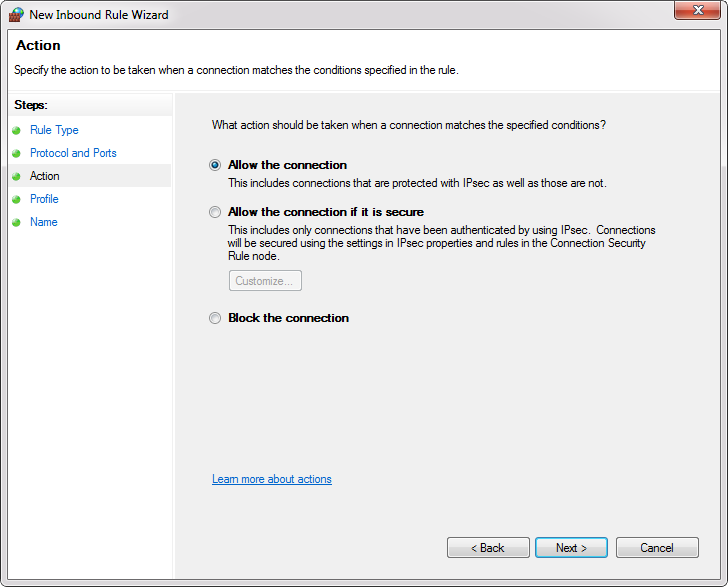
- Allow the connection: Includes all connections secure and insecure.
- Allow the connection if it is secure: Includes only connection if it is made through a secure channel.
- Block the connection: Blocks all connections secure and insecure.
In the Action dialog choose Allow the connection and click the Next button:
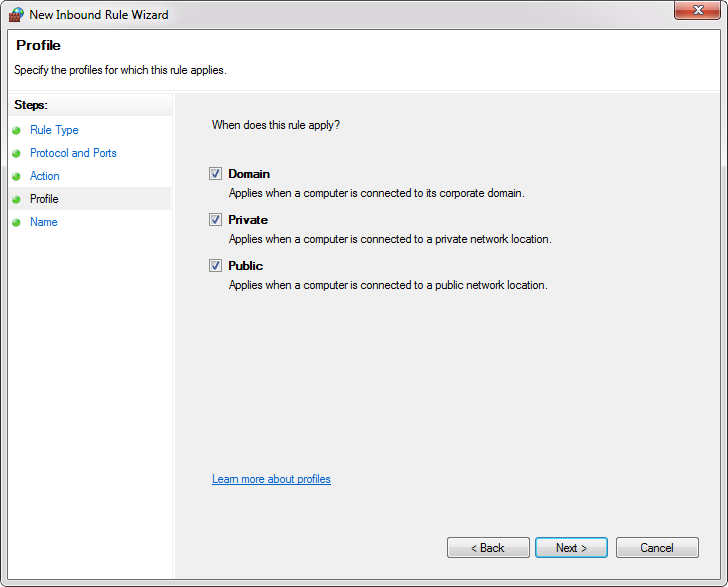
- Domain: The setting is applied only when a computer is connected to a domain.
- Private: The setting is applied when a computer is connected to a network that is identified as a private network.
- Public: The setting is applied when a computer is connected to untrusted public network.
In the Profile dialog choose all three profiles and click the Next:
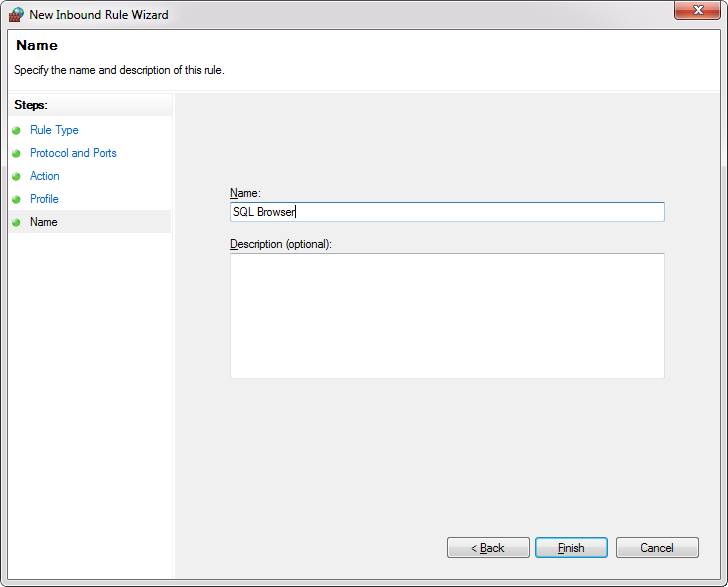
On this step give the rule a name and click the Finish.
Note: When we give the name of the rule, please write some descriptive name that you can understand later, when you need to find them or edit in the Inbound Rules list.
Now create an allow rule for the database engine instance.
Go to the New Rule and from the Rule Type select the Custom rule:

In the Program under the Services click the Customize button:
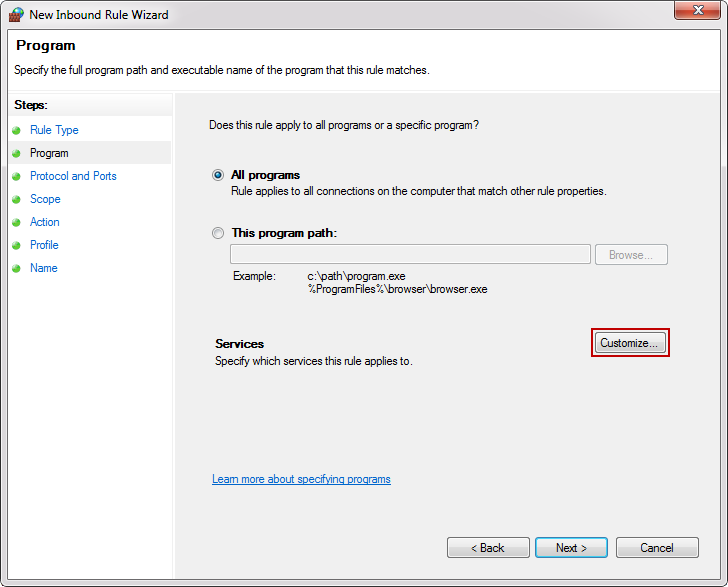
From the Customize Service Settings under Apply to this service select database engine instance service and click the OK button:
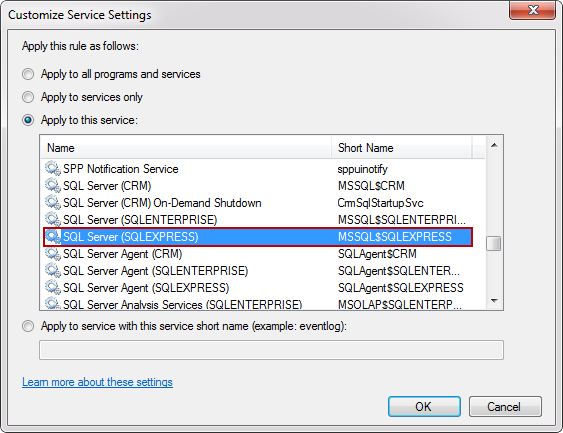
Then click the Next all the way to the Name dialog, give rule a name and click the Finish:

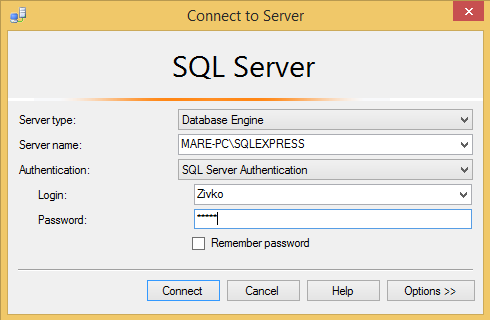
Now when all rules are set up, you are ready to connect to remote SQL Server.
Start the SQL Server, in the dialog window for the Server name enters the name of the instance that you want to connect with. From the Authentication drop down box, select the SQL Server Authentication and for the field Login and the Password enter your credentials then click the Connect button.
martes, septiembre 04, 2018
Deshabilitar touchpad cuando se escribe
TouchFreeze is a free and simple utility for Windows that automatically disables the touchpad while you are typing in text.
miércoles, agosto 29, 2018
Add ‘Open With’ To The Top
This registry hack comes from Superuser JosefZ.
Open Notepad and paste the following. Save it with the name OpenWith, and the REG extension.
Windows Registry Editor Version 5.00

[HKEY_CLASSES_ROOT\*\shell\.OpenWith]
"Position"="Top"

[HKEY_CLASSES_ROOT\*\shell\.OpenWith\command]
@="{09799AFB-AD67-11d1-ABCD-00C04FC30936}"
Run the file with admin rights, and accept the on-screen warning. Once it’s been added, right-click any file, and you will see Open With at the top. Select it, and you will see the default Windows app picker menu that lets you select an app to open the file with.

You can still double-click a file and open it in the default app assigned to it. This registry edit will not interfere with the default functionality for opening files. Apps add their own options to the context menu will not be able to push this option further down the menu.
If you decide you don’t need this option anymore, go to the following location, and delete the key you added.
HKEY_CLASSES_ROOT\*\shell\.OpenWith
This little hack isn’t for everyone. Perhaps you prefer the Open option to remain at the top or you prefer a different option appear at the top. This is hack is for anyone that needs to open the same file type in multiple apps and doesn’t want to be bothered going through a rather long list of options to find the right one.
You may have noticed that after adding this key to the registry, the default Open With option doesn’t go away. This key doesn’t do anything to it which is why it remains where it is regardless if you’ve added the key or not. Touching the default Windows Open With option is probably a bad idea anyway. This registry file adds a new option that you can delete any time without worrying about breaking anything.
martes, agosto 28, 2018
Limpiar el disco rígido en forma automática–. Windows 10
Clean out your hard disk
If you’ve got a bloated hard disk filled with files you don’t need, you could be slowing down your PC. Cleaning it out can give you a speed boost. Windows 10 has a surprisingly useful built-in tool for doing this called Storage Sense. Go to Settings > System > Storage and at the top of the screen – in the Storage Sense section – move the toggle from Off to On. When you do this, Windows constantly monitors your PC, and deletes old junk files you no longer need; temporary files; files in the Downloads folder that haven’t been changed in a month; and old Recycle Bin files.
You can customize how Storage Sense works and also use it to free up even more space than it normally would. Underneath Storage Sense, click “Change how we free up space automatically.” From the screen that appears, you can change how often Storage Sense deletes files (every day, every week, every month or when Windows decides). You can also tell Storage Sense to delete files in your Download folder, depending on how long they’ve been there. And you can also set how long to wait to delete files in the Recycle Bin automatically.
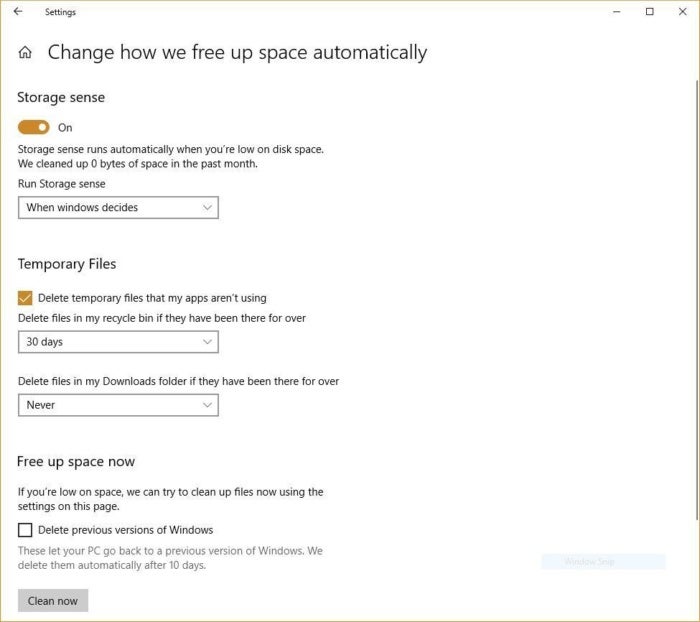 Here’s how to customize the way Storage Sense works, and to tell it to delete old versions of Windows.
You can also delete old versions of Windows that might be hogging space. At the bottom of the screen, check the box next to “Delete previous versions of Windows.” Storage Sense will then delete old versions of Windows ten days after you’ve installed an upgrade. Note that if you do this, you won’t be able to revert to the older version of Windows.
domingo, agosto 19, 2018
Cameyo
WINDOWS APPLICATIONS TO ANY DEVICE
Permite correr una aplicación Windows dentro de un Internet browser, por ejemplo Chrome.
Funcioan como un Terminal Server o una conexión de Escritorio Remoto pero sin sotware adicional.
jueves, julio 05, 2018
MultCloud.com Sync
From: https://www.multcloud.com/tutorials/sync-cloud-drive-1004.html
Next is the key step. Under File Manager interface, we can manage files in cloud like in Windows explorer. Before syncing, we suggest you to refresh the content in your cloud by clicking the refresh icon. Moving from Google Drive to another has many methods. “Copy” or ”Copy to” from contextmenu; direct drag&drop. All clouds in MultCloud can be synced.
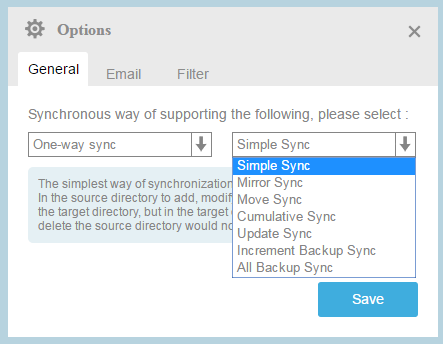
Switch to Cloud Sync Service interface, you can set more options of cloud syncing. MultCloud has eight syncing ways. They are:
- Simple Sync: In the source directory to add, modify, and delete will be reflected to the target directory, but in the target directory to add, modify, and delete the source directory would not be affected.
- Mirror Sync: Always keep the target directory in the file and the source directory is exactly (MultCloud will delete unnecessary files in the target directory).
- Move Sync: After the complete synchronization, delete all the files in the source directory.When the source directory file deletion, dont delete the corresponding files in the target directory.
- Cumulative Sync:When the source directory file deletion, dont delete the corresponding files in the target directory.
- Update Sync: Delete all files in the target directory first, then will increase in the source directory and modify the file transfer to the target directory.
- Incremental Backup Sync: In every time synchronization, will create a new subdirectory in the target directory, so that the new and modified in the source directory file transfer to the subdirectory.
- All Backup Sync: In every time synchronization, will create a new subdirectory in the target directory, so that all the source directory file transfer to the subdirectory.
*Note: Above seven methods are One-way Sync.
- Two-way Sync: In the source directory to add, modify, and delete will be reflected to the target directory, at the same time in the target directory to add, modify, and delete will be reflected in the source directory (also is the beginning and keep the files in the source directory and the target directory).
Other options are filter, overwritten, email notification and so on. Then you can choose sync now or schedule later. If you choose the latter, the task will be committed according to your preset time, which means sync automatically.
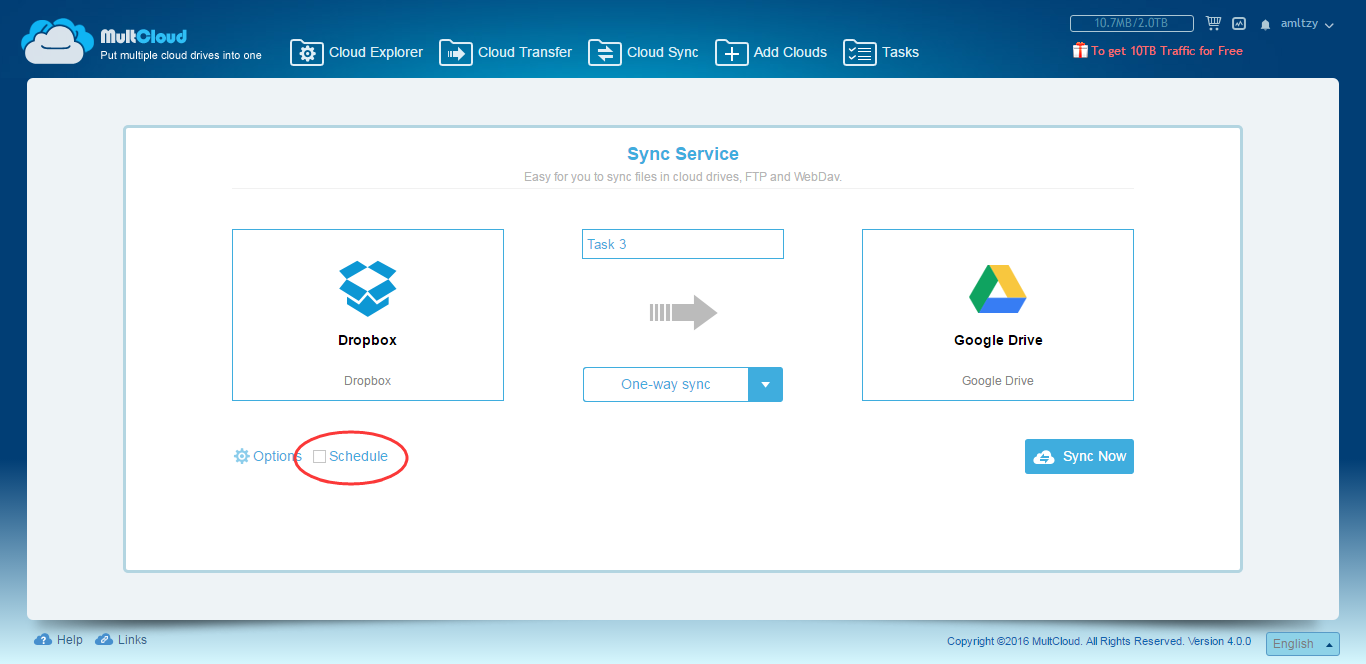
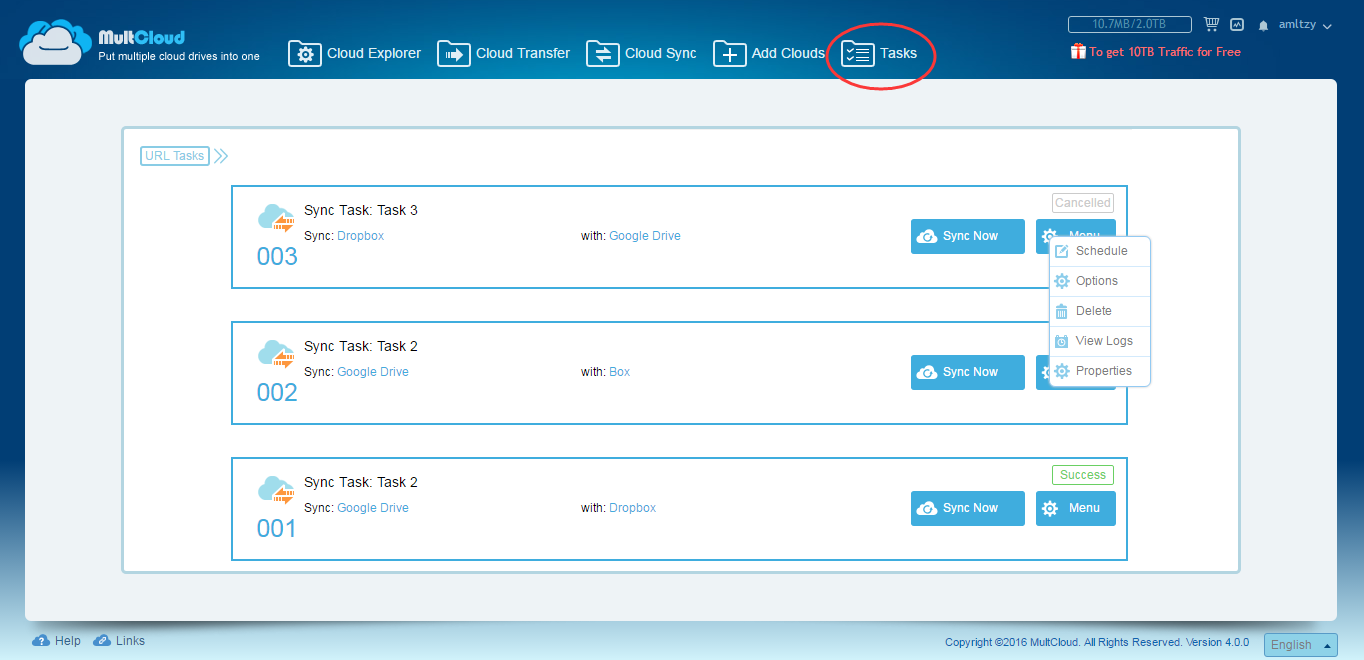
What's more, once you setted a sync task, you can commit it again from the task manager. Or re-edit, delete, view logs, etc.
domingo, junio 24, 2018
How to Hide or Unhide ZIP File in Picture (PNG/JPEG/GIF)
De: https://www.isunshare.com
Part 1: How to Hide ZIP File in Picture
Which files you can hide in picture?
Text files, programs, sound files, pictures, videos and much more, but you must be sure they have been compressed as .zip file.
Guide to hide zip file in picture with command prompt
Step 1: Compress files you want to hide as a .zip file.
Step 2: Create a new folder X in C:\ drive, such as C:\Users\isunshare\Desktop\X. Inside the folder, place the zip file (called x.zip) and a picture (called picture.png) that will hide everything.
![place-zip-file-and-png-file[1]](https://lh3.googleusercontent.com/-YhbLed4Cq30/Wy8VX8hfJVI/AAAAAAAAAT8/hBiB_KyHPuQWYei6djzd2BfeyzkbSxXigCHMYCw/place-zip-file-and-png-file%255B1%255D_thumb?imgmax=800 "place-zip-file-and-png-file[1]")
Step 3: Open command prompt and drill down to the directory of folder that holds the zip file and image.
When the command prompt opens, you can use the cd command to change directory.
![change-zip-file-directory-with-command[1]](https://lh3.googleusercontent.com/-W-K_3AoBT-A/Wy8VZ6r9PyI/AAAAAAAAAUE/RAMpfMlZkVMarpgHc-lCYkPBKpB9e9pZACHMYCw/change-zip-file-directory-with-command%255B1%255D_thumb?imgmax=800 "change-zip-file-directory-with-command[1]")
Step 4: Enter command to merge zip file and image file into new image file.
copy /b picture.png+x.zip isunshare.png
![hide-zip-file-in-picture-with-command[1]](https://lh3.googleusercontent.com/-CyMvyWRfit8/Wy8VlE-kQpI/AAAAAAAAAUM/Ytxz4p8Cs4YZgptxzrmGRkDqRRGJeRu6gCHMYCw/hide-zip-file-in-picture-with-command%255B1%255D_thumb?imgmax=800 "hide-zip-file-in-picture-with-command[1]")
Tips:
- The new image file is named isunshare.png.
- The new image file should be the same file type as the old image file. So it is PNG file.
- “copy /b” command just makes a binary copy of the files picture.png and x.zip.
- The file you get at last can be opened with 7-zip, WinRAR or an image editor.
All is done. You have a new picture that has files hidden inside it now. You can delete the original files you wanted hidden.
![successfully-hide-zip-file-in-a-picture[1]](https://lh3.googleusercontent.com/-8oRs5aFTefo/Wy8VmWKKouI/AAAAAAAAAUU/9bVj8wdHqdA2oTMcOxkqrE8JpQTLaqNiACHMYCw/successfully-hide-zip-file-in-a-picture%255B1%255D_thumb?imgmax=800 "successfully-hide-zip-file-in-a-picture[1]")
From now on, besides you, probably there is no person knowing what are hidden in the image. But if even you forgot which files are hidden in it, how can you find hidden files in picture or unhide zip file in picture?
Part 2: How to Unhide ZIP File in Picture
At this moment, the best way to find hidden files in picture is to extract it with compression software, such as WinRAR. Now let’s see how to extract hidden files from image with WinRAR.
1. Open compression software, WinRAR.
2. Navigate to the directory of picture that hides files.
3. Select the picture and click Extract To button on WinRAR toolbar.
![select-picture-to-extract-in-winrar[1]](https://lh3.googleusercontent.com/-U-EswIRmPPY/Wy8VoFfWfbI/AAAAAAAAAUg/NTNuMEUlr9kQFbmi41uEK4jUK0VIokG7gCHMYCw/select-picture-to-extract-in-winrar%255B1%255D_thumb?imgmax=800 "select-picture-to-extract-in-winrar[1]")
4. Confirm the destination path of folder you would get after extraction. And click OK in Extraction path and optionswindow.
![confirm-extraction-destination-path[1]](https://lh3.googleusercontent.com/-K6my-mU_B3Y/Wy8Vph5bC0I/AAAAAAAAAUw/LgmIDUe1T3oLpo8E1WLnbz8aIRYYHywMwCHMYCw/confirm-extraction-destination-path%255B1%255D_thumb?imgmax=800 "confirm-extraction-destination-path[1]")
If the zip file has been encrypted before hiding in picture, a dialog would pop up now and ask for zip password. Just enter password and click OK, and it would successfully extract the picture you select. Suppose zip password forgot, you would need to recover zip password with iSunshare ZIP Password Genius at first.
![enter-password-to-extact-encrypted-zip-file-in-pictures[1]](https://lh3.googleusercontent.com/-oRh7123URgA/Wy8VrMLu2HI/AAAAAAAAAU4/ZNnlDL96UZIrodNJMyzS81jQ9wGSwNZtwCHMYCw/enter-password-to-extact-encrypted-zip-file-in-pictures%255B1%255D_thumb?imgmax=800 "enter-password-to-extact-encrypted-zip-file-in-pictures[1]")
After successfully extracting hidden files from picture, go to destination path, you can see the files which has ever been saved in .zip file.
![successfully-unhide-zip-file-in-picture[1]](https://lh3.googleusercontent.com/-8UJbU9QGkPA/Wy8Vs9DTpdI/AAAAAAAAAVA/jOnS1EKpuOID_g-VlgYn-f6-tOga1OckgCHMYCw/successfully-unhide-zip-file-in-picture%255B1%255D_thumb?imgmax=800 "successfully-unhide-zip-file-in-picture[1]")
Suscribirse a:
Entradas (Atom)