domingo, noviembre 13, 2022

General Private Email configuration for mail clients and mobile devices

[De: https://www.namecheap.com/support/knowledgebase/article.aspx/1179/2175/general-private-email-configuration-for-mail-clients-and-mobile-devices/https://www.namecheap.com/support/knowledgebase/article.aspx/1179/2175/general-private-email-configuration-for-mail-clients-and-mobile-devices/

It is possible to use the service just as ordinary email account and configure mail client to retrieve and send messages through Namecheap Private Email server.

Only encrypted connections are supported by our mail servers, so please use the following settings:

Username: your email address
Password: password for this email account
Incoming/outgoing servers name: mail.privateemail.com
Incoming server type: IMAP or POP3
Incoming server (IMAP): 993 port for SSL, 143 for TLS/STARTTLS
Incoming server (POP3): 995 port for SSL
Outgoing server (SMTP): 465 port for SSL, 587 for TLS/STARTTLS

Outgoing server authentication should be switched on, SPA (secure password authentication) must be disabled.

More specific instructions can be found here.

Namecheap Private Email (Powered by Open-Xchange) User Guide can be found here.
You may also connect your mailbox from the Windows/Apple/Android device directly. Feel free to check this guide.

]

jueves, noviembre 10, 2022

Bitrix24.es vs. Felow.app

[De: https://www.getapp.es/compare/90602/2048177/bitrix24/vs/fellow]

Bitrix24

Bitrix24
(556)

SABER MÁS

Fellow

Fellow
(29)

SABER MÁS

Vista rápida

Bitrix24 es para todo tipo de compañías, tanto pequeñas como grandes. Se adapta a equipos en remoto, que necesitan mantenerse en contacto y colaborar de forma eficaz. Mostrar menos

Implementación
  • Basado en la nube
  • Entorno local
Opciones de asistencia
  • E-mail/Help Desk
  • Preguntas frecuentes/foro
  • Base de conocimientos
  • Asistencia 24/7
  • Chat

VER PERFIL

In person or remote, Fellow is a meeting management tool which help teams gather and build collaborative meeting agendas, record decisions, and keep... Leer más

Implementación
  • Basado en la nube
  • Entorno local
Opciones de asistencia
  • E-mail/Help Desk
  • Preguntas frecuentes/foro
  • Base de conocimientos
  • Asistencia 24/7
  • Chat

VER PERFIL

Imágenes

Ver 8 másBitrix24

Ver 3 másFellow

Precio
A partir de

61,00 US$/mes

  • Versión gratuita
  • Prueba gratis
  • Suscripción
A partir de

9,00 US$/mes

  • Versión gratuita
  • Prueba gratis
  • Suscripción
Opiniones
Calificación general

4,1/5

(556)

Facilidad de uso
3,8/5
Funcionalidades
4,1/5
Atención al cliente
3,9/5
Relación calidad-precio
4,2/5

TODAS LAS OPINIONES

Calificación general

4,9/5

(29)

Facilidad de uso
4,7/5
Funcionalidades
4,7/5
Atención al cliente
4,9/5
Relación calidad-precio
4,8/5

TODAS LAS OPINIONES

Funcionalidades
Total de funcionalidades401
  • @menciones
  • API
  • Acceso móvil
  • Acceso sin conexión
  • Acciones activadas por evento
  • Actualizaciones en tiempo real
  • Actualización automática
  • Admite método Scrum
  • Alertas y notificaciones
  • Almacen de archivos

EXPANDIR LISTA

Total de funcionalidades57
  • @menciones
  • API
  • Acceso móvil
  • Acceso sin conexión
  • Acciones activadas por evento
  • Actualizaciones en tiempo real
  • Actualización automática
  • Admite método Scrum
  • Alertas y notificaciones
  • Almacen de archivos

EXPANDIR LISTA

Integraciones
  • 3CX
  • Apache OpenOffice
  • Asana
  • Asterisk
  • Authorize.Net
  • Azure Active Directory
  • Box
  • Braintree
  • ClickUp
  • DocuSign

EXPANDIR LISTA

  • 3CX
  • Apache OpenOffice
  • Asana
  • Asterisk
  • Authorize.Net
  • Azure Active Directory
  • Box
  • Braintree
  • ClickUp
  • DocuSign

EXPANDIR LISTA

+AÑADIR PRODUCTO

COMPARAR CON PRODUCTOS SIMILARES

Compartir y sincronizar: OneDrive (profesional o educativo) Sincronizar archivos y carpetas de OneDrive

[De: https://support.microsoft.com/es-es/office/sincronizar-archivos-y-carpetas-de-onedrive-3b8246e0-cc3c-4ae7-b4e1-4b4b37d27f68#:~:text=Tambi%C3%A9n%20puede%20hacer%20clic%20en,administrar%20otras%20opciones%20de%20sincronizaci%C3%B3n.]

¿Se atreve?

Con OneDrive, puede sincronizar archivos entre el equipo y la nube, por lo que puede acceder a ellos desde cualquier lugar.

Nota: Si se encuentra en Windows 10, el equipo ya tiene la aplicación de escritorio de Aplicación de sincronización de OneDrive. Si usa un equipo Mac o una versión anterior de Windows, vaya a onedrive.com/download y descargue la aplicación OneDrive.

Sincronizar OneDrive con su equipo
  1. Seleccione Inicio, escriba OneDrive y, después, seleccione OneDrive.

  2. Inicie sesión en OneDrive con la cuenta que quiere sincronizar y finalice la configuración.

    Sus archivos de OneDrive empezarán a sincronizarse con el equipo.

Trabajar con los archivos en su sistema de archivos

Cuando haya terminado la sincronización, verá los archivos en el Explorador de archivos. En un equipo Mac, los archivos aparecerán en OneDrive en el Finder.

Si usa más de una cuenta, sus archivos personales aparecerán en OneDrive – Personal y los archivos profesionales o educativos, en OneDrive - CompanyName.

Puede copiar o mover archivos de su equipo a OneDrive directamente desde el sistema de archivos.

También puede hacer clic en el icono de nube de OneDrive del área de notificación de Windows para comprobar el estado de los archivos. Haga clic en Configuración para agregar una cuenta o administrar otras opciones de sincronización.

¿Quiere más información?

Inicio rápido de OneDrive para la Empresa

Sincronizar archivos y carpetas de SharePoint

Trabajar con archivos sincronizados en Explorador de archivos

Sincronizar archivos con OneDrive en Windows

Descubra más aprendizajes de Office en LinkedIn Learning

Significado de los iconos de OneDrive

[De: https://support.microsoft.com/es-es/office/significado-de-los-iconos-de-onedrive-11143026-8000-44f8-aaa9-67c985aa49b3#:~:text=Las%20flechas%20circulares%20sobre%20los,la%20nube%20con%20el%20equipo.]

OneDrive para la Empresa SharePoint Server Edición de Suscripción SharePoint Server 2019 SharePoint en Microsoft 365 OneDrive (trabajo o escuela) OneDrive (hogar o personal) OneDrive (trabajo o escuela) ofrecido por 21Vianet OneDrive for Mac OneDrive for Windows

Los iconos de Microsoft OneDrive en las áreas de notificación del escritorio, las barras de menús, windows Explorador de archivos y finder de macOS le indican el estado de sincronización del archivo o carpeta.

Si no ves ninguna notificación del escritorio o iconos de la barra de menús, es posible que OneDrive estén ocultos, no estén instalados o no se estén ejecutando. Obtener más información.

Windows

Círculo rojo con cruz blanca

Icono de error de sincronización de OneDrive

Icono de error de sincronización de OneDrive

Icono de error de sincronización de OneDrive para la Empresa

Un círculo rojo con una cruz blanca significa que no se pueden sincronizar un archivo o carpeta. Verá esto en el Explorador de archivos o en los iconos del área de notificación de OneDrive.

Haga clic en el icono de OneDrive azul o blanco del área de notificación para obtener más información sobre el problema.

Para obtener más ayuda, lea cómo a Solucionar problemas de sincronización de OneDrive.

Icono gris OneDrive nube con una línea a través de él

Icono "OneDrive no se está ejecutando”

Un icono de OneDrive atenuado con una línea a través de él significa que no has iniciado sesión o OneDrive configuración no se ha completado.

Presione Presionar la tecla Windows, busque OneDrive y abra la aplicación de escritorio de OneDrive.

Nota: Si ve el mensaje de error "Ya está sincronizando un OneDrive personal en este equipo", siga los pasos para desvincular y volver a vincular su cuenta.

OneDrive icono pausado

Icono "pausado" de OneDrive

Icono "pausado" de OneDrive para la Empresa

El símbolo pausado sobre el icono de OneDrive o OneDrive para el trabajo o la escuela significa que los archivos no se están sincronizando actualmente.

Para reanudar la sincronización, seleccione el icono deOneDrive relevante en el área de la notificación o de la barra de menús, seleccione Más y, después, Reanudar la sincronización.

Obtenga información sobre Cómo pausar y reanudar la sincronización en OneDrive.

icono deOneDrive con flechas pendientes de sincronización

Icono de sincronización en curso de OneDrive

Icono de sincronización en curso de OneDrive para la Empresa

Icono de sincronización en curso de OneDrive

Las flechas circulares sobre los iconos de notificación OneDrive o OneDrive para el trabajo o la escuela indican que la sincronización está en curso. Esto incluye el momento en que carga archivos o OneDrive está sincronizando nuevos archivos desde la nube con el equipo.

Los iconos de sincronización también pueden verse en línea en OneDrive.com.

OneDrive también comprobará si hay otros cambios en archivos o carpetas y puede mostrar "Procesando cambios". SiOneDrive muestra "Procesando cambios" durante mucho tiempo, puede deberse a que tiene un archivo en línea abierto, una sincronización de archivos muy grande y una gran cantidad de archivos atascados en una cola. Para obtener ayuda para resolver estos problemas, lea OneDrive se detiene en "Procesando cambios".

Si ve el icono de sincronización pendiente en Explorador de archivos, lea OneDrive se detiene en "Sincronización pendiente".

Icono deOneDrive rojo con barra blanca

Cuenta de OneDrive bloqueada

Si ves un icono de estilo rojo "sin entrada" sobre el icono de OneDrive, significa que tu cuenta está bloqueada.

Obtenga más información sobre qué hacer cuando su cuenta de OneDrive está inmovilizada.

Icono de signo de exclamación amarilloOneDrive

Icono de OneDrive con advertencia

Icono de OneDrive con advertencia

Si ves un triángulo de advertencia amarillo sobre el icono de OneDrive oOneDrive para el trabajo o la escuela, significa que tu cuenta necesita atención. Seleccione el icono para ver el mensaje de advertencia que se muestra en el centro de actividades.

Los archivos con este icono no se sincronizan

texto alternativo

Es posible que vea este icono si inicia sesión enOneDrive con una cuenta profesional o educativa. Significa que el administrador ha bloqueado la sincronización de determinados tipos de archivo. Es más común bloquear archivos de datos de Outlook.

Si también inicia sesión en OneDrive con una cuenta personal, se aplicarán las mismas restricciones.

Obtenga información sobre cómo quitar un archivo de datos .pst de Outlook de OneDrive.

Personas icono junto a un archivo o carpeta

Icono de archivo compartido de OneDrive

Si ve un icono "contactos" junto a su OneDrive archivos o carpetas, esto indica que el archivo o carpeta se ha compartido con otras personas.

Obtenga más información sobre cómo cambiar el uso compartido en Compartir archivos y carpetas de OneDrive.

Icono de nube azul

Icono de archivo en línea de OneDrive

Un icono de nube azul junto a los archivos o carpetas de OneDrive indica que el archivo solo está disponible en línea.  Los archivos solo en línea no ocupan espacio en el equipo.

Los archivos solo en línea no se pueden abrir cuando el dispositivo no está conectado a Internet. Más información sobre Archivos a petición de OneDrive

Iconos de garrapatas verdes

Archivo disponible localmente en OneDrive

Al abrir un archivo solo en línea, se descarga en el dispositivo y pasa a ser un archivo disponible localmente . Puede abrir un archivo disponible localmente siempre que quiera, incluso sin acceso a Internet.

Si necesita más espacio, puede cambiar el archivo a solo en línea. Simplemente haga clic con el botón derecho en el archivo y seleccione "Liberar espacio".

Más información sobre Archivos a petición de OneDrive

Círculo verde sólido con la marca de verificación blanca

Icono de archivo siempre disponible de OneDrive

Los archivos que se marcan como "Mantener siempre en este dispositivo" tienen el círculo verde con la marca de verificación blanca.

Estos archivos siempre disponibles se descargan en el dispositivo y ocupan espacio, pero siempre están ahí incluso cuando se trabaja sin conexión.

Más información sobre Archivos a petición de OneDrive

X gris en iconos del escritorio

Superposición de iconos de X grises

No se trata de un icono de OneDrive, sino de un icono de acceso directo de Windows dañado. Si ves una X gris sobre los accesos directos del escritorio de Windows, prueba estas sugerencias:

  • Haz clic con el botón derecho en el escritorio y selecciona Actualizar.

  • Desinstale las aplicaciones de copia de seguridad que ya no se usen. Reinicia el equipo después de cada desinstalación.

Icono de candado

Icono de archivo bloqueado de OneDrive

OneDrive mostrará un icono de candado junto al estado de sincronización si el archivo o carpeta tiene una configuración que impide la sincronización.

Obtenga más información sobre Restricciones y limitaciones al sincronizar archivos y carpetas.

¿Por qué tengo dos iconos de OneDrive?

Iconos de OneDrive azules y blancos

Si ha iniciado sesión en la aplicación de sincronización OneDrive con una cuenta personal o profesional o educativa, verá dos iconos de sincronización OneDrive.

La azul es para su cuenta profesional o educativa, la blanca es para su cuenta personal.

Obtenga información sobre cómo agregar una cuenta en OneDrive.

Icono de cadena en una carpeta

texto alternativo

Un icono de cadena o vínculo sobre una carpeta significa que es un acceso directo a otra carpeta que se ha compartido.

Cuadro marrón en iconos del escritorio

texto alternativo

Un cuadro marrón sobre los iconos del escritorio de Windows puede deberse a un problema con el Explorador de Windows.
Para resolver el problema, reinicia el Explorador de Windows:

  1. Presiona la tecla Windows + E.

  2. Presiona CTRL + ALT + SUPR y selecciona Administrador de tareas.

  3. Selecciona Más detalles para mostrar todas las aplicaciones.

  4. En la pestaña Procesos, en Aplicaciones, haz clic con el botón derecho en el Explorador de Windows.

  5. Selecciona Reiniciar.

Flecha de método abreviado

texto alternativo

Si ves una flecha de acceso directo sobre archivos que no son accesos directos, la solución es reiniciar Windows Explorador de archivos.
Para resolver el problema, reinicia el Explorador de Windows:

  1. Presiona la tecla Windows + E.

  2. Presiona CTRL + ALT + SUPR y selecciona Administrador de tareas.

  3. Selecciona Más detalles para mostrar todas las aplicaciones.

  4. En la pestaña Procesos, en Aplicaciones, haz clic con el botón derecho en el Explorador de Windows.

  5. Selecciona Reiniciar.

martes, agosto 16, 2022

Acceso Namecheap por IMAP

https://www.namecheap.com/support/knowledgebase/article.aspx/9545/2175/private-email-account-setup-on-windows-8-smtpimap/

Private Email account setup on Windows 8 (SMTP/IMAP)
This tutorial will help you to configure your Namecheap Private Email account in Windows 8 default mail application.
NOTE: POP3 protocol is not supported by Windows 8 default Mail app. If you need to configure mailbox using POP3, it is advised to use non-native email clients - Microsoft Outlook, Thunderbird, etc.
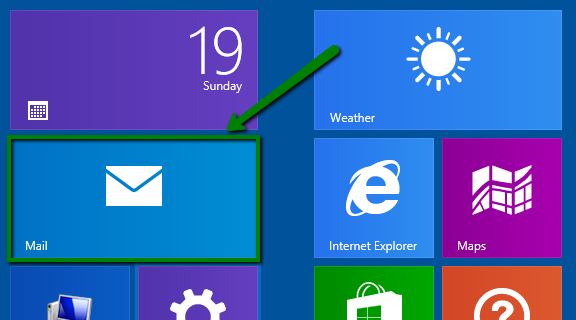
1. To create a new account, hit  and click on Mail app on the Start Screen:

NOTE: start screen may look different on your side, and Mail app might be missing. Thus, feel free to use Search charm to find the app. Some tips on how to use it in Windows 8 can be found here.
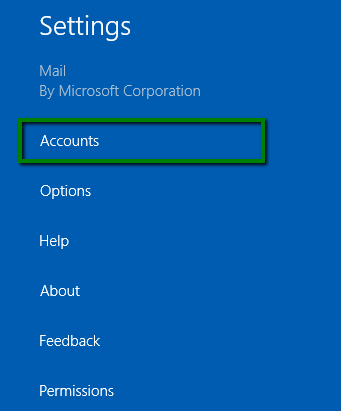
2. When inside, hover over lower right corner of the screen. Once the Charms Bar is brought, click on Settings > Accounts:

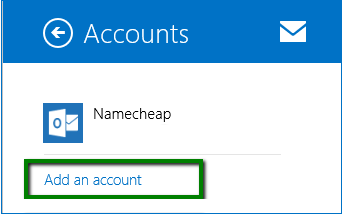
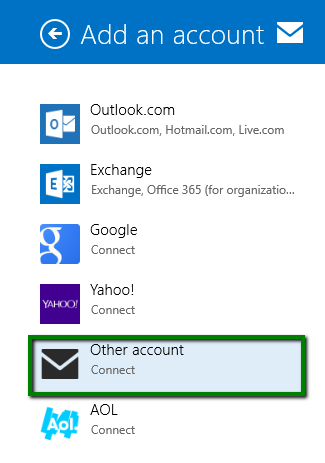
3. Click on Add an account > Other account option:

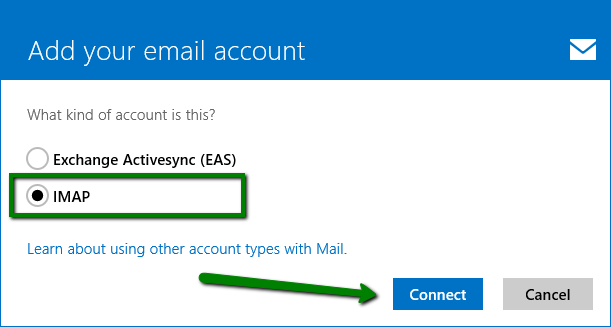
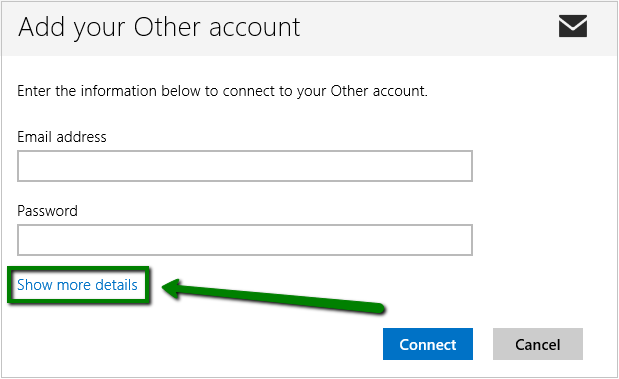
4. Choose IMAP and click on Connect. On the next page hit Show more details:

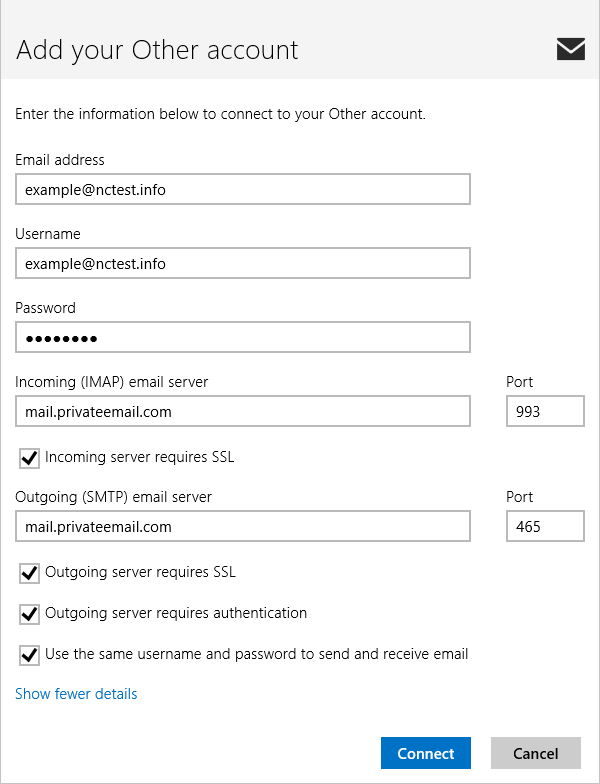
5. Enter the following settings in corresponding fields:
Email address: full email address
Username: full email address
Password: password for this email account
Incoming (IMAP) email server: mail.privateemail.com (the same for all subscriptions)
Outgoing (SMTP) email server: mail.privateemail.com (the same for all subscriptions)
Also make sure that the following options are checked:
  • Incoming server requires SSL
  • Outgoing server requires SSL
  • Outgoing server requires authentication
  • Use the same username and password to send and receive email


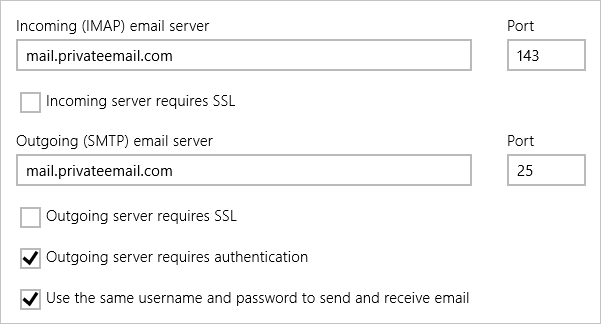
NOTE: if you would like to use alternative non-SSL ports, make sure corresponding boxes are unchecked.

6. Once finished, click on Connect.
That's it!

sábado, marzo 12, 2022

How to Hardcode Subtitles

De: https://www.veed.io/learn/how-to-hardcode-subtitles

How to hardcode subtitles with VLC media player

You now know that hardcoding subtitles comes with too many perks to ignore. So let’s get you started with adding burned-in subtitles to your video.

On a side note, if you prefer learning by watching, here’s a video walkthrough of how to hardcode subtitles into a video:

Using a VLC media player for this job is ideal for folks who are looking to add hardcode subtitles once in a while. Say, you are a creator who doesn’t focus much on video content.

If you’re a creator or social media marketer who lives and breathes video content though, feel free to skip this section and jump straight to adding hardcode subtitles the easy and fast way.

Now, for adding hardcoding subtitles with VLC.

What is VLC?

Developed by VideoLAN project, VLC is a free, cross-platform media player. It’s available for use on desktop and mobile platforms including Android, Windows, and iOS.

You'll need the following:

  • Your masterpiece – the video
  • The SRT file containing video’s subtitles
  • The VLC player itself. Download and install on your computer for free from their website.

Pro Tip: If you just want to add subtitles with the click of a button and don't want to deal with a clunky freer alternative use VEED's online video editor and auto-subtitle generator.

Heads-up: Make sure your SRT file is the correct one. If it’s wrong and you end up adding the subtitles, you’ll have to restart the subtitling process from scratch to add the correct subs.

To add the subtitles, follow these steps:

1. Open VLC media player

Open the VLC media player. There’s no point selecting your video and opening it using the “open with VLC” option since you’ll be selecting the video in the next step anyway.

2. Add your video within the stream menu

Hover over the media tab and click on Stream. Alternatively, use the shortcut CTRL+S and the Stream menu will open up.

Now, click the Add button to select the video file you want to burn the subtitles into.

3. Select the subtitles you want to hardcode

After you’ve added your video, tick the Use a subtitle file box and click Browse to find and import your SRT file.

At the bottom of this window, click on the Stream button. Once done, you'll see the next page. Here, confirm the video source by clicking Next in the bottom right.

4. Add stream output file destination

Next you need to create the output location for your new video file. To do so, select File in the dropdown menu and tap the Add button next to it.

Now, a File tab will open up and you’ll have to name that file whatever you want to call it. Don’t forget to make sure you add the “.mp4” extension to the end of your filename.

Done? click on Next.

5. Activate transcoding subtitles option

In the transcoding options section, make sure you tick the Activate Transcoding box. Then click on the spanner icon next to the dropdown menu.

This will show a new window pop up. Here, under the subtitles tab, make sure that you tick the Subtitles and the Overlay subtitles on the video boxes.

Click Save, followed by Next.

6. Save new hardcoded subtitles video from stream

On the last page, the only thing you need to do is click the Stream button in the bottom right of the window.

The video will then playback once all the way through and then a second time the playhead will move once again from start to finish in the timeline. It’s important that you let VLC finish transcoding your file.

Don’t close VLC Media Player during this process.

7. Quit VLC media player the correct way

After the player finishes transcoding, all that’s left to do is quitting the player the right way. Closing VLC by selecting the cross on the window fails to save videos properly.

So a good way to ensure everything is thoroughly saved: hover over Media in the top bar menu and then select Quit.

That’s it. You’re done.

lunes, febrero 14, 2022

How to Merge [Combine] Multiple Excel FILES into ONE WORKBOOK

From: How to Merge [Combine] Multiple Excel FILES into ONE WORKBOOK (excelchamps.com)

If you ask people who work with data, you will get to know that combining Excel files or merging workbooks is a part of their daily work.

Agree?

A simple an example: Let’s say you want to create a sales report and you have data of four different zones in four different files.

Now:

The very first thing you need to do is to combine those files in one single workbook and only then you can create your report further.

The point is: You have to have a method which you can use for merging these files. Say “YES” in the comment section if you want to know the best method for this.

Today in this post, I’m going to share with you the best way to merge data from multiple Excel files into a SINGLE workbook.

But, here's the kicker.

This post will teach you something you need to learn to use in the real world data problem so make sure to read the entire post.

The Best Possible Way for Combining Excel Files by Merging data into ONE Workbook - POWER QUERY

Power Query is the best way to merge or combine data from multiple Excel files in a single file. You need to store all the files in a single folder and then use that folder to load data from those files into the power query editor. It also allows you to transform that data along with combining.

It works something like this:

  • Saving All the Files into a Single Folder

  • Combining them using Power Query

  • Merging Data into a Single Table

Make sure to download these sample file from here to follow along and check out this tutorial to learn power query.

Note: For combining data from different Excel files, your data should be structured in the same way. That means the number of columns and their order should be the same.

To merge files, you can use the following steps:

  1. First of all, extract all the files from the sample folder and save that folder at the desktop (or wherever you want to save it).
    combine-data-from-multiple-files-into-one-workbook-by-merging-data-save-files
  2. Now, the next thing is to open a new Excel workbook and open “POWER Query”.
  3. For this, go to Data Tab ➜ Get & Transform Data ➜ Get Data ➜ From File ➜ From Folder.
    combine-data-from-multiple-files-into-one-workbook-by-merging-data-open-from-folder
  4. Here you need to locate the folder where you have files.
    combine-data-from-multiple-files-into-one-workbook-by-merging-data-locate-the-folder
  5. In the end, click OK, and once you click OK, you’ll get a window listing all the file from the folder, just like below.
    combine-multiple-files-into-one-workbook-using-power-query-listing-all-the-file
  6. Now, you need to combine data from these files and for this click on “Combine & Edit”.
    combine-multiple-files-into-one-workbook-using-power-query-combine-and-edit
  7. From here, the next thing is to select the table in which you have data in all the workbooks and yes, you’ll get a preview of this at the side of the window.
    combine-multiple-files-into-one-workbook-using-power-query-select-the-table
  8. Once you select the table, click OK. At this point, you have merged data from all the files into your power query editor and, if you look closely you can see a new column with the name of the workbooks from which data is extracted.
    combine-multiple-files-into-one-workbook-using-power-query-combine-data-in-editor
  9. So, right-click on the column header and select “Replace Values”.
    combine-multiple-files-into-one-workbook-using-power-query-right-click-replace-values
  10. Here in the “Value to Replace” enter the text “.xlsx” and leave “Replace With” blank (here idea is to remove the file extension from the name of the workbook).
    combine-multiple-files-into-one-workbook-using-power-query-enter-value-to-replace-1
  11. After that, double click on the header and select “Rename” to enter a name for the column i.e. Zone
    combine-multiple-files-into-one-workbook-using-power-query-rename-the-folder.
  12. At this point, your merged data is ready and all you need is to load it into your new workbook. So, go to the Home Tab and click on the “Close & Load”.
    combine-multiple-files-into-one-workbook-using-power-query-close-and-load

Now you have your combined data (from all the workbooks) into a single workbook.

This is the moment of JOY, write “Joy” in the comment section if you love to use “Power Query for combining data from multiple files”.

Important Point

In the above steps, we have used the table name to combine data from all the files and add all of it into a single workbook. But not all time you will have the same table name in all the Excel files and at that point, you can use the worksheet name as a key to summarizing all that data.

One more thing:

As I said, you can use a worksheet name to combine data with the power query but there are few more things which I want to share with you and you need to take care of those. Power Query is case sensitive, so when combining files make sure to have the name of worksheets in all the workbooks in the same letters.

The next thing is, to have the same name for the column headers, but here the kicker: The order of the columns doesn’t matter. If column1 in the north.xlsx is column2 in the west.xlsx, Power Query will match it, but you have to have column names the same.

So now, while combining files using power query you can use the worksheet name instead of the table name, and here you have "SalesData" as the worksheet name in all the files.

You select it and click on the "Combine & Edit" and follow all the steps which I have mentioned in the above method.

Why Power Query is the Best Way to Merge Data into a Single File?
Merge Data from Multiple Workbooks When you don’t have the Same Name for Worksheets and data in Tables

This is the hard truth…

…that in some situations, you won’t have the same name for worksheets and not all the data in tables all the time.

Now, what you should be doing in that case?

Well…

…in this case, you must know how you can combine data from all the files and I don’t want to miss to share with this thing with you.

Make sure to download these sample files to follow along and save it on your desktop.

...so without any further ado, let's get started.

  • First of all, open the “From Folder” dialog box to locate the folder where you have all the files.
  • Now in this dialog box, locate the folder and click OK.

  • After that, click on the “Edit” to edit the table.

  • At this point, you will have a table like below in your power query editor.

  • Next, select the first two columns of the table and click on the “Remove Other Columns” from the right-click menu.

From here, we need to add a custom column to fetch data from the worksheets of the workbooks.

  • For this, go to Add Column Tab and click on the “Custom Column” button. This will open the “Custom Column” dialog box.

  • In the dialog box, enter =Excel.Workbook([Content]) and click OK.

…at this time you have a new column in the table but next, you need to extract data from it.

  • Now, open the filter from that newly added custom column and click OK to expand all the data into the table.

  • Here you have the newly expanded table with some new columns.
  • Now from this new table, delete all the columns except third and fourth.

  • So, open the filter for the column “Custom.Data” to expand it and click OK.

The moment you click OK, you’ll get all the data from all the files into a single table…

you need to make some changes into it to make it PERFECT.

If you notice, all the heading of the column are into data itself...

...so you need to add the column headings.

  • To do this, you need to double click on the header and add a name, or you can right click and select rename it.

The next you need to exclude the headings which you have in the data table.

  • Now open any column’s filter option and unselect the heading name which you have in the column data and click OK after that.

Now our data is ready to load into the worksheet, so, go to the Home Tab and click on the close and load.

Congratulations! you have just combined data from the different workbooks (with different worksheets name and without any table).

This is also important:

At this point, you have merged the data into one table.

But there’s one thing you need to do…

…and that’s applying some formatting to it and making sure that it won’t go away when you update your data.

Here’s what you need to do…

  • First of all, select the column where you have dates (as it is formatted as number right now) and format it as dates.
  • After that, make all the columns wide as per the data you have in them.
  • Here you can also format amount and price as “Currency”.

But the next thing is to make this formatting fix.

  • For this, go to “Design Tab”, and open properties.
  • Untick “Adjust Column” width and tick mark “Preserve Cell Formatting”.
  • Yes, that’s it.

Now you have a query in your workbook which can combine data from multiple files...

...and merge it into a single workbook...

...even if the worksheet name is not the same or if you don’t have tables.

And yes, you have also made the formatting fix. ?

In the end,

As I said, POWER QUERY is real and if you frequently use to combine data from multiple files then you must use this method…

…as it’s a ONE-TIME setup.

The most important thing is you when you use power query you can even clean the data from those files as well.

I hope this tutorial will help you to Get Better at Excel. But now, you need to tell me one thing.

Which method do you use to combine data from multiple files?

Make sure to share your views with me in the comment section, I'd love to hear from you. And please, don’t forget to share this post with your friends, I am sure they will appreciate it.