martes, julio 09, 2019

Redirección dominios “desnudos” (Naked Domain)

http://wwwizer.com/naked-domain-redirect

Naked Domain Redirect FAQ

What is naked domain redirect?

wwwizer.com provides free service – naked domain redirect. That helps with "naked domain problem".

What is a "naked domain" problem? Do I have it?

Naked domain problem means that your website doesn't work without www in front. So if you havewww.example.com website it can be opened only by entering full name. When someone enters only example.com (notice no www in front) the error is shown.

Yes, I can see error on my website. Why is that?

In short: it happens because of the way DNS works and because your hosting provider or publishing platform does not support www-less websites.

Long explanation: your hosting provider has a lot of servers and all of them can show your website. But there is no way to know which particular server will process requests to your website. So your provider providing you with a CNAME record for your website. And you (or provider on your behalf) put that record into www.example.com name. But there is a catch: it is not possible to put CNAME-record into www-less or "naked" name. Only particular server's IP-address must go there. wwwizer.com gives you that address.

How wwwizer.com can solve this problem?

We can redirect (for free!) all visitors from example.com to www.example.com.

How this redirect works?

Every visitor to your "naked domain" (example.com) will be redirected to www.example.com. It is done with HTTP 301-redirect, and all parameters and full path is preserved.

How can I use this service?

Point your "naked domain" (example.com not www.example.com!) to IP address 174.129.25.170

Previous answer is too short. Is there a typo?

No typo. All you need to do to redirect visitors from example.com to www.example.com is: point your naked domain A-record to the IP address 174.129.25.170. And it will start to work as soon as your DNS updates.

Even no sign up necessary.

But the home page tells about SSL for the cloud. Is free domain redirect here to stay?

Free naked domain redirect will continue to work, there are no plans to stop providing it.

If I still have questions?

Follow links on our How To Use page. These are real-world examples of wwwizer.com usage.

Back to home page.

viernes, junio 14, 2019

Añadir y eliminar prefijo en nombres de ficheros

De: https://www.adslayuda.com/foro/topic/23974-a%C3%B1adir-y-eliminar-prefijo-en-nombres-de-ficheros/

Copiar renombrar múltiples archivos con un solo comando

AÑADIR PREFIJO DM- A CTF-*.* = DM-CTF-*.*
ELIMINAR DM- DE DM-CTF-*.* = CTF-*.*
AÑADIR PREFIJO DM- A BR-*.* = DM-BR-*.*
ELIMINAR PREFIJO DM- DE DM-BR-*.* = BR-*.*
AÑADIR PREFIJO DM- A AS-*.* = DM-AS-*.*
ELIMINAR PREFIJO DM- DE DM-AS-*.* = AS-*.*
AÑADIR PREFIJO DM- A DOM-*.* = DM-DOM-*.*
ELIMINAR PREFIJO DM- DE DM-DOM-*.* = DOM-*.*
AÑADIR PREFIJO DM- A ONS-*.* = DM-ONS-*.*
ELIMINAR PREFIJO DM- DE DM-ONS-*.* = ONS-*.*
AÑADIR PREFIJO DM- A VCTF-*.* = DM-VCTF-*.*
ELIMINAR PREFIJO DM- DE DM-VCTF-*.* = VCTF-*.*


Ren CTF-*.* DM-CTF-*.*
Ren DM-CTF-*.* CTF-*.*
Ren BR-*.* DM-BR-*.*
Ren DM-BR-*.* BR-*.*
Ren AS-*.* DM-AS-*.*
Ren DM-AS-*.* AS-*.*
Ren DOM-*.* DM-DOM-*.*
Ren DM-DOM-*.* DOM-*.*
Ren ONS-*.* DM-ONS-*.*
Ren DM-ONS-*.* ONS-*.*
Ren VCTF-*.* DM-VCTF-*.*
Ren DM-VCTF-*.* VCTF-*.*


sábado, junio 01, 2019

Agregar dominio propio a Googe Sites - G Suite y Personal

Map a Custom Domain URL (G Suite) - new Google Sites

https://www.steegle.com/google-sites/how-to/map-domain-web-address-g-suite

Instructions


G Suite Web Address Mapping

  1. Make sure your site is published and note its published URL
  2. Sign in to your G Suite admin console (admin.google.com ⇗)
  3. Go to Apps, G Suite, Sites and expand Web address mapping (Aplicaciones –> G Suite –> Configuración de Google Sites).
  4. Use the Add web address link and make sure you choose new Sites from the Version drop-down.
  5. Choose the primary or secondary domain in Site Location that the site is published to
  6. Enter the published URL of the site in Site Location and enter the web address you want the site to appear at in Web Address
  7. Use the Add Mapping link and G Suite will instruct you to add the appropriate DNS records (a CNAME record that points to ghs.googlehosted.com - this is with your domain provider) and once added use the I've completed these steps option

G

Map a custom domain URL in G Suite to a new Google Sites

Full screen video ⇗

Capabilities

  • Make your new Google Site appear at your own domain
  • Traffic to your site is secured via SSL (https) without any further configuration

Limitations

  • If you made your site with a personal Google Account or Gmail account then please see Assign Custom URL Domain Web Address (Personal)
  • To map a secondary domain you need to create a site with a user account that uses the secondary domain as its sign in domain. This allows you to publish the site to the secondary domain. For more info see our demo.

Notes

  • This takes time to process so your site will not appear immediately at the web address
  • If the mapping does not work within an hour try again

domingo, mayo 12, 2019

Get share link of multiple files in Google Drive to put in spreadsheet

De: https://webapps.stackexchange.com/questions/88769/get-share-link-of-multiple-files-in-google-drive-to-put-in-spreadsheet

3

2

I've got 200+ jpegs in a folder and need shareable links for each jpeg in a spreadsheet. Is there a way to do this without doing the right clicking thing for each image individually?

google-drive links

shareimprove this question

edited Jan 16 '16 at 22:00


ale

42.3k25111255

asked Jan 16 '16 at 21:48


Leon Moon

16112

add a comment

2 Answers

activeoldestvotes

2

Yes, you can select all these files and get shareable links to them at once.

  1. Select files
  2. Right-click any of them and pick "Share.." out of the context menu.
  3. Click "Get shareable links" in the upper right corner of the Share dialog window. This does several things at once: makes files accessible to anyone with a link, and copies the links to your clipboard.
  4. Paste into the spreadsheet. The copied links are newline-separated, so when pasted into a spreadsheet, they form a neat column.

12.3k71736

answered Jan 17 '16 at 5:45

user79865

A method without painful clicking is the following:

Open the desired Google Drive folder and get the [ID] in its URL from the browser location bar:

https://drive.google.com/drive/u/0/folders/[ID]

Open a new Google Sheet and navigate Tools > Script editor.
In the new script, put (replace the [ID] in the code):

function myFunction() {
  var ss=SpreadsheetApp.getActiveSpreadsheet();
  var s=ss.getActiveSheet();
  var c=s.getActiveCell();
  var fldr=DriveApp.getFolderById("REPLACE_[ID]_HERE");
  var files=fldr.getFiles();
  var names=[],f,str;
  while (files.hasNext()) {
    f=files.next();
    str='=hyperlink("' + f.getUrl() + '","' + f.getName() + '")';
    names.push([str]);
  }
  s.getRange(c.getRow(),c.getColumn(),names.length).setFormulas(names);
}

Run the script (after having saved it and granted permissions) and revisit the Google Sheet, which should now contain the list of URLs.

(I stole most of this from https://productforums.google.com/forum/#!topic/docs/0ilSDjhFnHI)


https://chrome.google.com/webstore/detail/extract-drive-links/klonacpfbangpegffkdopiilfdhgjhgo


De: https://www.syncwithtech.org/google-drive-direct-links/ 

https://gsuite.google.com/marketplace/app/drive_direct_links/520711270513

How to Get Direct Download Links of Google Drive Files

Published: 6th Feb, 2018

Last Updated: 13th Apr, 2019

3 min read

3 years ago, I had shared a tool to generate direct download link for a Google Drive file. But what if you need to create direct links for the files inside a specific folder or simply all your drive files. There's a Sheets Add-on which lets you do it.

Google Drive Direct Download links

How to Generate direct links

Upon installation, it requires permission to access your Google drive files.
Basically, there are two ways you can use this add-on.

1. Files inside specific folders

Using this feature, you can select the list of folders you want. All the files inside those folders will be exported to a sheet.

2. All the files inside Google drive

Simply all your files are exported to a sheet.

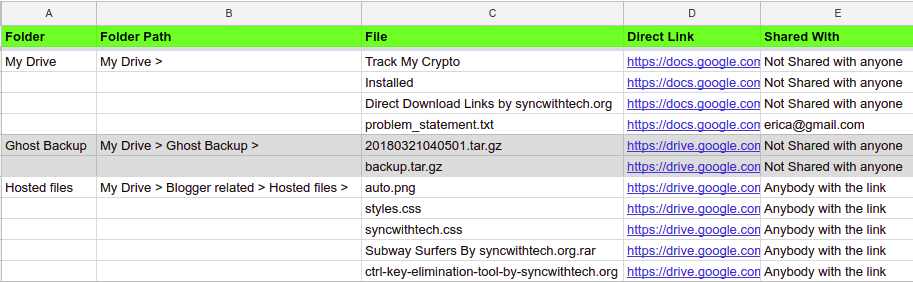
File details include folder name, path of the folder on Google Drive, file name, direct link & with whom you've shared the file. Each row on spreadsheet represents a file on your Drive.

drive-direct-link-sheet

How to install & use

You can install the Add-on using this link - Direct Download links for Google Drive. Click INSTALL, it will ask for your permission. Click Continue and choose your Google account to authorize the app.

Now you're all set to use the Add-on, on your sheet select Add-ons → Direct Drive Links → Generate Links. A pop-up opens as showed in the image below.

drive direct links sheets add-on select-folder-prompt

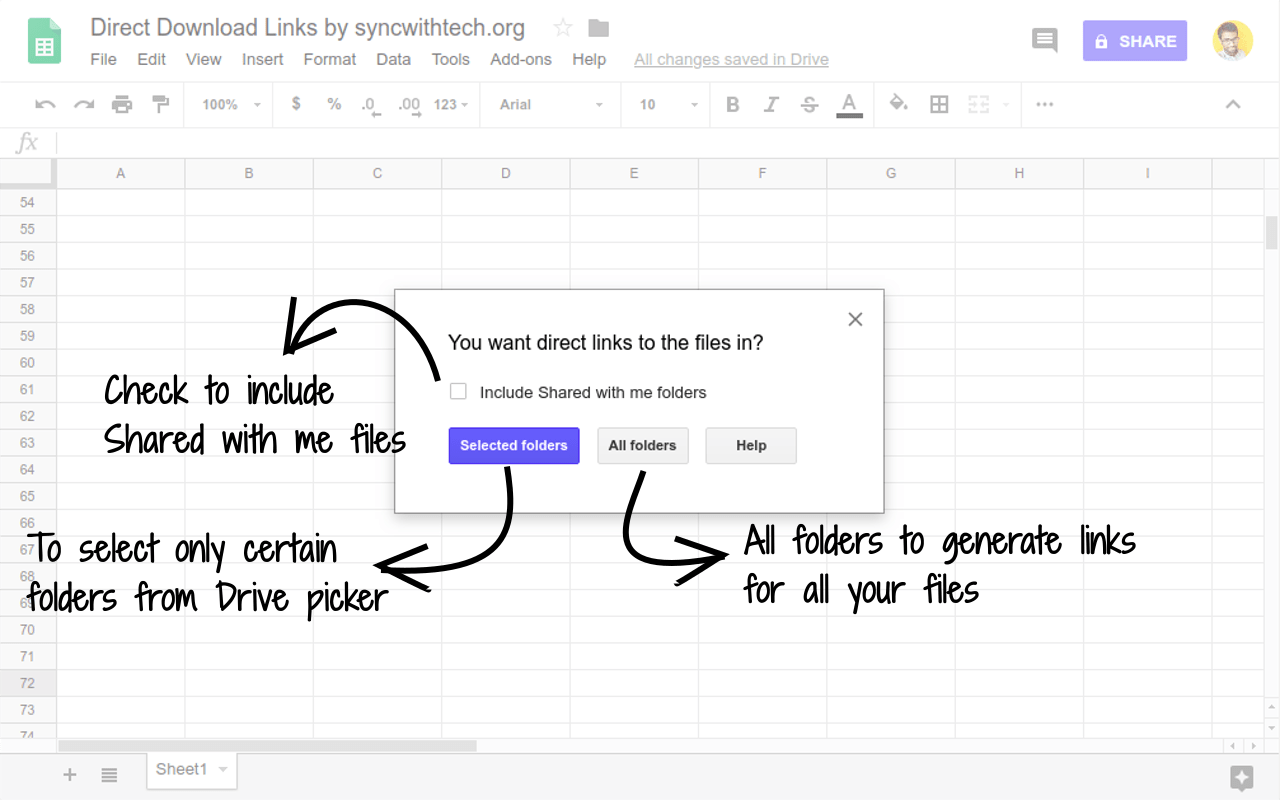
If you choose Selected folders, folder picker pop-up opens and you can select the folders you want. When you select All folders, the pop-up closes and a sheet opens with details of all your Google Drive files.

If you need links to the files shared with you, you have to tick the Include Shared with me folders checkbox.

Selected folders

Once you pick the folders, a pop-up opens with the list of folders you select. From that pop-up, you can add/remove a folder.

drive direct links sheets add-on folder list modal

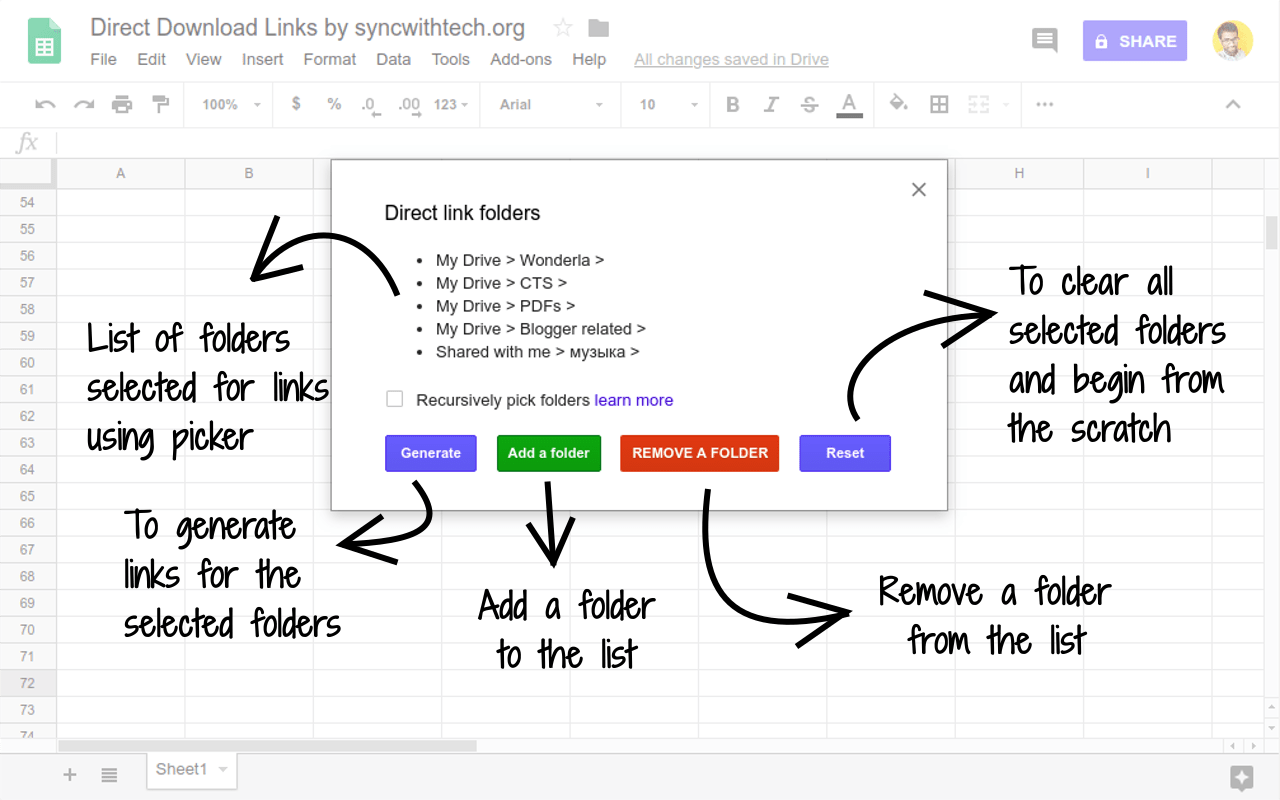
You have to tick Recursively pick folders, if you want to cover the files inside nested folders. To explain this, let's take the following file system hierarchy.

    My Drive
    |--Folder 1
    |  |--File 1
    |  |--Folder 11
    |     |-- File 11
    |--Folder 2

Here, My Drive has two folders Folder 1 and Folder 2. Folder 1 contains a file File 1 and a folder Folder 11. Let's say your folder list contains only,

My Drice > Folder 1 >

So, if you select Generate without opting for recursive operation, you'll end up with File 1 info alone. If you had ticked the checkbox, your sheet will also have Folder 11 and File 11 entry.

Note: The sheet will generate pdf download links for Google Documents, Sheets and Presentations by default, however, you can change that by replacing pdf with xlsx or doc or pptx.

The best thing is you can also use this add-on as a Google Drive file manager by opting for All folders in the prompt. It'll simply list all your files.

Settings and Configuration

At any point of time, you can change the way you use this add-on. For example, if you want to pick folders after selecting all folders, you can do that by selecting Add-ons → Direct Drive Links → Select folders for links.

If you had selected too many unwanted folders and want to remove all at once, you can select Reset on the folder list pop-up.

For now, there are two configurations for you to use according to your needs,

1. Auto refresh

By default, whenever you open the sheet, it'll refresh the links automatically for you. But if you open the sheet more than once between 6-hour interval, automatic refresh won't happen. If you want to get the links to newly added files in the meantime, you can use Refresh Links option that's available under Add-ons → Direct Drive Links.

You can also disable the auto refresh option altogether, select Add-ons → Direct Drive Links → ✓ Autorefresh on open.

2. Repeat folder names

There is an option for you to repeat the folder path & names in column 2 & 3. When you sort by filename, to know within which folder every file is, you can use this. It is by default disabled, to enable it, just select Add-ons → Direct Drive Links → Repeat folder names. You can toggle if you want to disable later.

Open folders on Google Drive

Hover over the folder name in the first column and click on the link to view the folder contents on Google Drive.

Update Share details

If any of the files are not shared with anyone or you want to share that with more people, you can do that using your sheet, all you have to do is, hover over the file name for which you want to update share details, click on the link, you'll be redirected to the file preview page.

On the top right corner of the page, left to your profile picture, click on the menu and then Share. Now you can share that file with anyone you want.

Issues and Feature requests

If you run into any issues or you want any feature to be added to this add-on, do leave a comment on this post. I'll see what best I can do.

Ganapathy S

Written by Ganapathy, a Web developer by profession and a tech enthusiast.

Comments

domingo, abril 28, 2019

How to Partition USB Drive in Windows 7/8/10 Simply?

https://www.disk-partition.com/articles/how-to-partition-usb-drive-3889.html

USB hard drive or memory card, as the removable storage, is the most ordinary device in people’s daily life. They are widely used for storing important data and files, system backup images, for example. One of the most important advantages of them, when put into use is their portability. People can transfer data and files between computer and different removable storage devices conveniently and smoothly.

Sometimes, you do need to multi partition your Kingston or SanDisk USB drive, like create a partition or format one partition. For example, the file system of your memory card is showing RAW, it means the partition on the flash drive is corrupted or lost. You need to create a new partition first and then format the damaged one.

Therefore, the question of how to partition USB drive will come into your sight. Actually, you can perform this task using both Diskpart and free partition manager -- AOMEI Partition Assistant Standard. Connect USB drive to your PC first and make sure it is detected by Windows.

How to partition USB drive using Diskpart?

Firstly, open Diskpart by pressing Windows key and R key (same time), type in “diskpart” in the pop-up window and then hit Enter. For Windows 7 and XP, click on Windows icon, select “Command Prompt” & click “Run as Administrator”. For Windows 8, press Windows key and X key (same time), click “Command Prompt (Admin)”.

Note: To execute a command line, please press Enter key after your each move.

Secondly, enter “list disk”. Then you will see all your disks (it is important you know which disk is the USB key).

Diskpart 1

Thirdly, enter “select disk *” (* stands for the USB key)-> enter “clean”-> “list part”.

Fourthly, enter “create partition primary”-> “list part”, and then enter “select part 1”-> “active”-> enter “format fs=fat32 label=’Tabernus’” (label is optional).

Diskpart 2

The process may take some time. However, all steps in Diskpart are  irreversible. So to get better simple and easy-to-use solution, you’d better turn to AOMEI Partition Assistant for help. As a mighty and comprehensive partition manager, AOMEI Partition Assistant can help you under following cases:

  • USB drive partition has been corrupted.
  • Format USB hard drive or memory card that command line doesn’t work.
  • Resetting and wiping out all existing data to become a blank USB drive.
  • Make a bootable USB drive.
  • Simply reset and reformat a USB drive.

This free tool allows you to partition USB flash drive to NTFS or FAT32 in Windows 10/8/7/XP. Download AOMEI Partition Assistant Standardfree edition and have a try.

Partition USB drive with AOMEI Partition Assistant

Step 1. Install and launch AOMEI Partition Assistant. Right-click the USB drive, select “Create Partition”. You can pitch on the USB drive and select “Create Partition” on the left panel, too.

Create Partition on Removable Drive

Step 2. Specify the size and drive letter for the new partition. You can also edit partition label, file system under Advanced tab.

Resize New Partition on Removable

Step 3. Then you get a new partition G: in your USB drive. Click “Apply”.

Apply Create- Partition on Removable

Tips:

*You can multi partition your USB drive via AOMEI Partition Assistant by repeating above steps.

*Please note that Windows will recognize only the first primary partition on a removable device. Therefore, after this operation, the second partition will not have a drive letter and showing in Windows Explorer. However, you can keep two partitions be recognized in other operating systems like Linux.

Conclusion

Here two ways on how to partition USB drive in Windows are offered. You can easily find out which one is simpler and more straightforward. With AOMEI Partition Assistant, you can partition your USB drive in three simple steps instead of complicated command line operations. Other than partitioning USB drive, you can partition C drive, merge partitions or convert NTFS to FAT32 without data loss using AOMEI Partition Assistant. However, nothing is going to be changed unless you download it and start to use it, so just enjoy it. If you have more demands like quick partition, migrating OS from GPT to GPT and so on, you can upgrade AOMEI Partition Assistant to Professional edition.

sábado, abril 20, 2019

Advanced Renamer: renombrar archivos

https://www.advancedrenamer.com/

Advanced Renamer is a program for renaming multiple files and folders at once. By configuring renaming methods the names can be manipulated in various ways.
It is easy to set up a batch job using multiple methods on a large amount of files. The 14 different methods enables you to change the names, attributes, and timestamps of files in one go. The files can also be copied or moved to new locations based on information in the files.
With Advanced Renamer you can construct new file names by adding, removing, replacing, changing case, or giving the file a brand new name based on known information about the file.
Before performing the operations on the files you can verify that the output will be correct and if you perform the rename and regret it, you can undo the complete batch.

jueves, marzo 28, 2019

martes, marzo 26, 2019

Host website in Dropbox, Google Drive or Onedrive


https://www.makeuseof.com/tag/free-website-hosting-dropbox-google-drive-onedrive/

https://drv.tw/

https://my.droppages.com/

https://www.quora.com/Can-I-use-Microsoft-OneDrive-to-host-websites


Video

https://lifehacker.com/how-to-turn-google-drive-into-your-personal-media-serve-1551083632

http://www.canalyoutube.es/como-insertar-un-video-de-google-drive-en-una-web/


Embed video stored in Dropbox in another site

EMBED AND STREAM VIDEOS FROM DROPBOX TO YOUR WEBSITE

This video is hosted in my Public folder on Dropbox.  Right click on video stored in your Public Dropbox folder to get the Public link.  Use the html code found below as a template to embed and stream your videos from your Dropbox account.
<video width="640" height="480" controls="controls">
<source src="dropboxvideo.mp4" type="video/mp4" />
</video>
The text in quotes "dropboxvideo.mp4" must be changed to Public link copied from your Public folder.  Change the video width and height number in between the quotes to fit the embedded video into your website or blog post.  The html embed code for the video streaming from my Public Dropbox account can be found under the video.
<video controls="controls" height="480" width="640">
<source src="https://dl.dropboxusercontent.com/u/87532981/Ella%20May%20and%20the%20Wishing%20Stone%20By%20Cary%20Fagan.mp4" type="video/mp4"></source>
</video>


Actually, you can, depending on the platform you're referring to. You'll need to create a share link to the video, then modify the link by changing the ?dl=0 at the end to ?raw=1. That results in a direct link to the file which you can use to embed it on most sites.

Just remember that when embedding a file like that (or really, anytime a file is played directly from Dropbox) there are bandwidth limitations to consider. Depending on the size of the file and your account type, you could easily use up all of alotted bandwidth for your account.

sábado, marzo 23, 2019

domingo, marzo 17, 2019

Open Live Writer – Server Error 501 using Blogger Service

De: https://lehsys.blogspot.com/2017/02/open-live-writer-server-error-501using.html?fbclid=IwAR0r39Od4Ik-xIWQxiyRAKqen3F8m6-m_FA4rRSo_CnvIto1Yb2XFgRVKq4
Open Live Writer – Server Error 501 using Blogger Service

Since the death of Windows Live Writer, the Open Live Writer dev team has given it a new life and  making small improvements over the past year. While there has been some improvements, the application is still has a lot of the old dependencies.

Take for an example, in a recent forum post an user posted an error with using the Blogger service; saying he was getting error 501.

The exact error was:

The remote server returned an error: (501) Not Implemented.

This is really a reminder that the images that you use on the Blogger service are all stored in the Google Photos service. And when you post images using the web GUI of Blogger, it’s a transparent function. When you use/used Windows Live Writer/Open Live Writer the images are stored in Google Photos, where a folder/album called Windows Live Writer has to be created.

So, if you are running into the same error, open https://photos.google.com/, create a new album called Windows Live Writer and then try to publish with Open Live Writer and you should be fine.

If you have multiple Google accounts, ensure you are doing this on the account you use with your Blogger account.

image

Creating a new album requires at least one image.

Some clarification needs to be made here.
This article says you need a “Windows Live Writer” folder with Google Photos, but you can also use “Open Live Writer”. For this article, I said “Windows Live Writer” because if you have used Windows Live Writer previously, you should have that folder, if not, you can establish an “Open Live Writer” folder for new installs.

For more information on Open Live Writer:

http://openlivewriter.org/

https://github.com/OpenLiveWriter/OpenLiveWriter/issues

If I can assist any more, just let me know…

Update:
The Open Live Writer dev team confirms this is a result of the API change from Google. Open Live Writer can’t create the Open Live Writer/Windows Live Writer folder automatically, so it has to be done manually. The instructions above apply and are now part of the tutorials from Open Live Writer

sábado, marzo 09, 2019

Cómo enviar ficheros grandes | ChicaGeek

De: https://www.youtube.com/watch?v=D7FOLGzduQQ

WeTransfer 2GB, 7 días

SendTransfer 10 GB. 7 a 14 días

+++ SendAnyWhere 10 GB, 48 hs, VPN 10 mins (sin límite de tamaño), App

- https://wetransfer.com/

- https://www.sendtransfer.com/

- https://send-anywhere.com/

https://fromsmash.com/  no tiene limite de tamaño de fichero que quieras enviar, disponibilidad de los archivos hasta 14 días, sin necesidad de darse de alta y gratuitamente.