https://stablebit.com/CloudDrive/Overview
sábado, febrero 16, 2019


jueves, febrero 14, 2019
martes, febrero 05, 2019
Cómo crear alias de correo electrónico–G Suite
Cómo crear alias de correo electrónico
Si uno de tus usuarios quiere más de una dirección de correo electrónico en castano.com.ar, como guille@castano.com.ar y guillermo@castano.com.ar, crea un alias de correo electrónico para ellos (denominado seudónimo en G Suite). El correo que se envíe a la dirección principal o al alias llegará a su bandeja de entrada de Gmail. También pueden enviar correo desde ambas direcciones.
En esta Consola del administrador:
- Ve a la página Usuarios y encuentra al usuario que necesita el alias.
- Haz clic en el nombre del usuario para ver su perfil (también puedes hacer clic en Perfil).
- Desplázate a Alias y haz clic en Añadir seudónimos.
- Introduce el alias en el cuadro de texto. Es la parte de la dirección que aparece antes del signo @.
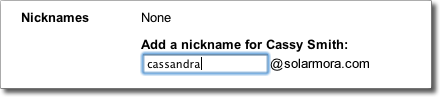
- Haz clic en el botón Guardar cambios en la parte inferior de la pantalla.
- Indícale al usuario que vaya a su configuración de Gmail y añada el alias como dirección personalizada en el campo De de forma que pueda enviar correo desde la dirección del alias. De este modo, al redactar el mensaje, podrá elegir la dirección que quiera que aparezca en el campo De.

- Una vez que hayas terminado, haz clic en Configuración para volver aquí y continuar con este asistente.

Un alias de correo electrónico solo puede utilizarse para enviar y recibir correo. Para acceder a G Suite, siempre debes utilizar la dirección principal con la que se haya creado la cuenta.
viernes, febrero 01, 2019
Solución de email y almacenamiento en la nube: inbox.eu
Buzón de correo del dominio
yourname@yourdomain
Almacenamiento de email (20 Gb)
3 buzones de correo gratis por dominio
Varios dominios
Codificación SSL segura
POP3/IMAP/SMTP
Almacenamiento de archivos (10 Gb)
Sincronización de contactos y copia de seguridad
Versión móvil
Logo personalizado y URL
Sin publicidad
Soporte de autoservicio en línea
Soporte al cliente por teléfono
99.9% garantía efectiva
Tarifas
3 buzones de correo gratis por dominio
Cada buzón de correo adicional a 1 euro por mes
jueves, enero 31, 2019
Redireccionar un dominio a un Google Site
Assign Custom Domain URL (Personal) - new Google Sites
https://www.steegle.com/google-sites/how-to/assign-custom-url-domain-personal
martes, enero 08, 2019
miércoles, enero 02, 2019
Tecla de inicio en Windows 10
Combinaciones más usadas de teclas, alfabéticamente.
- Tecla de inicio de Windows + A: Abrir el Centro de actividades
- Tecla de inicio de Windows + B: Llevar el foco al área de notificación
- Tecla de inicio de Windows + C: Abrir Cortana en modo de escucha
- Tecla de inicio de Windows + Mayús + C: Abrir el menú de accesos
- Tecla de inicio de Windows + D: Mostrar y ocultar el escritorio
- Tecla de inicio de Windows + Alt + D: Mostrar y ocultar la fecha y hora en el escritorio
- Tecla de inicio de Windows + E: Abrir el Explorador de archivos
- Tecla de inicio de Windows + F: Abrir el Centro de opiniones y hacer una captura de pantalla
- Tecla de inicio de Windows + G: Abrir la barra de juegos cuando se abre un juego
- Tecla de inicio de Windows + H: Iniciar dictado
- Tecla de inicio de Windows + I: Abrir Configuración
- Tecla de inicio de Windows + J: Resaltar una sugerencia de Windows cuando esté disponible
- Tecla de inicio de Windows + K: Abrir la acción rápida Conectar
- Tecla de inicio de Windows + L: Bloquear el equipo o cambiar de cuenta
- Tecla de inicio de Windows + M: Minimizar todas las ventanas
- Tecla de inicio de Windows + O: Bloquear la orientación del dispositivo
- Tecla de inicio de Windows + P: Elegir un modo de presentación
- Tecla de inicio de Windows + R: Abrir el cuadro de diálogo Ejecutar
- Tecla de inicio de Windows + S: Abrir la búsqueda
- Tecla de inicio de Windows + T: Desplazarse por las aplicaciones de la barra de tareas
- Tecla de inicio de Windows + U: Abrir el Centro de accesibilidad
- Tecla de inicio de Windows + V: Desplazarse por las notificaciones
- Tecla de inicio de Windows + Mayús + V: Desplazarse por las notificaciones en orden inverso
- Tecla de inicio de Windows + X: Abrir el menú Vínculo rápido
- Tecla de inicio de Windows + Y: Cambiar entrada entre Windows Mixed Reality y el escritorio
- Tecla de inicio de Windows + Z: Mostrar los comandos disponibles en una aplicación en modo de pantalla completa
- Tecla de inicio de Windows + punto (.) o punto y coma (;): Abrir panel de emojis
- Tecla de inicio de Windows + coma (,): Inspeccionar temporalmente el escritorio
- Tecla de inicio de Windows + Pausa: Mostrar el cuadro de diálogo Propiedades del sistema
- Tecla de inicio de Windows + Ctrl + F: Buscar equipos (en una red)
- Tecla de inicio de Windows + Mayús + M: Restaurar las ventanas minimizadas en el escritorio
FUNCIONES MÁS COMPLEJAS DE LA TECLA DE INICIO EN WINDOWS 10
Este segundo apartado está destinado a las funciones más complejas. Algunas de estas pueden resultarnos de ayuda a la hora de gestionar aplicaciones abiertas, mover ventanas y hacer otro tipo de tareas menos frecuentes para la gran mayoría. Como por ejemplo, abrir el narrador o las notificaciones animadas.
- Tecla de inicio de Windows + número: Abrir el escritorio e iniciar la aplicación anclada a la barra de tareas en la posición del número.
- Tecla de inicio de Windows + Mayús + número: Abrir el escritorio e iniciar una nueva instancia de la aplicación anclada a la barra de tareas en la posición del número
- Tecla de inicio de Windows + Ctrl + número: Abrir el escritorio y cambiar a la última ventana activa de la aplicación anclada a la barra de tareas en la posición del número
- Tecla de inicio de Windows + Alt + número: Abrir el escritorio y abrir la lista de accesos directos de la aplicación anclada a la barra de tareas del número indicado.
- Tecla de inicio de Windows + Ctrl + Mayús + número: Abrir el escritorio y abrir una nueva instancia de la aplicación ubicada en la posición determinada en la barra de tareas como administrador
- Tecla de inicio de Windows + Tabulador: Abrir la Vista de tareas
- Tecla de inicio de Windows + Flecha arriba: Maximizar la ventana
- Tecla de inicio de Windows + Flecha abajo: Quitar la aplicación actual de la pantalla
- Tecla de inicio de Windows + Flecha izquierda: Maximizar la ventana de la aplicación o del escritorio en el lado izquierdo de la pantalla
- Tecla de inicio de Windows + Flecha derecha: Maximizar la ventana de la aplicación o del escritorio en el lado derecho de la pantalla
- Tecla de inicio Windows + Inicio: Minimizar todo excepto la ventana del escritorio activa (repetir la acción para restaurar todas las ventanas)
- Tecla de inicio de Windows +Mayús+Flecha arriba: Expandir la ventana del escritorio a la parte superior e inferior de la pantalla
- Tecla de inicio de Windows +Mayús+Flecha abajo: Restaurar/minimizar las ventanas del escritorio activas verticalmente conservando el ancho
- Tecla de inicio de Windows +Mayús+Flecha izquierda o derecha: Mover una aplicación o ventana del escritorio de un monitor a otro
- Tecla de inicio de Windows +Barra espaciadora: Cambiar entre el idioma de entrada y la distribución del teclado
- Tecla de inicio de Windows + Ctrl + Barra espaciadora: Cambiar a una entrada seleccionada anteriormente
- Tecla de inicio de Windows + Ctrl + Entrar: Abrir el Narrador
- Tecla de inicio de Windows + barra diagonal (/): Iniciar la reconversión de IME
- Tecla de inicio de Windows + Ctrl + V: Abrir notificaciones animadas
viernes, diciembre 14, 2018
Send Anywhere
Send Anywhere is a file sharing application that takes an easy, quick, and unlimited approach to file sharing. Cloud sharing or storage services often offer a promise of unlimited file storing and sharing but their speeds and usability is compromised. Send Anywhere is for anyone wanting to share quality content, quickly, from any device to anyone in the world.
jueves, noviembre 22, 2018
martes, noviembre 20, 2018
IP Webcam

https://play.google.com/store/apps/details?id=com.pas.webcam
Esta aplicación permite configurar una celular una cámara de red (por ejemplo: http://192.168.0.9:8080/
La imagen de la cámara, tanto trasera como delantera, puede ser vista por cualquier usuario de la red.
Para que sea visible desde Internet se debe redireccionar un puerto de la IP Pública a la IP de la cámara.
viernes, noviembre 16, 2018
domingo, noviembre 04, 2018
The 10 Best Online Whiteboards with Realtime Collaboration
De: https://getvoip.com/blog/2016/09/14/online-whiteboard-collaboration/
| AwwApp | Realtime Board | Whiteboard Fox | Web Whiteboard | Conceptboard | Tiwddla | Groupboard | Scribblar | Ziteboard | Limnu | |
| Free Plan | Yes | Yes | Yes | Yes | Yes | Yes | Yes | No | Yes | Free Trial |
| Basic Plan Price | $10/mo | $35/mo | N/A | N/A | $28.50/mo | $14/mo | $9.90/mo | $14/mo | $8/mo | $5/mo |
| Free Plan Board Limit | One Board | 3 | Unlimited | Unlimited | 50 | 1 | 1 | N/A | 3 | 15 |
| Free Plan Guest Limit | Unlimited, Draw Only | 3 draw, unlimited view | Unlimited | Unlimited | Unlimited | Unlimited | 5 | N/A | Unlimited | Unlimited |
| Basic Plan Board Limit | 10 | Unlimited | N/A | N/A | Unlimited | 1 | 2 | 5 | Unlimited | 300 |
| Basic Plan Guest Limit | Unlimited, View or Draw | Unlimited | N/A | N/A | Unlimited | Unlimited | Unlimited | 5 | Unlimited | Unlimited |
| Slack Integration | DIY | Yes | DIY | DIY | DIY | DIY | DIY | DIY | Yes | Yes |
| Undo Function | Yes | Yes | Yes | Yes | Yes | Yes | No | Yes | Yes | Yes |
| Duplication | No | Yes | No | No | Yes | Yes | No | Yes | Yes | No |
| Multiple Ink Colors | Yes | Yes | Yes | Yes | Yes | Yes | Yes | Yes | Yes | Yes |
| Multiple Pen Widths | Yes | Yes | No | Yes | Yes | Yes | Yes | Yes | Yes | Yes |
| Clear Entire Board | Yes | No | Yes | No | No | Yes | Yes | Yes | Yes | No |
| Text Support | Yes | Yes | Yes | Yes | Yes | Yes | Yes | Yes | Yes | Yes |
| Post-It/Sticky Notes | No | Yes | No | Yes | Yes | Yes | No | No | Yes | Yes |
| Built in Chat | No | Yes | No | No | Yes | Yes, voice | Yes | Yes | No | No |
| Image Embed | Yes | Yes | Yes | Yes | Yes | Yes | Yes | Yes | Yes | Yes |
| File Embed | No | Yes | No | No | Yes | Yes | No | Yes | Yes | No |
| Export Board | No | Yes | Yes | Yes | Yes | Yes | No | Yes | Yes | Yes |
jueves, noviembre 01, 2018
domingo, octubre 21, 2018
Sincronizar dos carpetas en la red–ROBOCOPY
Una alternativa es utilizar la opción “Espejo” (MIRROR) de ROBOCOPY.
Los comandos necesarios se pueden incluir en un .archivo .bat y programar la ejecución de ese .bat con con Programador de Tareas, para que se ejecute con la frecuencia o intervalos que se desee.
En la sintaxis de Robocopy se deberan usar las opciones /MIR y /E que indican que “espeje” ambas carpetas, todos sus archivos y subcarpetas.
Ej:
robocopy \\computerA\FolderA \\computerB\FolderB /E /MIR
Incluirlo en un archivo .bat file, y en el Programado de Tareas programarlo para que se ejecute la sincronización en los momentos en que se dese.
Documentación de robocopy: https://technet.microsoft.com/en-us/library/cc733145(v=ws.11).aspx
How to Create a Backup Script using ROBOCOPY Command
From: https://www.sevenforums.com/tutorials/187346-robocopy-create-backup-script.html
 Information
There are many paid and free software solutions available to backup critical data and files on a computer system. Many users, however, are unaware of an inbuilt Windows 7 command called ROBOCOPY (Robust File Copy) that allows users to create simple or highly advanced backup strategies.
In its simplist form, ROBOCOPY can be likened to an extension of XCOPY on steroids. Some of the more important features that make ROBOCOPY an attractive backup alternative are:
- multi-threaded copying
- mirroring or synchronisation mode between the destination and source
- automatic retry and copy resumption
http://technet.microsoft.com/en-us/library/cc733145(WS.10).aspx
and also here:
http://www.theether.net/download/Mic...s/robocopy.pdf
or by simply typing robocopy /? at a cmd window prompt.
 Note
Note
ROBOCOPY is a FOLDER copier, not a FILE copier - the source and destination syntax arguments in ROBOCOPY can only be folder names.
 Creating a BACKUP strategy
The easiest way to use the ROBOCOPY command to create a backup strategy is by creating a batch (.BAT) file. A batch file is a simple text file, that when executed, runs several commands one after the other.
Step 1
Click  and in the search box, type notepad. Select Notepad to open up a new blank Notepad document.
Step 2
Type the ROBOCOPY commands into the Notepad document, save it as a .BAT file, and then execute it.
In the example below, I have 3 folders (Data1, Data2, and Data3) containing some data that I wish to backup. One folder is located on E: drive and the other two are located on F: drive. I wish to back these up as follows:
Data1 folder on E: backup to a folder called Backups on G: (external USB drive)
Data2 folder on F: backup to a folder called Backups on G: (external USB drive)
Data3 folder on F: backup to a folder called Backups on Q: (network storage drive)
The general format of the ROBOCOPY command is:
Code:
robocopy <source> <destination> <options>
In the empty Notepad document, the simplist form of the command would look like this:
Code:
robocopy E:\Data1 G:\Backups\Data1
robocopy F:\Data2 G:\Backups\Data2
robocopy F:\Data3 Q:\Backups\Data3
pause
 Tip
Tip
If source or destination paths contain spaces in them, enclose these in double quotes e.g. "C:\My Data\My Music"
Only the source
- E:\Data1
- F:\Data2
- F:\Data3
- G:\Backups\Data1
- G:\Backups\Data2
- Q:\Backups\Data3
Tip
The PAUSE command at the bottom of the .BAT file allows the cmd window to stay open after it has completed to allow me to see the output from ROBOCOPY.
If I save the .BAT file to my Desktop, and run it by double-clicking it, then a cmd window is opened and the .BAT file executes the three ROBOCOPY commands as shown below.

The same information is repeated for every ROBOCOPY line in the .BAT file.
In order to utilise some of the powerful functionality in ROBOCOPY, I need to utilise some options in the ROBOCOPY command line. In this next example I want to edit my existing backup strategy such that:
- All sub-folders within my data folders are backed up, even if they are empty.
- The backup only copies newer files to my existing backup - this means a faster backup time.
- The percentage progress counter for copying is not shown - this neatens the overall appearance of the ROBOCOPY information, and creates a smaller log file.
- The information normally echoed to the cmd window is saved to a log file that I can examine at a later stage.
Code:
robocopy E:\Data1 G:\Backups\Data1 /e /mir /np /log:backup_log.txt
robocopy F:\Data2 G:\Backups\Data2 /e /mir /np /log+:backup_log.txt
robocopy F:\Data3 Q:\Backups\Data3 /e /mir /np /log+:backup_log.txt
pause
Where:
/e = copy all sub-folders, even empty ones
/mir = mirror (check the files in the destination, and only copy newer files)
/np = no progress counter
/log: = create a logfile
Tip
Note the use of the /log+: option in the 2nd and 3rd line of the .BAT file. This option ensures that the results of the 2nd and 3rd ROBOCOPY are appended to the log file created in the 1st ROBOCOPY line, meaning I only need one log file to capture all the information I backup.
The log file is always saved to the same folder as the .BAT file - in my case, the folder is saved to my Desktop.
Since the output from ROBOCOPY is written to the log file, the cmd window will not display the output from ROBOCOPY. If I wish to have this information written to both the log file and the cmd window for visual tracking of the backup process, then I can add the /tee option to each line in the .BAT file, as shown below.
Code:
robocopy E:\Data1 G:\Backups\Data1 /e /mir /np /tee /log:backup_log.txt
robocopy F:\Data2 G:\Backups\Data2 /e /mir /np /tee /log+:backup_log.txt
robocopy F:\Data3 Q:\Backups\Data3 /e /mir /np /tee /log+:backup_log.txt
pause
This is an example of the typical output to the the log file - it looks exactly the same as what is echoed to the cmd window.
Code:
-------------------------------------------------------------------------------
   ROBOCOPY     ::     Robust File Copy for Windows
-------------------------------------------------------------------------------
  Started : Sun Sep 18 23:35:01 2011
   Source : E:\Data1\
     Dest : G:\Backups\Data1\
    Files : *.*

  Options : *.* /S /E /COPY:DAT /PURGE /MIR /R:1000000 /W:30
------------------------------------------------------------------------------
                    2 E:\Data1\
------------------------------------------------------------------------------
               Total    Copied   Skipped  Mismatch    FAILED    Extras
    Dirs :         1         0         1         0         0         0
   Files :         2         0         2         0         0         0
   Bytes :   442.1 k         0   442.1 k         0         0         0
   Times :   0:00:00   0:00:00                       0:00:00   0:00:00
   Ended : Sun Sep 18 23:35:01 2011
Since one of the data folders I am backing up is being copied across a network, I want to ensure that any possible network outages do not cause some critical files to be skipped in the backup. To do this, I can make use of the /z option in the 3rd line of my .BAT file (backup to my network storage) as shown below.
Code:
robocopy E:\Data1 G:\Backups\Data1 /e /mir /np /tee /log:backup_log.txt
robocopy F:\Data2 G:\Backups\Data2 /e /mir /np /tee /log+:backup_log.txt
robocopy F:\Data3 Q:\Backups\Data3 /e /mir /np /z /tee /log+:backup_log.txt
This option implements a "retry" for the copying. If I were part way through the copying process, and I lost connection with the network, then ROBOCOPY would automatically restart the copying at the point of failure once the network connection was re-established. It would retrying a million times every 30 seconds (the default settings shown in the image above). The only drawback with this option, is that it can significantly increase the backup time.
ROBOCOPY also has the ability to perform faster multi-threaded copying by simply using the option /mt. I can choose the number of threads to use by specifying a number between 1 and 128 after the /mt option, or if I just specify /mt without a number then the it will use 8 threads by default. In the example below, I use 4 threads to copy to my USB drive, and 8 threads (no number) to copy to my network drive.
Code:
robocopy E:\Data1 G:\Backups\Data1 /e /mir /np /tee /mt:4 /log:backup_log.txt
robocopy F:\Data2 G:\Backups\Data2 /e /mir /np /tee /mt:4 /log+:backup_log.txt
robocopy F:\Data3 Q:\Backups\Data3 /e /mir /np /z /tee /mt /log+:backup_log.txt
Below is a template that you can use to create your own backup strategy using ROBOCOPY. Simply copy and paste the lines into a blank text document, and then edit as appropriate.
Code:
rem --- Edit the lines below to create your own backup strategy
rem --- The /mir option has been left out for safety sake
rem --- Add more lines for each new folder requiring backup
rem --- Specified 4 threads to use for multi-threaded copying
rem --- The results of the backup can be found in my_backup_log.txt
robocopy <source> <destination> /e /np /tee /mt:4 /log:my_backup_log.txt
robocopy <source> <destination> /e /np /tee /mt:4 /log+:my_backup_log.txt
robocopy <source> <destination> /e /np /tee /mt:4 /log+:my_backup_log.txt
pause
Tip
The can automate your backup's by using the Windows 7 Task Scheduler to run the .BAT file at specific times.
For more information please refer to this tutorial by Orbital Shark:
Task Scheduler - Create New Task
I hope this brief tutorial helps you access the power and simplicity of ROBOCOPY to create some effective backup strategies.
lunes, octubre 08, 2018
Air Explorer
https://www.airexplorer.net/es/
Accede a todas tus nubes
desde un solo programa

Básico
1 cuenta por nube
No encripta
Funciones de sincronización
5 descargas simultáneas
5 subidas simultáneas
Sin limitador de velocidad
Sin contraseña para entrar
Gratis
domingo, octubre 07, 2018
CLOUDBUCKIT
CloudBuckit is a simple desktop application that connects all your favorite cloud storages, FTP and WebDAV servers in one place.
Available on Windows


Duplicati
Duplicati 2.0
Free backup software to store encrypted backups online
For Windows, macOS and Linux

Many Backends
Duplicati works with standard protocols like FTP, SSH, WebDAV as well as popular services like Microsoft OneDrive, Amazon Cloud Drive & S3, Google Drive, box.com, Mega, hubiC and many others.

Features
Backup files and folders with strong AES-256 encryption. Save space with incremental backups and data deduplication. Run backups on any machine through the web-based interface or via command line interface. Duplicati has a built-in scheduler and auto-updater.

Free software
Duplicati is free software and open source. You can use Duplicati for free even for commercial purposes. Source code is licensed under LGPL. Duplicati runs under Windows, Linux, MacOS. It requires .NET 4.5 or Mono.

Strong encryption
Duplicati uses strong AES-256 encryption to protect your privacy. You can also use GPG to encrypt your backup.

Built for online
Duplicati was designed for online backups from scratch. It is not only data efficient but also handles network issues nicely. E.g. interrupted backups can be resumed and Duplicati tests the content of backups regularly. That way broken backups on corrupt storage systems can be detected before it’s too late.

Web-based user interface
Duplicati is configured by a web interface that runs in any browser (even mobile) and can be accessed - if you like - from anywhere. This also allows to run Duplicati on headless machines like a NAS (network attached storage).
Suscribirse a:
Entradas (Atom)