lunes, marzo 09, 2020

Google ID: Cómo crear una cuenta de Google sin un correo de Gmail

De: https://tecnologia.uncomo.com/articulo/como-crear-una-cuenta-de-google-sin-un-correo-de-gmail-23346.html

Existe la posibilidad de tener una cuenta de Google sin necesidad de que dispongas de un correo electrónico de gmail. Esto te será muy útil para disfrutar de servicios gratuitos que ofrece la compañía de Internet, como Google Analytics o Herramientas para webmasters, entre otros. Crear una cuenta de Google con un correo externo es muy sencillo y rápido. Además, te proporcionará la oportunidad de acceder a todos los productos vinculados con Google con tu email profesional, que suele finalizar con el dominio de la web de la empresa. En unComo.com te explicamos cómo crear una cuenta de Google sin un correo de Gmail.

Pasos a seguir:

1

Primero debes acceder a esta web para crear una cuenta de Google y rellenar los siguientes datos:

  • Nombre y apellidos.
  • Correo electrónico. Aunque por defecto te aparezca para rellenar un email acabado en "@gmail" puedes emplear cualquiera.
  • Contraseña. Será la clave que siempre emplearás después para acceder a tu cuenta de Google. Por seguridad, es preferible que no coincida con la contraseña de tu correo electrónico.
  • Fecha de nacimiento.
  • Teléfono móvil. Este dato es opcional siempre que escribas correctamente el Captcha.
  • País.

2

Una vez que hayas aceptado las Condiciones del servicio, Google te enviará un mensaje de verificación al correo electrónico que hayas utilizado para crear tu cuenta de Google sin tener gmail.

3

Normalmente, la compañía tarda unos minutos en enviar este mensaje. Cuando lo recibas, deberas pinchar en el enlace para verificar la cuenta y, después, ya la tendrás creada. Ahora, podrás usar el correo electrónico que empleaste, junto a la contraseña que elegiste, para darte de alta en los productos de Google.

4

Para proteger tu cuenta de Google, tienes la opción de añadir otro correo electrónico, que se emplearía en el caso de que hubiese alguna incidencia.

miércoles, febrero 26, 2020

90 Trucos para WhatsApp la lista definitiva 2018

De: https://www.youtube.com/watch?v=kU4-i295ex8

15 atajos increíbles que no conocías

De: https://www.youtube.com/watch?v=PJxmpUbeOUc

¿Cuáles son los atajos de teclado que todos deberían saber? Si quieres ser un usuario avanzado, no debes negar la utilidad de las teclas de acceso rápido. Mejoran tu experiencia diaria con la computadora y te dan un impulso absoluto en tu productividad. ¡Así que toma un bolígrafo y toma notas, ya que estas combinaciones de teclas de acceso rápido serán útiles para todos los usuarios de Windows y OS X!

Otros videos que te pueden gustar: 15 Formas De Buscar En Google Que El 96% De Las Personas Desconoce https://www.youtube.com/watch?v=VyKXn... 12 Señales de que tu computadora ha sido hackeada https://www.youtube.com/watch?v=iZngv... 15 Increíbles funciones de teléfono que no sabías que existían https://www.youtube.com/watch?v=T4348... MARCAS DE TIEMPO: Crear un escritorio virtual 0:46 Cambiar entre escritorios virtuales 1:24 Regreso al escritorio desde las aplicaciones 2:15. Abre una aplicación desde la barra de tareas 3:04 Pantalla dividida entre dos aplicaciones 3:50 Cambiar aplicaciones 4:24 Gestión de programas y resolución de problemas 5:27 Abrir el Explorador de archivos 6:17 Usa la lupa 6:48 Tomar capturas de pantalla 7:41 Usa el Centro de Acción 8:24 Accede a los ajustes 9:02 Habla con Cortana o Siri 9:22 Usa la barra de juegos de Windows 10:02 Bloquea tu PC 11:20 Música por Epidemic Sound https://www.epidemicsound.com/ RESUMEN: - Presiona la tecla de Windows + Ctrl + D o Control + Arriba si usas una Mac. Cambiará a un nuevo escritorio nuevo. - Presiona la tecla de Windows + Ctrl o la tecla Control en una Mac. Ahora puedes cambiar entre todos los escritorios virtuales que has creado utilizando las teclas de flecha izquierda y derecha. - Si tienes demasiadas aplicaciones abiertas y necesitas usar otra oculta detrás de todas las ventanas de tu escritorio, puedes minimizarlas todas al mismo tiempo presionando la tecla de Windows + M. - Si deseas un acceso mucho más rápido a las aplicaciones más utilizadas, considera mantenerlas en la barra de tareas. Acelerará tu flujo de trabajo aún más si utilizas la siguiente combinación: la tecla de Windows + una tecla numérica del 1 al 9. - Abre una aplicación que necesites para tu trabajo y presiona la tecla de Windows + flecha izquierda. Luego, abre otra aplicación y haz clic en la tecla de Windows + flecha derecha. Ahora, dos ventanas están compartiendo tu pantalla! - Presionando Ctrl + Alt + Tab te mostrará todas las aplicaciones que se ejecutan actualmente en tu PC. - Para evitar reiniciar tu dispositivo y perder todo tu progreso, prueba el siguiente combo: Ctrl + Shift + Esc o Command + Option + Escape si estás trabajando en una Mac. - Al presionar la tecla de Windows + E se abre la ventana del administrador de archivos en tu PC. Para usuarios de Mac, esta es tu aplicación Finder. - La tecla de Windows combinada con la tecla + o - abrirá la aplicación de la lupa, lo que te permite acercar y alejar la imagen donde apunta el cursor. - Usa la tecla de Windows + Imprimir pantalla para tomar una captura de pantalla e inmediatamente guárdala en la carpeta Imagen en tu disco duro. - Para abrir Bluetooth, presiona simultáneamente la tecla de Windows + A. Para usuarios de Mac, su Centro de notificaciones está siempre a un clic en la esquina superior derecha. - ¡Si necesitas más ajustes o acceso a parámetros más avanzados de tu PC, puedes tenerlo todo! Usa la tecla de Windows + I para hacer eso. - Para abrir Cortana en Windows en modo de audición, presiona la tecla de Windows + C. Y para invocar a Siri en Mac OS, mantén presionado Comando y Espacio. "¡Hola Siri!" - Si de repente necesitas alejarte de la computadora pero no quieres que nadie se entrometa en tus cosas, puedes bloquear rápidamente tu perfil de usuario. Simplemente presiona la tecla de Windows + L o Shift + Command + Q en una Mac.

miércoles, octubre 02, 2019

Analizarán la sangre de los autónomos para investigar por qué nunca enferman

17 de marzo de 2015

elmundotoday.com/2015/03/analizaran-la-sangre-de-los-autonomos-para-investigar-por-que-nuncaenferman


Investigadores del CSIC tomarán muestras de la sangre de cientos de autónomos
españoles para averiguar el motivo por el que nunca se ponen enfermos. También
procurarán descubrir por qué no necesitan vacaciones ni una vida familiar estable para
conservar su salud mental.
“Los autónomos son capaces de subsistir sin tener asegurado el suministro regular de
ingresos y comida. En algunos casos, llegan incluso a reproducirse. No tienen una joroba
como los camellos o los dromedarios, ni varios estómagos como las vacas, por lo que es
un auténtico milagro que sobrevivan estando tan expuestos a la precariedad”, admite el
doctor Israel Graulio, funcionario del CSIC que describe a los autónomos como “una
extraordinaria y exótica forma de vida”.
Los expertos sospechan que los autónomos comparten con los primeros organismos
que se formaron en la Tierra esa capacidad para florecer en condiciones muy adversas.
“Muchos de ellos trabajan sin contrato. Para mí, que soy funcionario desde los veintidós
años, es como ver una planta crecer sin tierra, encima de un trozo de plástico”, insiste
Graulio.
Los científicos creen que, si se descubren las claves que permiten a los autónomos vivir
en la permanente inestabilidad, resistiendo altas presiones durante horas, el resto de los
seres humanos podría superar multitud de enfermedades y dejar de necesitar periodos de descanso que lastran su productividad en entornos laborales.
“Puede que la clave esté en las pizzas frías que comen de pie frente a la pantalla del
ordenador. O en el hecho de no salir de casa durante días. Hay que estudiarlo muy a
fondo, aunque da pereza porque hay mucho curro por delante”, explica el investigador.
El CSIC está experimentando desde hace meses con un ejemplar de “freelance” al que
sacan sangre de vez en cuando. “Es increíble. Le llamas un domingo por la noche y le
pides una cosa para ayer, y te la hace. Le dices que no sabes ni cuánto ni cuándo le vas a
poder pagar porque estas cosas ya sabes cómo van, que está todo muy mal, y se encoge
de hombros y te dice que vale”, relata el doctor Graulio.
“Necesitamos más muestras de vida autónoma y muchas más horas para experimentar.
Lo que pasa es que, entre la pausa para el bocata y el cigarrillo, las bajas del personal y la
excedencia que he pedido esta semana, creo que no podremos empezar la investigación
hasta el año que viene. Ya sabes cómo van estas cosas”, asegura el especialista del CSIC.
Lo más probable, pues, es que la experimentación se externalice. “Es más práctico que
los autónomos se investiguen a sí mismos y nos pasen un informe lo antes posible.
Además nos saldrá mucho más barato”, concluyen desde la institución.

miércoles, septiembre 11, 2019

OneDriveMapper

OneDriveMapper automatically map your OneDrive for Business upon login

This script maps your Onedrive / Sharepoint / Teams document libraries to driveletters (or shortcuts). It can be used in any environment (VDI, RemoteApp, w10 etc).

Para Onedrive Personal ver más abajo

Calificaciones

4,6 Star

(111)

Descargado63.552 veces

Favoritos Agregar a favoritos

CategoríaOffice 365

Subcategoría

SharePoint Online

Última actualización03/02/2019

Licencia

MIT

Traducido al

English

Etiquetas

Powershell, Office 365, citrix, Sharepoint Online, webdav, Logon Script, OneDrive, document library, RemoteApp, Drive Maps, Onedrive for Business

Notificar abuso a Microsoft

Descripción

Preguntas y respuestas (191)

Comprobado en las siguientes plataformas

Windows 10
Sí

Windows Server 2012
Sí

Windows Server 2012 R2
No

Windows Server 2008 R2
Sí

Windows Server 2008
Sí

Windows Server 2003
No

Windows Server 2016
No

Windows 8
Sí

Windows 7
Sí

Windows Vista
No

Windows XP
No

Windows 2000
No

El autor probó el script en estas plataformas. Es probable que también funcione en otras plataformas. Si lo prueba y descubre que funciona en otra plataforma, agregue una nota a la discusión de scripts para informarlo a otras personas.

https://gallery.technet.microsoft.com/OneDriveMapper-automaticall-d7d498b0


Descarga alternativa

https://drive.google.com/file/d/1WpmeR-HAzTZtzPIkBK9pm7ol6TNpXR5G/view?usp=sharing


Para Onedrive Personal

https://www.youtube.com/watch?v=50RnLmCJ95w&t=2s

martes, julio 09, 2019

Redirección dominios “desnudos” (Naked Domain)

http://wwwizer.com/naked-domain-redirect

Naked Domain Redirect FAQ

What is naked domain redirect?

wwwizer.com provides free service – naked domain redirect. That helps with "naked domain problem".

What is a "naked domain" problem? Do I have it?

Naked domain problem means that your website doesn't work without www in front. So if you havewww.example.com website it can be opened only by entering full name. When someone enters only example.com (notice no www in front) the error is shown.

Yes, I can see error on my website. Why is that?

In short: it happens because of the way DNS works and because your hosting provider or publishing platform does not support www-less websites.

Long explanation: your hosting provider has a lot of servers and all of them can show your website. But there is no way to know which particular server will process requests to your website. So your provider providing you with a CNAME record for your website. And you (or provider on your behalf) put that record into www.example.com name. But there is a catch: it is not possible to put CNAME-record into www-less or "naked" name. Only particular server's IP-address must go there. wwwizer.com gives you that address.

How wwwizer.com can solve this problem?

We can redirect (for free!) all visitors from example.com to www.example.com.

How this redirect works?

Every visitor to your "naked domain" (example.com) will be redirected to www.example.com. It is done with HTTP 301-redirect, and all parameters and full path is preserved.

How can I use this service?

Point your "naked domain" (example.com not www.example.com!) to IP address 174.129.25.170

Previous answer is too short. Is there a typo?

No typo. All you need to do to redirect visitors from example.com to www.example.com is: point your naked domain A-record to the IP address 174.129.25.170. And it will start to work as soon as your DNS updates.

Even no sign up necessary.

But the home page tells about SSL for the cloud. Is free domain redirect here to stay?

Free naked domain redirect will continue to work, there are no plans to stop providing it.

If I still have questions?

Follow links on our How To Use page. These are real-world examples of wwwizer.com usage.

Back to home page.

viernes, junio 14, 2019

Añadir y eliminar prefijo en nombres de ficheros

De: https://www.adslayuda.com/foro/topic/23974-a%C3%B1adir-y-eliminar-prefijo-en-nombres-de-ficheros/

Copiar renombrar múltiples archivos con un solo comando

AÑADIR PREFIJO DM- A CTF-*.* = DM-CTF-*.*
ELIMINAR DM- DE DM-CTF-*.* = CTF-*.*
AÑADIR PREFIJO DM- A BR-*.* = DM-BR-*.*
ELIMINAR PREFIJO DM- DE DM-BR-*.* = BR-*.*
AÑADIR PREFIJO DM- A AS-*.* = DM-AS-*.*
ELIMINAR PREFIJO DM- DE DM-AS-*.* = AS-*.*
AÑADIR PREFIJO DM- A DOM-*.* = DM-DOM-*.*
ELIMINAR PREFIJO DM- DE DM-DOM-*.* = DOM-*.*
AÑADIR PREFIJO DM- A ONS-*.* = DM-ONS-*.*
ELIMINAR PREFIJO DM- DE DM-ONS-*.* = ONS-*.*
AÑADIR PREFIJO DM- A VCTF-*.* = DM-VCTF-*.*
ELIMINAR PREFIJO DM- DE DM-VCTF-*.* = VCTF-*.*


Ren CTF-*.* DM-CTF-*.*
Ren DM-CTF-*.* CTF-*.*
Ren BR-*.* DM-BR-*.*
Ren DM-BR-*.* BR-*.*
Ren AS-*.* DM-AS-*.*
Ren DM-AS-*.* AS-*.*
Ren DOM-*.* DM-DOM-*.*
Ren DM-DOM-*.* DOM-*.*
Ren ONS-*.* DM-ONS-*.*
Ren DM-ONS-*.* ONS-*.*
Ren VCTF-*.* DM-VCTF-*.*
Ren DM-VCTF-*.* VCTF-*.*


sábado, junio 01, 2019

Agregar dominio propio a Googe Sites - G Suite y Personal

Map a Custom Domain URL (G Suite) - new Google Sites

https://www.steegle.com/google-sites/how-to/map-domain-web-address-g-suite

Instructions


G Suite Web Address Mapping

  1. Make sure your site is published and note its published URL
  2. Sign in to your G Suite admin console (admin.google.com ⇗)
  3. Go to Apps, G Suite, Sites and expand Web address mapping (Aplicaciones –> G Suite –> Configuración de Google Sites).
  4. Use the Add web address link and make sure you choose new Sites from the Version drop-down.
  5. Choose the primary or secondary domain in Site Location that the site is published to
  6. Enter the published URL of the site in Site Location and enter the web address you want the site to appear at in Web Address
  7. Use the Add Mapping link and G Suite will instruct you to add the appropriate DNS records (a CNAME record that points to ghs.googlehosted.com - this is with your domain provider) and once added use the I've completed these steps option

G

Map a custom domain URL in G Suite to a new Google Sites

Full screen video ⇗

Capabilities

  • Make your new Google Site appear at your own domain
  • Traffic to your site is secured via SSL (https) without any further configuration

Limitations

  • If you made your site with a personal Google Account or Gmail account then please see Assign Custom URL Domain Web Address (Personal)
  • To map a secondary domain you need to create a site with a user account that uses the secondary domain as its sign in domain. This allows you to publish the site to the secondary domain. For more info see our demo.

Notes

  • This takes time to process so your site will not appear immediately at the web address
  • If the mapping does not work within an hour try again

domingo, mayo 12, 2019

Get share link of multiple files in Google Drive to put in spreadsheet

De: https://webapps.stackexchange.com/questions/88769/get-share-link-of-multiple-files-in-google-drive-to-put-in-spreadsheet

3

2

I've got 200+ jpegs in a folder and need shareable links for each jpeg in a spreadsheet. Is there a way to do this without doing the right clicking thing for each image individually?

google-drive links

shareimprove this question

edited Jan 16 '16 at 22:00


ale

42.3k25111255

asked Jan 16 '16 at 21:48


Leon Moon

16112

add a comment

2 Answers

activeoldestvotes

2

Yes, you can select all these files and get shareable links to them at once.

  1. Select files
  2. Right-click any of them and pick "Share.." out of the context menu.
  3. Click "Get shareable links" in the upper right corner of the Share dialog window. This does several things at once: makes files accessible to anyone with a link, and copies the links to your clipboard.
  4. Paste into the spreadsheet. The copied links are newline-separated, so when pasted into a spreadsheet, they form a neat column.

12.3k71736

answered Jan 17 '16 at 5:45

user79865

A method without painful clicking is the following:

Open the desired Google Drive folder and get the [ID] in its URL from the browser location bar:

https://drive.google.com/drive/u/0/folders/[ID]

Open a new Google Sheet and navigate Tools > Script editor.
In the new script, put (replace the [ID] in the code):

function myFunction() {
  var ss=SpreadsheetApp.getActiveSpreadsheet();
  var s=ss.getActiveSheet();
  var c=s.getActiveCell();
  var fldr=DriveApp.getFolderById("REPLACE_[ID]_HERE");
  var files=fldr.getFiles();
  var names=[],f,str;
  while (files.hasNext()) {
    f=files.next();
    str='=hyperlink("' + f.getUrl() + '","' + f.getName() + '")';
    names.push([str]);
  }
  s.getRange(c.getRow(),c.getColumn(),names.length).setFormulas(names);
}

Run the script (after having saved it and granted permissions) and revisit the Google Sheet, which should now contain the list of URLs.

(I stole most of this from https://productforums.google.com/forum/#!topic/docs/0ilSDjhFnHI)


https://chrome.google.com/webstore/detail/extract-drive-links/klonacpfbangpegffkdopiilfdhgjhgo


De: https://www.syncwithtech.org/google-drive-direct-links/ 

https://gsuite.google.com/marketplace/app/drive_direct_links/520711270513

How to Get Direct Download Links of Google Drive Files

Published: 6th Feb, 2018

Last Updated: 13th Apr, 2019

3 min read

3 years ago, I had shared a tool to generate direct download link for a Google Drive file. But what if you need to create direct links for the files inside a specific folder or simply all your drive files. There's a Sheets Add-on which lets you do it.
Google Drive Direct Download links

How to Generate direct links

Upon installation, it requires permission to access your Google drive files.
Basically, there are two ways you can use this add-on.

1. Files inside specific folders

Using this feature, you can select the list of folders you want. All the files inside those folders will be exported to a sheet.

2. All the files inside Google drive

Simply all your files are exported to a sheet.

File details include folder name, path of the folder on Google Drive, file name, direct link & with whom you've shared the file. Each row on spreadsheet represents a file on your Drive.
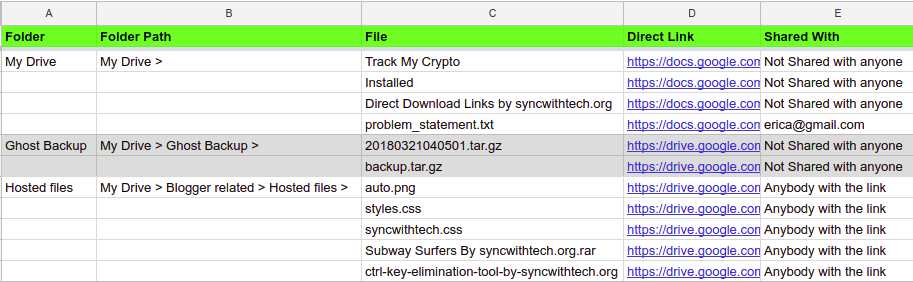
drive-direct-link-sheet

How to install & use

You can install the Add-on using this link - Direct Download links for Google Drive. Click INSTALL, it will ask for your permission. Click Continue and choose your Google account to authorize the app.

Now you're all set to use the Add-on, on your sheet select Add-ons → Direct Drive Links → Generate Links. A pop-up opens as showed in the image below.
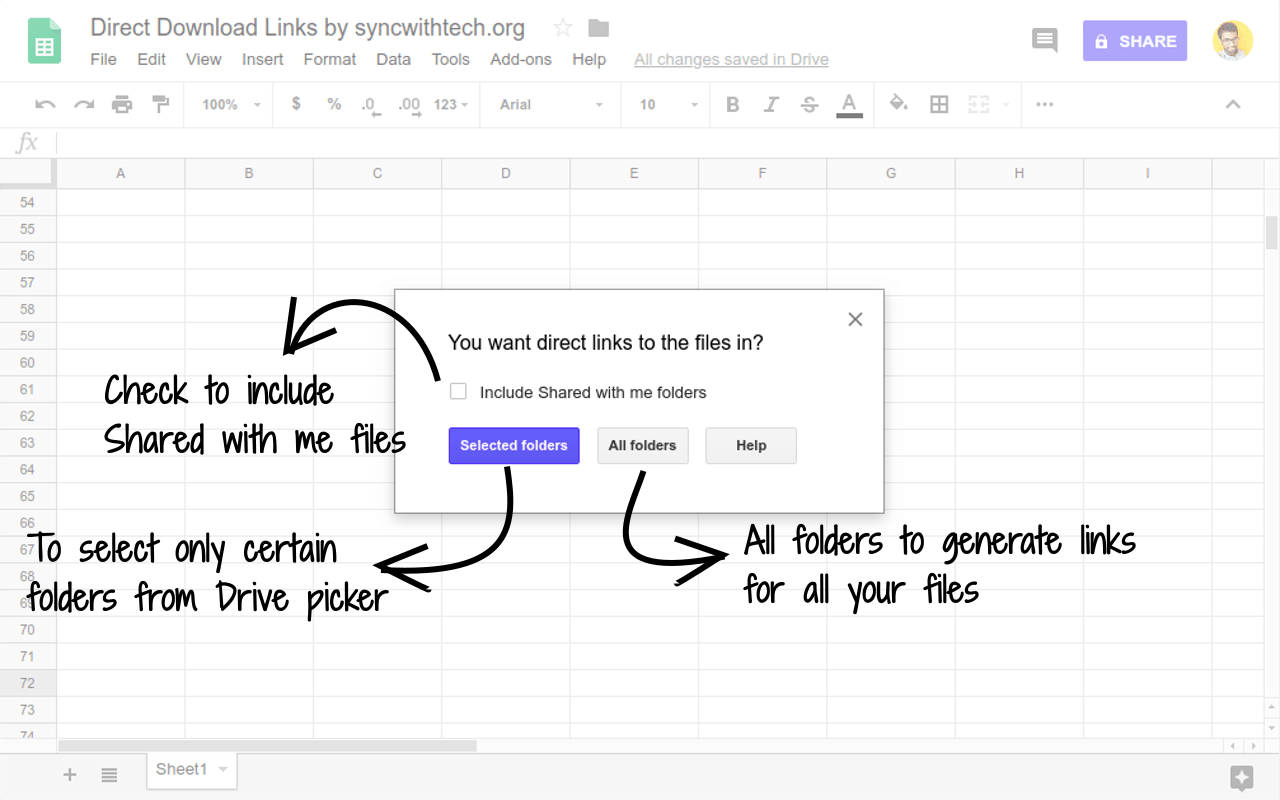
drive direct links sheets add-on select-folder-prompt

If you choose Selected folders, folder picker pop-up opens and you can select the folders you want. When you select All folders, the pop-up closes and a sheet opens with details of all your Google Drive files.

If you need links to the files shared with you, you have to tick the Include Shared with me folders checkbox.

Selected folders

Once you pick the folders, a pop-up opens with the list of folders you select. From that pop-up, you can add/remove a folder.
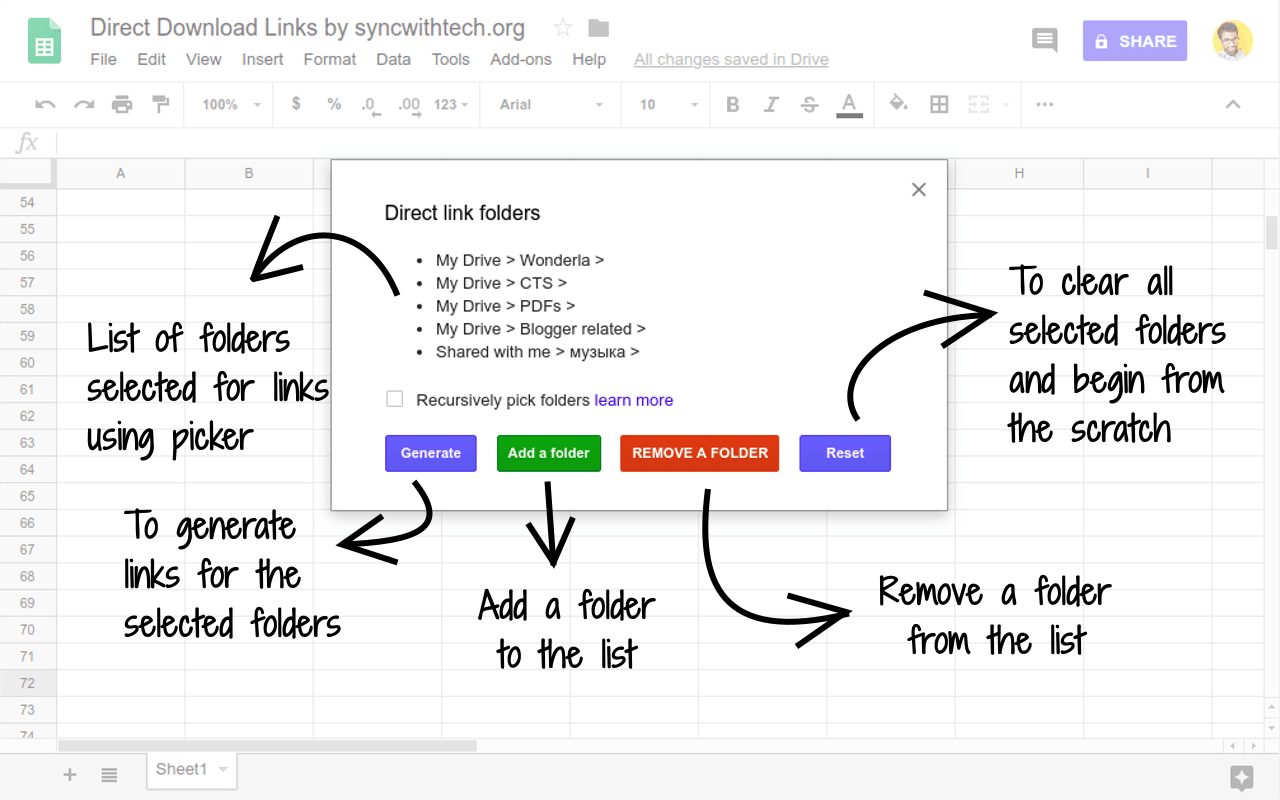
drive direct links sheets add-on folder list modal

You have to tick Recursively pick folders, if you want to cover the files inside nested folders. To explain this, let's take the following file system hierarchy.

    My Drive
    |--Folder 1
    |  |--File 1
    |  |--Folder 11
    |     |-- File 11
    |--Folder 2

Here, My Drive has two folders Folder 1 and Folder 2. Folder 1 contains a file File 1 and a folder Folder 11. Let's say your folder list contains only,

My Drice > Folder 1 >

So, if you select Generate without opting for recursive operation, you'll end up with File 1 info alone. If you had ticked the checkbox, your sheet will also have Folder 11 and File 11 entry.

Note: The sheet will generate pdf download links for Google Documents, Sheets and Presentations by default, however, you can change that by replacing pdf with xlsx or doc or pptx.

The best thing is you can also use this add-on as a Google Drive file manager by opting for All folders in the prompt. It'll simply list all your files.

Settings and Configuration

At any point of time, you can change the way you use this add-on. For example, if you want to pick folders after selecting all folders, you can do that by selecting Add-ons → Direct Drive Links → Select folders for links.

If you had selected too many unwanted folders and want to remove all at once, you can select Reset on the folder list pop-up.

For now, there are two configurations for you to use according to your needs,

1. Auto refresh

By default, whenever you open the sheet, it'll refresh the links automatically for you. But if you open the sheet more than once between 6-hour interval, automatic refresh won't happen. If you want to get the links to newly added files in the meantime, you can use Refresh Links option that's available under Add-ons → Direct Drive Links.

You can also disable the auto refresh option altogether, select Add-ons → Direct Drive Links → ✓ Autorefresh on open.

2. Repeat folder names

There is an option for you to repeat the folder path & names in column 2 & 3. When you sort by filename, to know within which folder every file is, you can use this. It is by default disabled, to enable it, just select Add-ons → Direct Drive Links → Repeat folder names. You can toggle if you want to disable later.

Open folders on Google Drive

Hover over the folder name in the first column and click on the link to view the folder contents on Google Drive.

Update Share details

If any of the files are not shared with anyone or you want to share that with more people, you can do that using your sheet, all you have to do is, hover over the file name for which you want to update share details, click on the link, you'll be redirected to the file preview page.

On the top right corner of the page, left to your profile picture, click on the menu and then Share. Now you can share that file with anyone you want.

Issues and Feature requests

If you run into any issues or you want any feature to be added to this add-on, do leave a comment on this post. I'll see what best I can do.

Ganapathy S

Written by Ganapathy, a Web developer by profession and a tech enthusiast.

Comments

domingo, abril 28, 2019

How to Partition USB Drive in Windows 7/8/10 Simply?

https://www.disk-partition.com/articles/how-to-partition-usb-drive-3889.html

USB hard drive or memory card, as the removable storage, is the most ordinary device in people’s daily life. They are widely used for storing important data and files, system backup images, for example. One of the most important advantages of them, when put into use is their portability. People can transfer data and files between computer and different removable storage devices conveniently and smoothly.

Sometimes, you do need to multi partition your Kingston or SanDisk USB drive, like create a partition or format one partition. For example, the file system of your memory card is showing RAW, it means the partition on the flash drive is corrupted or lost. You need to create a new partition first and then format the damaged one.

Therefore, the question of how to partition USB drive will come into your sight. Actually, you can perform this task using both Diskpart and free partition manager -- AOMEI Partition Assistant Standard. Connect USB drive to your PC first and make sure it is detected by Windows.

How to partition USB drive using Diskpart?

Firstly, open Diskpart by pressing Windows key and R key (same time), type in “diskpart” in the pop-up window and then hit Enter. For Windows 7 and XP, click on Windows icon, select “Command Prompt” & click “Run as Administrator”. For Windows 8, press Windows key and X key (same time), click “Command Prompt (Admin)”.

Note: To execute a command line, please press Enter key after your each move.

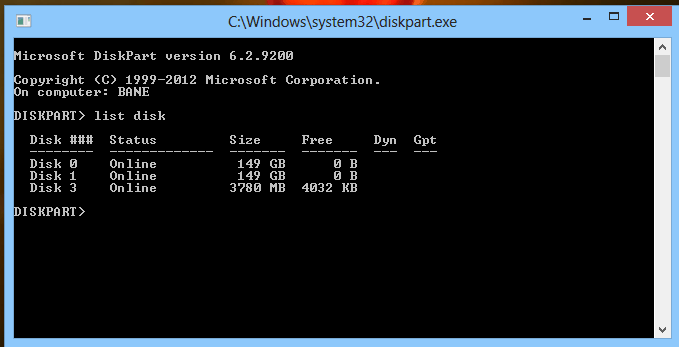
Secondly, enter “list disk”. Then you will see all your disks (it is important you know which disk is the USB key).

Diskpart 1

Thirdly, enter “select disk *” (* stands for the USB key)-> enter “clean”-> “list part”.

Fourthly, enter “create partition primary”-> “list part”, and then enter “select part 1”-> “active”-> enter “format fs=fat32 label=’Tabernus’” (label is optional).

Diskpart 2

The process may take some time. However, all steps in Diskpart are  irreversible. So to get better simple and easy-to-use solution, you’d better turn to AOMEI Partition Assistant for help. As a mighty and comprehensive partition manager, AOMEI Partition Assistant can help you under following cases:

  • USB drive partition has been corrupted.
  • Format USB hard drive or memory card that command line doesn’t work.
  • Resetting and wiping out all existing data to become a blank USB drive.
  • Make a bootable USB drive.
  • Simply reset and reformat a USB drive.

This free tool allows you to partition USB flash drive to NTFS or FAT32 in Windows 10/8/7/XP. Download AOMEI Partition Assistant Standardfree edition and have a try.

Partition USB drive with AOMEI Partition Assistant

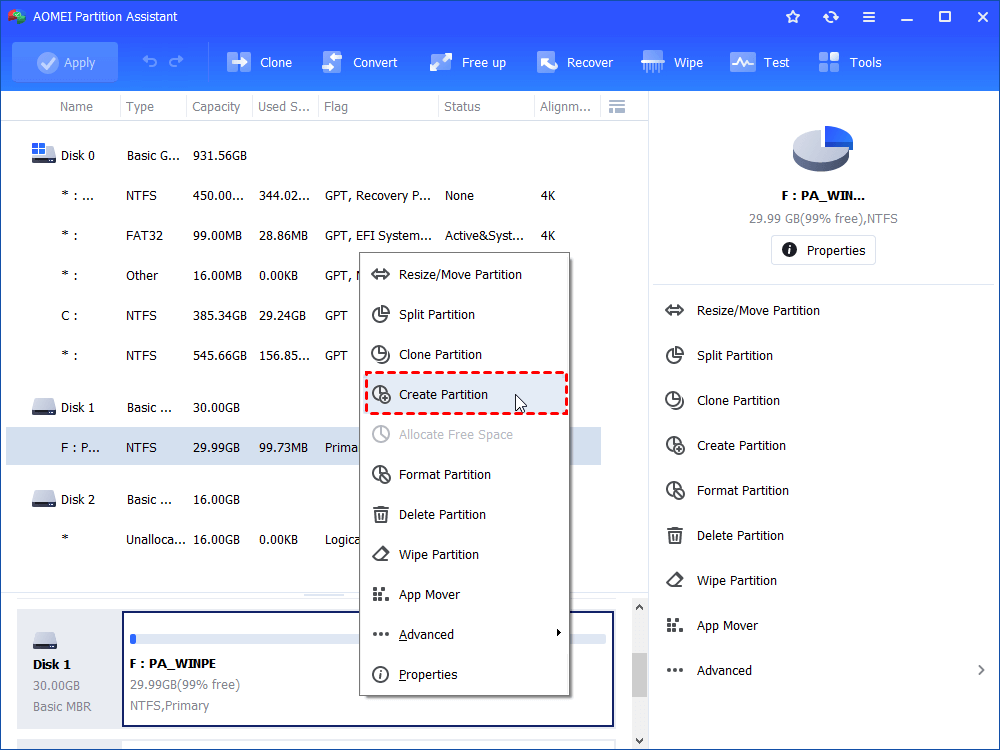
Step 1. Install and launch AOMEI Partition Assistant. Right-click the USB drive, select “Create Partition”. You can pitch on the USB drive and select “Create Partition” on the left panel, too.

Create Partition on Removable Drive

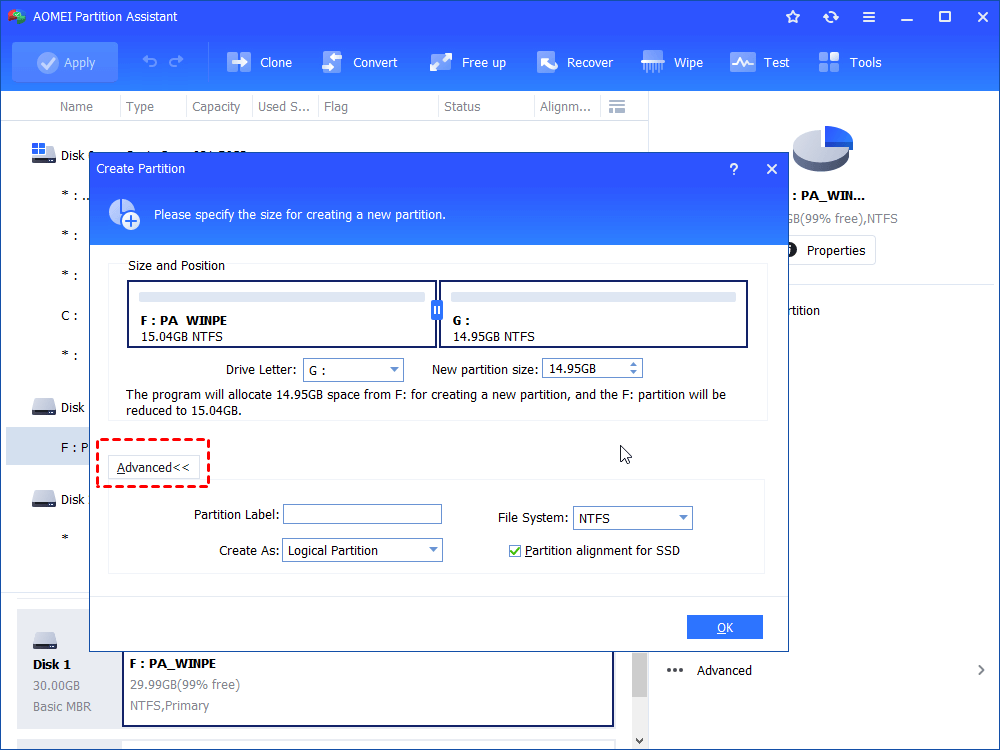
Step 2. Specify the size and drive letter for the new partition. You can also edit partition label, file system under Advanced tab.

Resize New Partition on Removable

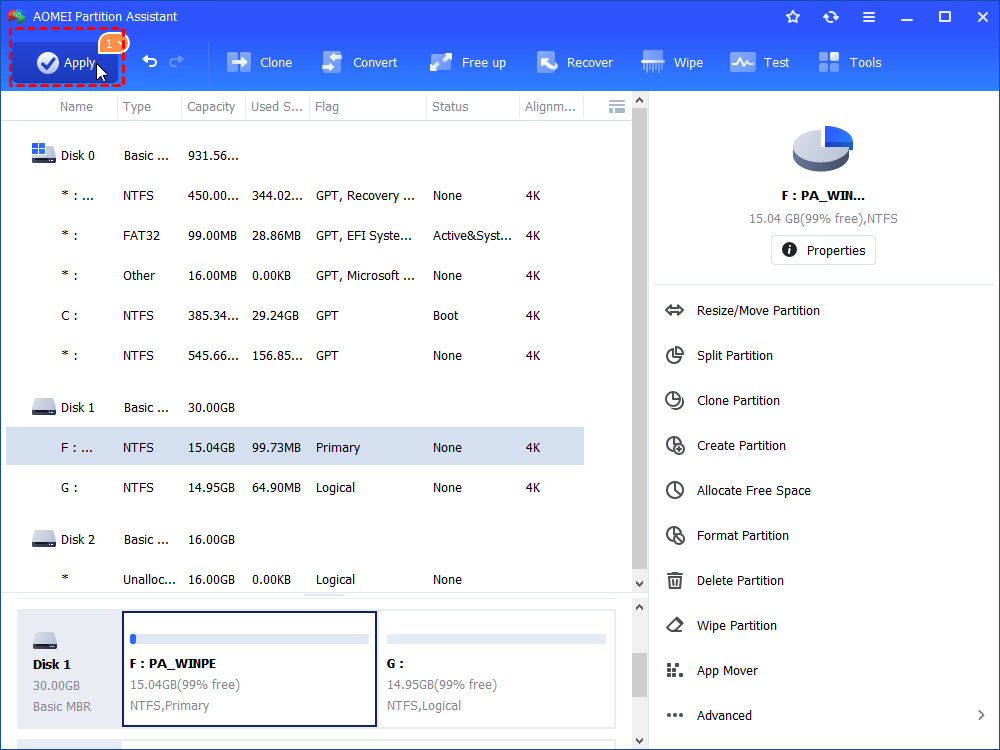
Step 3. Then you get a new partition G: in your USB drive. Click “Apply”.

Apply Create- Partition on Removable

Tips:

*You can multi partition your USB drive via AOMEI Partition Assistant by repeating above steps.

*Please note that Windows will recognize only the first primary partition on a removable device. Therefore, after this operation, the second partition will not have a drive letter and showing in Windows Explorer. However, you can keep two partitions be recognized in other operating systems like Linux.

Conclusion

Here two ways on how to partition USB drive in Windows are offered. You can easily find out which one is simpler and more straightforward. With AOMEI Partition Assistant, you can partition your USB drive in three simple steps instead of complicated command line operations. Other than partitioning USB drive, you can partition C drive, merge partitions or convert NTFS to FAT32 without data loss using AOMEI Partition Assistant. However, nothing is going to be changed unless you download it and start to use it, so just enjoy it. If you have more demands like quick partition, migrating OS from GPT to GPT and so on, you can upgrade AOMEI Partition Assistant to Professional edition.

sábado, abril 20, 2019

Advanced Renamer: renombrar archivos

https://www.advancedrenamer.com/

Advanced Renamer is a program for renaming multiple files and folders at once. By configuring renaming methods the names can be manipulated in various ways.
It is easy to set up a batch job using multiple methods on a large amount of files. The 14 different methods enables you to change the names, attributes, and timestamps of files in one go. The files can also be copied or moved to new locations based on information in the files.
With Advanced Renamer you can construct new file names by adding, removing, replacing, changing case, or giving the file a brand new name based on known information about the file.
Before performing the operations on the files you can verify that the output will be correct and if you perform the rename and regret it, you can undo the complete batch.