viernes, septiembre 28, 2018

Accesos WebDAV

https://community.cryptomator.org/t/webdav-urls-of-common-cloud-storage-services/75


This is a list of the most common WebDAV URLs you need to enter into the iOS and Android app if you want to connect to your cloud storage service.

Cloud Storage Service
URL

1&1 Online-Speicher (DSL)
https://sd2dav.1und1.de

1&1 Online-Speicher (Webhosting)
https://webdav.office.1und1.de

blaucloud
https://{username}.blaucloud.de/remote.php/webdav

Box
https://dav.box.com/dav

Cubby
https://webdav.cubby.com

freenetcloud
https://webmail.freenet.de/webdav

GMX MediaCenter
https://webdav.mc.gmx.net

HiDrive
https://webdav.hidrive.strato.com

IDrive
https://dav.idrivesync.com

MagentaCLOUD
https://webdav.magentacloud.de

Mail.Ru
https://webdav.cloud.mail.ru

Nextcloud
https://{host}/{path}/remote.php/dav/files/{username}

ownCloud
https://{host}/{path}/remote.php/webdav

pCloud
https://webdav.pcloud.com

Seafile (self-hosted)
https://{host}/{path}/seafdav

STACK
https://{username}.stackstorage.com/remote.php/webdav

Strato HiDrive
https://webdav.hidrive.strato.com

Syncwerk (formerly Seafile.de)
https://app.syncwerk.com/seafdav

WEB.DE Online-Speicher
https://webdav.smartdrive.web.de

wölkli
https://cloud.woelkli.com/remote.php/webdav

Yandex.Disk
https://webdav.yandex.com

Mailbox.org
https://dav.mailbox.org/servlet/webdav.infostore/

jueves, septiembre 27, 2018

Connecting Securely to Microsoft OneDrive with WebDAV and WinSCP

https://winscp.net/eng/docs/guide_microsoft_onedrive

Connecting Securely to Microsoft OneDrive with WebDAV

With WinSCP you can easily upload, manage or backup files on your Microsoft OneDrive cloud storage over WebDAV protocol.

Before starting you should have the latest version of WinSCP installed.

Find out your “OneDrive customer ID”:

  • In your web browser, login to your OneDrive.
  • After you log in, your URL should be like:
    https://onedrive.live.com/?id=root&cid=ABCDEFGHIJKLMNOP
    The ABCDEFGHIJKLMNOP part is your “customer ID”. Select it and copy it to the clipboard.

Start WinSCP. Login dialog will appear. On the dialog:

  • Make sure New site node is selected.
  • On the New site node, select WebDAV protocol and TLS/SSL Implicit encryption.
  • Enter d.docs.live.net into the Host name box.
  • Enter your Microsoft account username/email into the User name box.
  • Enter your Microsoft account password into the Password box.
  • Press the Advanced button to open Advanced site settings dialog and go to Environment > Directories page.
  • Paste your “OneDrive customer ID” into the Remote directory box and add a slash in front of it, i.e. like /ABCDEFGHIJKLMNOP.
  • Submit the Advanced site settings dialog with the OK button.
  • Save your site settings using the Save button.
  • Login using the Login button.

Further reading


Guides: https://winscp.net/eng/docs/guides

Useful Scripts: https://winscp.net/eng/docs/scripts

miércoles, septiembre 12, 2018

How to connect to a remote SQL Server

De: https://www.sqlshack.com/how-to-connect-to-a-remote-sql-server/

Comentarios: El puerto que usé en el Firewall es el 1433, TCP (no UDP). No hice nada con el puerto 1434.

No fue necesario agregar una regla Custom para abrir el Firewall para el programa MSSQL$SQLEXPRESS.

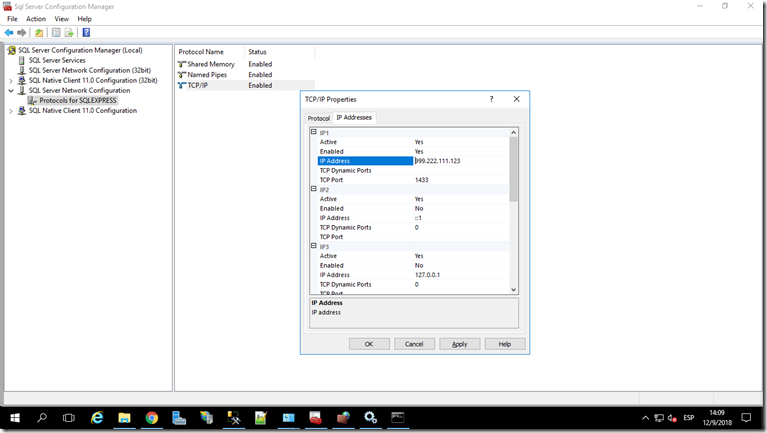
En SQL Server Network Configuration, se configuró, donde 999.222 etc. es la IP Pública

image

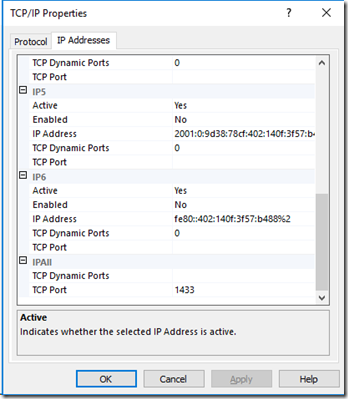
Adicionalmente, en IPAll dejar TCP Synamic Portes en blanco, NO 0 (cero) y en TCP Port 1433

image

 Artículo original

n this article, we will explain step by step how to connect remotely to a SQL Server Express instance. Remote access is the ability to get access to a SQL Server from a remote distance in order to manipulate data which are located on that SQL Server.

There are two types of adjustments which must be set before connecting to the remote SQL Server. These settings are important because without them the connection to the remote SQL Server will not be able to be successfully created

Configuration settings:

  1. The SQL Server instance to allow the protocol being requested
  2. Allow access through the Window Firewall

In order to allow access to SQL Server instance, we have to enable TCP/IP protocol which is not enabled by default. TCP/IP (Transmission Control Protocol/Internet Protocol) is a set of protocols developed to allow networked computers to share resources over the network. It was developed by DARPA under the ARPANET in the early 1970s.

In order to establish a successful remote connection is to set up appropriate ports through the Window Firewall. In SQL Server there are two types of instances. First is a default instance and the second is a named instance. To connect to the default instance of Database Engine, or named instance that is the only instance installed on the machine, the TCP port 1433 is the only port that you need to specify.

But if you have multiple name instances installed on your machine, to connect with one of them, we must provide a port number which corresponding to appropriate instance name. By default named instance used dynamic port, which means that every time when the Database Engine starts new port number is assigned. Because of that it is difficult to configure Windows Firewall to enable access.

In order to resolve this problem, there is a SQL Browser service, which provide the TCP port number that corresponds to the named instances. The SQL Browser services use UDP port 1434. Now we met with the basic matters relating to remote connection, let’s continue with the setup procedure.

Enabling TCP/IP protocol

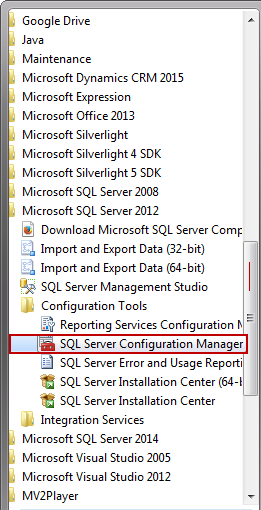
The first step is to enable TCP/IP protocol on the SQL Server service. Open the SQL Server Configuration Manager in the Configuration Tools folder under the Microsoft SQL Server folder:

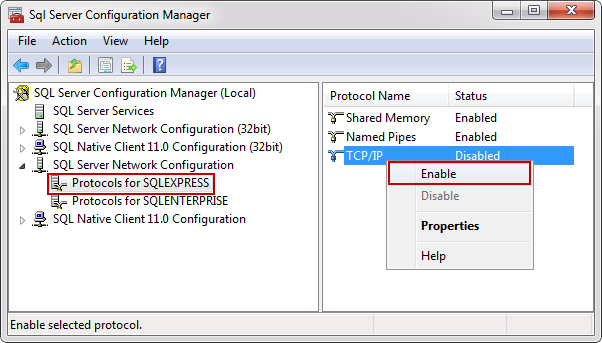
From the SQL Server Network Configuration node, select the Protocols item for the appropriate SQL Server. In the details pane, right click the TCP/IP item and select the Enable option:

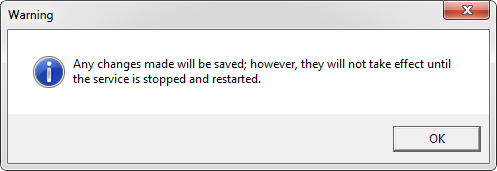
After this step the Warning box pop up in which informs us that changes that are made won’t take effect until the next time service is started.

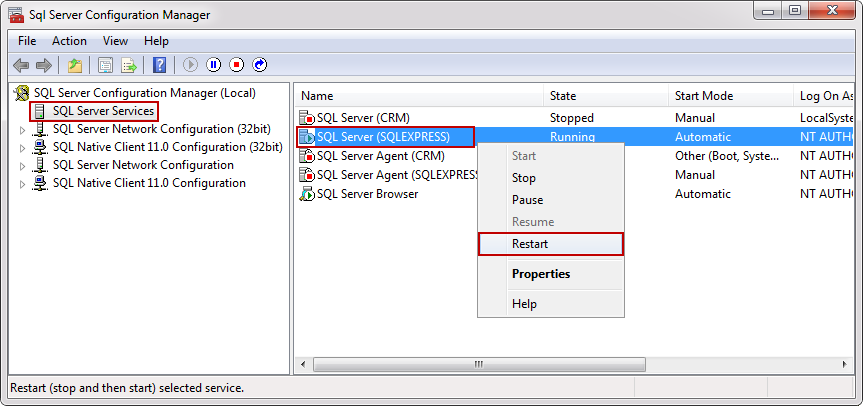
In order for the changes take effect, from console pane, select the SQL Server Services and from the details pane, right click the SQL Server (SQLEXPRESS) database engine instance and click the Restart option:

Now the service started with TCP/IP enabled, but still can’t connect remotely until we configure the Windows Firewall.

Configuring Windows Firewall

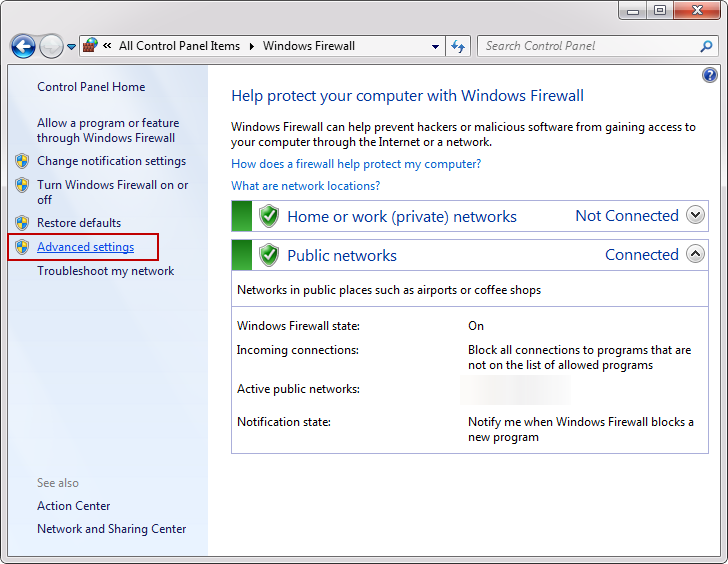
From the Control Panel choose Windows Firewall and click the Advanced settings or just type wf.msc in Search program and files from the Start menu:

  • Inbound Rules: You can allow or block traffic attempts to access the computer that matches certain criteria in the rule. By default inbound traffic is blocked, to allow traffic to access computer, you need to create inbound rule.
  • Outbound Rules: You can allow or block traffic originating from specifying computer creating rules. By default outbound traffic is allowed, so you need to create the rule that block outbound traffic.

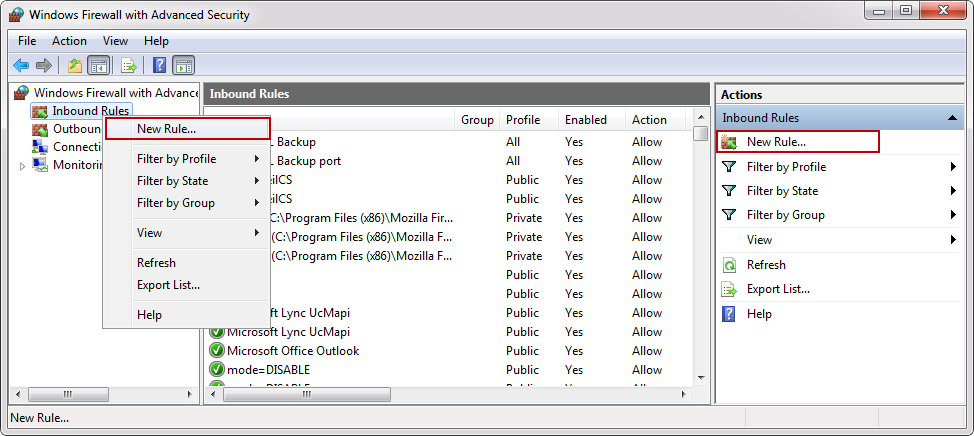
In the Windows Firewall with Advanced Security, click the Inbound Rules from the left pane, right click Inbound Rules and select the New Rule or from the Actions pane click the New Rule:

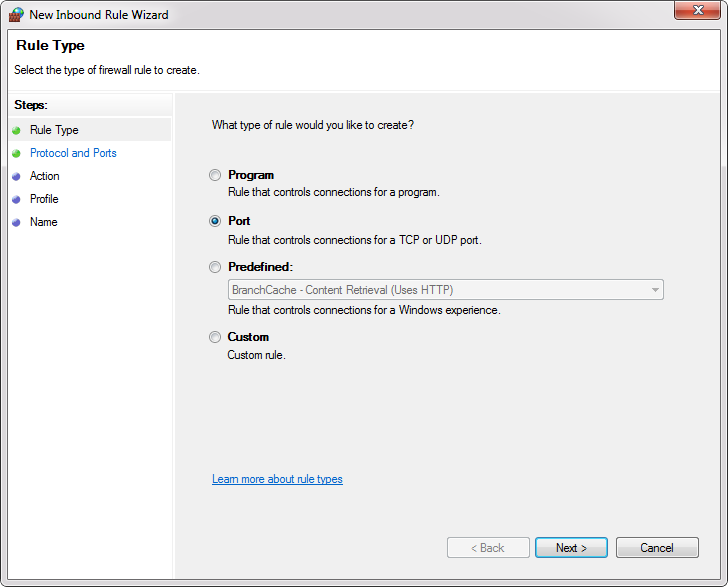
On which you will click, it’s up to you. In both case the New Inbound Rule Wizard will appear. Under the Rule Type choose Port and click the Next button:

From this link you can more informed of all rule types which are shown in the image above.

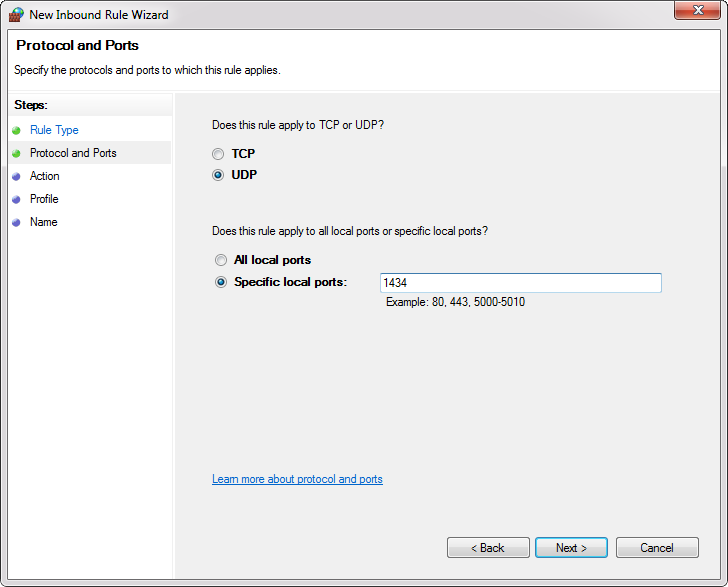
In the Protocols and Ports there are a several options that you can choose, depending on which type of protocols you select.

If you are wondering what is the difference between the TCP and UDP protocols you can find from this link.

As we mentioned at the beginning of the article TCP is used for the default instance and named instance if is the only instance installed on the machine and default port is 1433.

  • All local ports: Rule applies on all ports from the selected protocol.
  • Specific local ports: In the text box you specify a port or set of ports to which the rule applies.

For this example, select the UDP protocol and in the Specific local ports enter port number 1434. To proceed with the settings SQL Browser services, click the Next button:

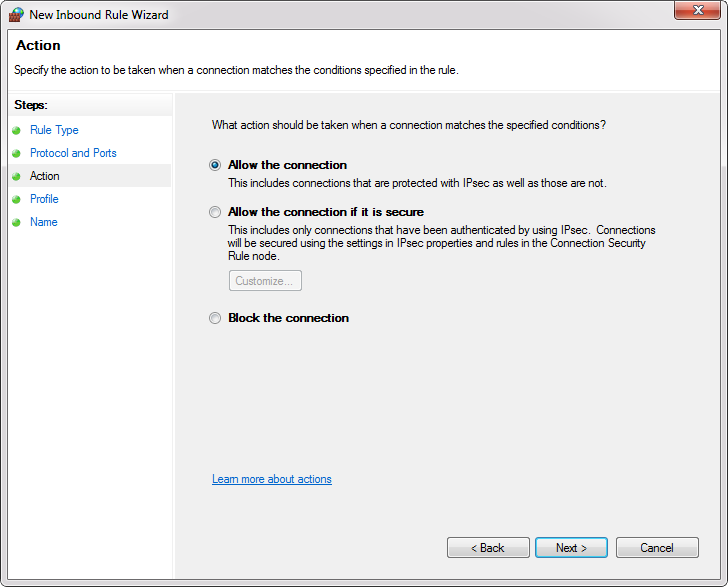
  • Allow the connection: Includes all connections secure and insecure.
  • Allow the connection if it is secure: Includes only connection if it is made through a secure channel.
  • Block the connection: Blocks all connections secure and insecure.

In the Action dialog choose Allow the connection and click the Next button:

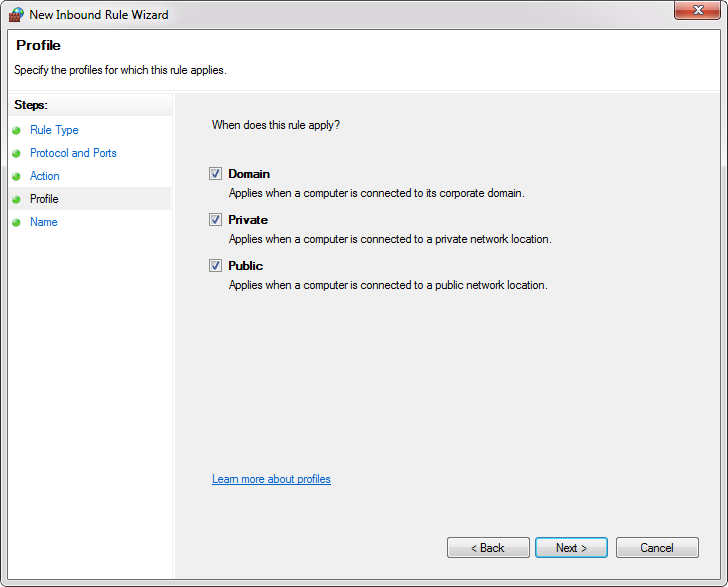
  • Domain: The setting is applied only when a computer is connected to a domain.
  • Private: The setting is applied when a computer is connected to a network that is identified as a private network.
  • Public: The setting is applied when a computer is connected to untrusted public network.

In the Profile dialog choose all three profiles and click the Next:

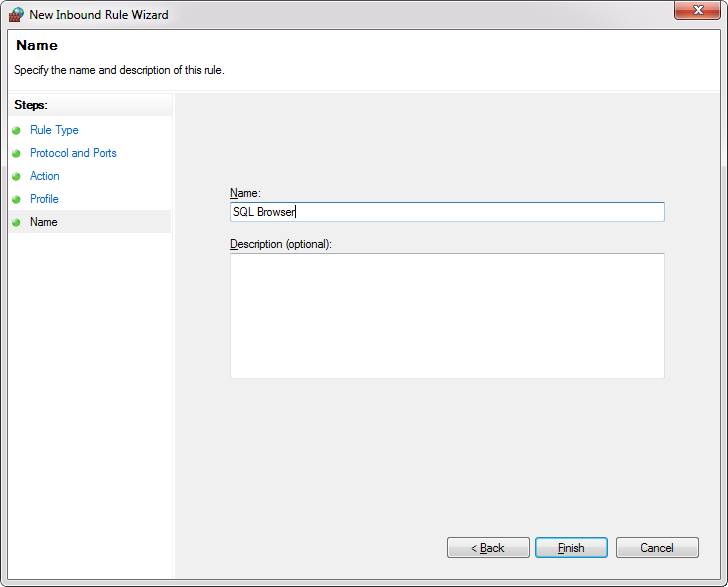
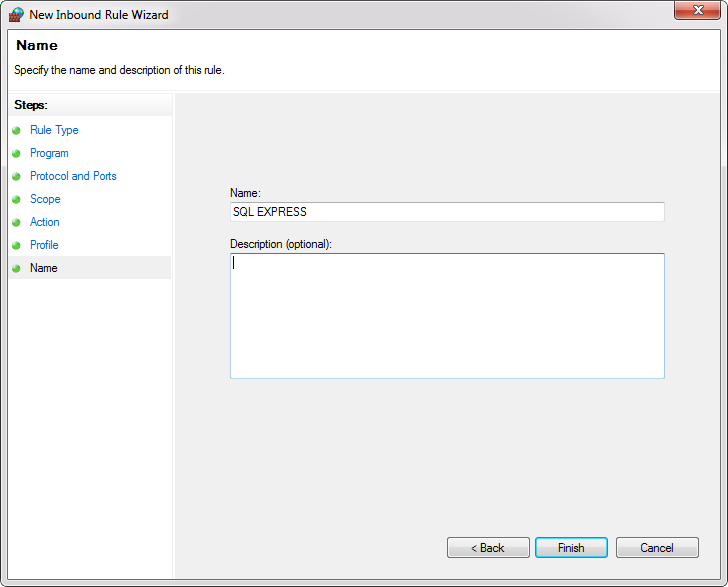
On this step give the rule a name and click the Finish.

Note: When we give the name of the rule, please write some descriptive name that you can understand later, when you need to find them or edit in the Inbound Rules list.

Now create an allow rule for the database engine instance.

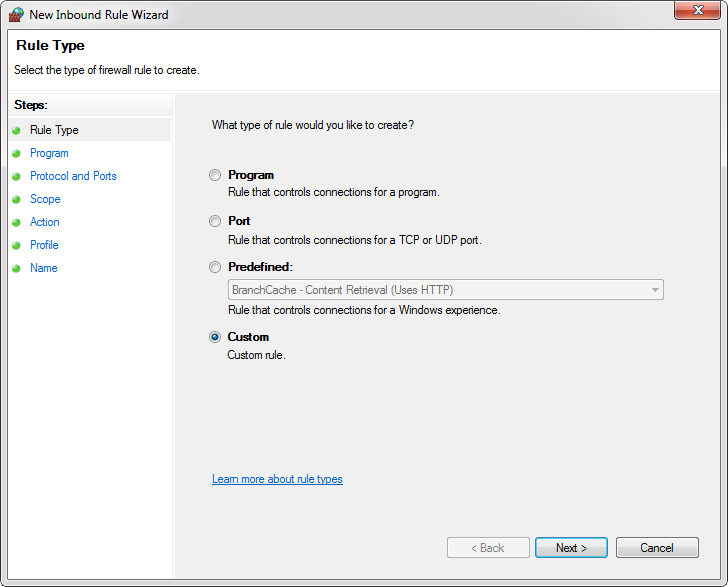
Go to the New Rule and from the Rule Type select the Custom rule:

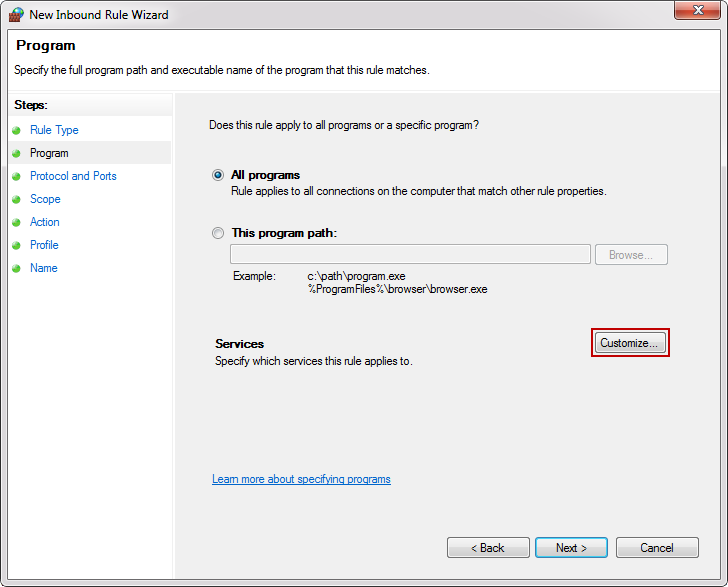
In the Program under the Services click the Customize button:

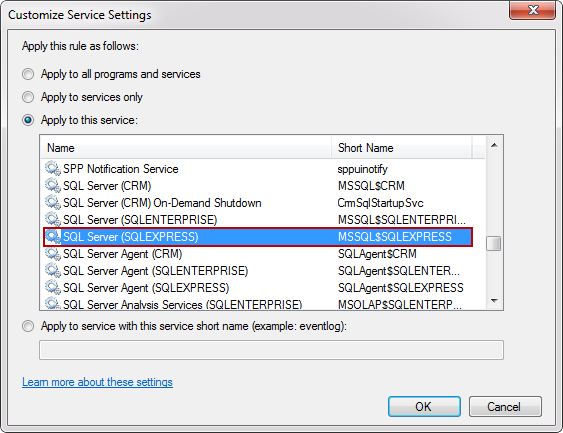
From the Customize Service Settings under Apply to this service select database engine instance service and click the OK button:

Then click the Next all the way to the Name dialog, give rule a name and click the Finish:

Now when all rules are set up, you are ready to connect to remote SQL Server.

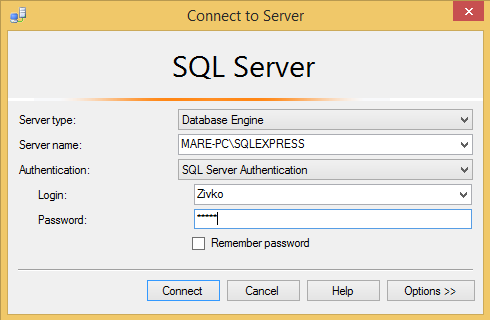
Start the SQL Server, in the dialog window for the Server name enters the name of the instance that you want to connect with. From the Authentication drop down box, select the SQL Server Authentication and for the field Login and the Password enter your credentials then click the Connect button.

martes, septiembre 04, 2018

miércoles, agosto 29, 2018

Add ‘Open With’ To The Top

This registry hack comes from Superuser JosefZ.

Open Notepad and paste the following. Save it with the name OpenWith, and the REG extension.

Windows Registry Editor Version 5.00

[HKEY_CLASSES_ROOT\*\shell\.OpenWith]
"Position"="Top"

[HKEY_CLASSES_ROOT\*\shell\.OpenWith\command]
@="{09799AFB-AD67-11d1-ABCD-00C04FC30936}"

Run the file with admin rights, and accept the on-screen warning. Once it’s been added, right-click any file, and you will see Open With at the top. Select it, and you will see the default Windows app picker menu that lets you select an app to open the file with.

You can still double-click a file and open it in the default app assigned to it. This registry edit will not interfere with the default functionality for opening files. Apps add their own options to the context menu will not be able to push this option further down the menu.

If you decide you don’t need this option anymore, go to the following location, and delete the key you added.

HKEY_CLASSES_ROOT\*\shell\.OpenWith

This little hack isn’t for everyone. Perhaps you prefer the Open option to remain at the top or you prefer a different option appear at the top. This is hack is for anyone that needs to open the same file type in multiple apps and doesn’t want to be bothered going through a rather long list of options to find the right one.

You may have noticed that after adding this key to the registry, the default Open With option doesn’t go away. This key doesn’t do anything to it which is why it remains where it is regardless if you’ve added the key or not. Touching the default Windows Open With option is probably a bad idea anyway. This registry file adds a new option that you can delete any time without worrying about breaking anything.

martes, agosto 28, 2018

Limpiar el disco rígido en forma automática–. Windows 10

Clean out your hard disk

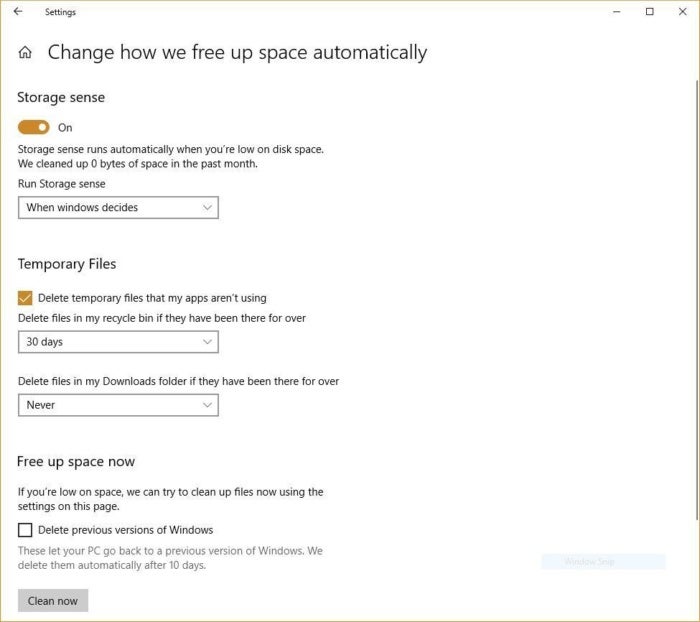
If you’ve got a bloated hard disk filled with files you don’t need, you could be slowing down your PC. Cleaning it out can give you a speed boost. Windows 10 has a surprisingly useful built-in tool for doing this called Storage Sense. Go to Settings > System > Storage and at the top of the screen – in the Storage Sense section – move the toggle from Off to On. When you do this, Windows constantly monitors your PC, and deletes old junk files you no longer need; temporary files; files in the Downloads folder that haven’t been changed in a month; and old Recycle Bin files.

You can customize how Storage Sense works and also use it to free up even more space than it normally would. Underneath Storage Sense, click “Change how we free up space automatically.” From the screen that appears, you can change how often Storage Sense deletes files (every day, every week, every month or when Windows decides). You can also tell Storage Sense to delete files in your Download folder, depending on how long they’ve been there. And you can also set how long to wait to delete files in the Recycle Bin automatically.

storage sense Here’s how to customize the way Storage Sense works, and to tell it to delete old versions of Windows.

You can also delete old versions of Windows that might be hogging space. At the bottom of the screen, check the box next to “Delete previous versions of Windows.” Storage Sense will then delete old versions of Windows ten days after you’ve installed an upgrade. Note that if you do this, you won’t be able to revert to the older version of Windows.

domingo, agosto 19, 2018

Cameyo

https://www.cameyo.com/

WINDOWS APPLICATIONS TO ANY DEVICE

Permite correr una aplicación Windows dentro de un Internet browser, por ejemplo Chrome.

Funcioan como un Terminal Server o una conexión de Escritorio Remoto pero sin sotware adicional.

jueves, julio 05, 2018

MultCloud.com Sync

From: https://www.multcloud.com/tutorials/sync-cloud-drive-1004.html

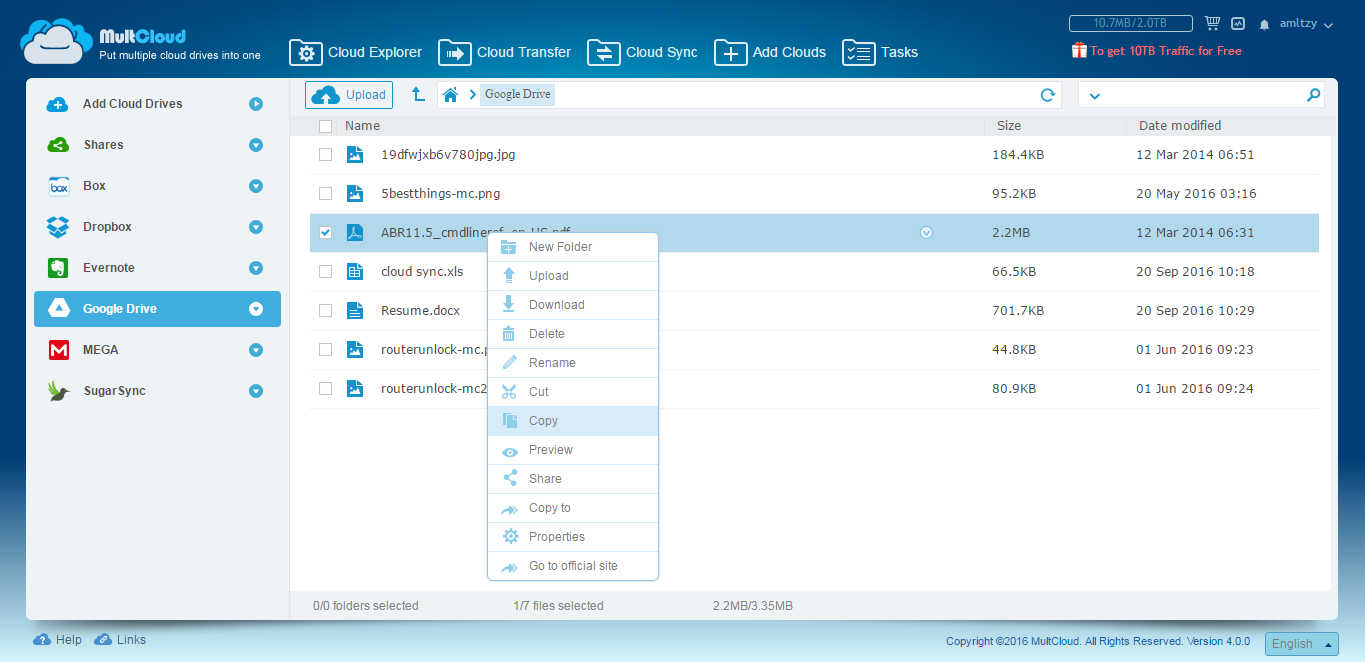
Next is the key step. Under File Manager interface, we can manage files in cloud like in Windows explorer. Before syncing, we suggest you to refresh the content in your cloud by clicking the refresh icon. Moving from Google Drive to another has many methods. “Copy” or ”Copy to” from contextmenu; direct drag&drop. All clouds in MultCloud can be synced.

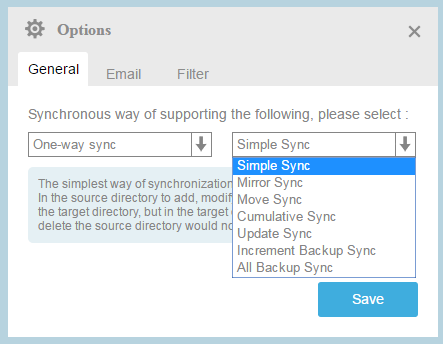
Switch to Cloud Sync Service interface, you can set more options of cloud syncing. MultCloud has eight syncing ways. They are:

  • Simple Sync: In the source directory to add, modify, and delete will be reflected to the target directory, but in the target directory to add, modify, and delete the source directory would not be affected.
  • Mirror Sync: Always keep the target directory in the file and the source directory is exactly (MultCloud will delete unnecessary files in the target directory).
  • Move Sync: After the complete synchronization, delete all the files in the source directory.When the source directory file deletion, dont delete the corresponding files in the target directory.
  • Cumulative Sync:When the source directory file deletion, dont delete the corresponding files in the target directory.
  • Update Sync: Delete all files in the target directory first, then will increase in the source directory and modify the file transfer to the target directory.
  • Incremental Backup Sync: In every time synchronization, will create a new subdirectory in the target directory, so that the new and modified in the source directory file transfer to the subdirectory.
  • All Backup Sync: In every time synchronization, will create a new subdirectory in the target directory, so that all the source directory file transfer to the subdirectory.

    *Note: Above seven methods are One-way Sync.

  • Two-way Sync: In the source directory to add, modify, and delete will be reflected to the target directory, at the same time in the target directory to add, modify, and delete will be reflected in the source directory (also is the beginning and keep the files in the source directory and the target directory).

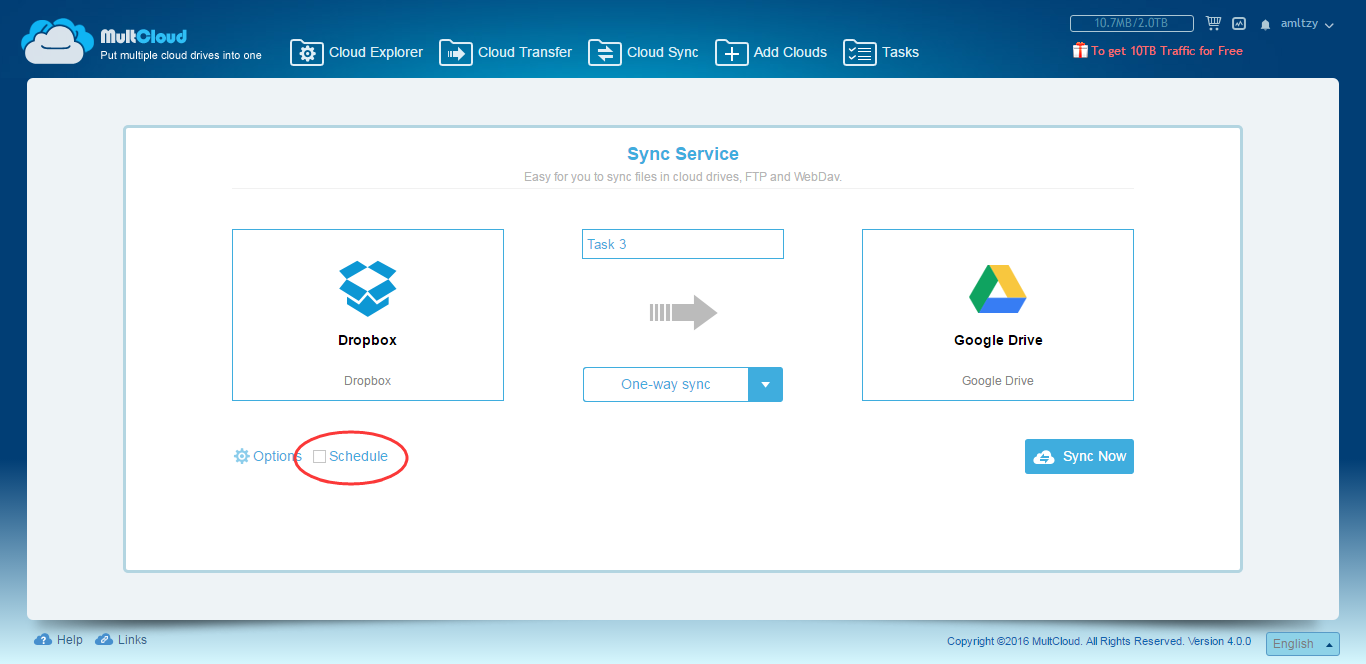
Other options are filter, overwritten, email notification and so on. Then you can choose sync now or schedule later. If you choose the latter, the task will be committed according to your preset time, which means sync automatically.

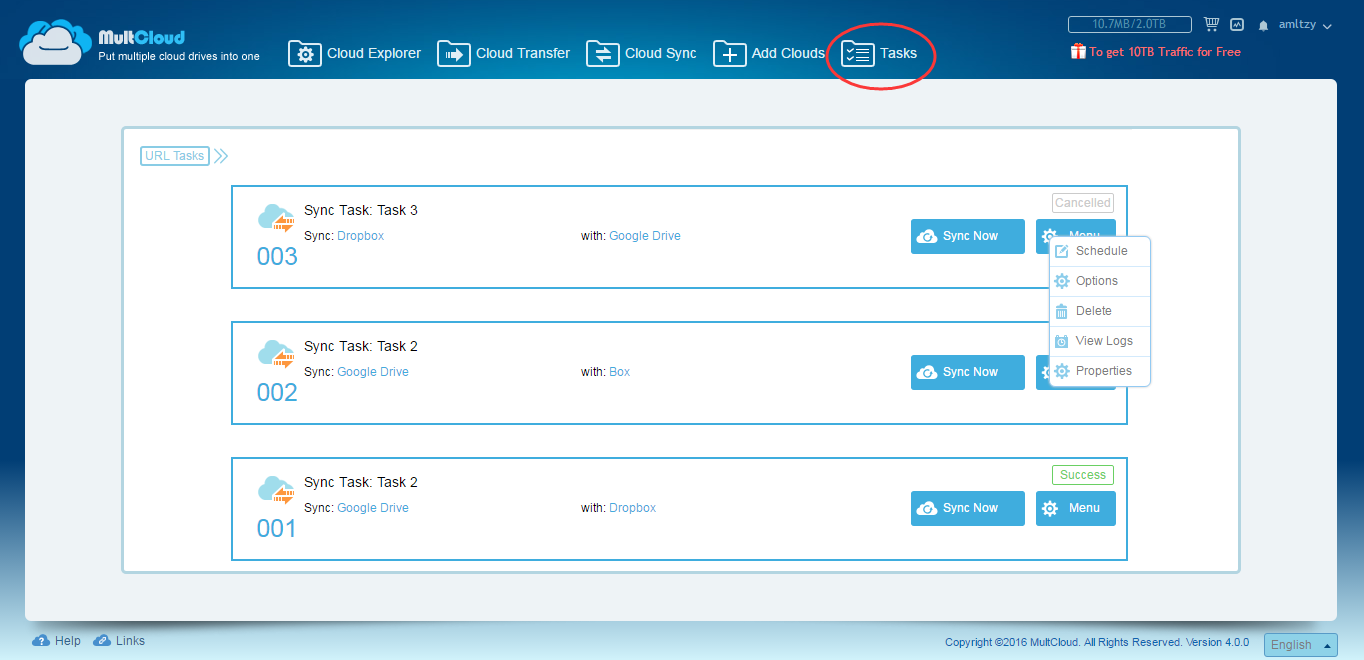
What's more, once you setted a sync task, you can commit it again from the task manager. Or re-edit, delete, view logs, etc.

domingo, junio 24, 2018

How to Hide or Unhide ZIP File in Picture (PNG/JPEG/GIF)


De: https://www.isunshare.com


Part 1: How to Hide ZIP File in Picture

Which files you can hide in picture?

Text files, programs, sound files, pictures, videos and much more, but you must be sure they have been compressed as .zip file.

Guide to hide zip file in picture with command prompt

Step 1: Compress files you want to hide as a .zip file.

Step 2: Create a new folder X in C:\ drive, such as C:\Users\isunshare\Desktop\X. Inside the folder, place the zip file (called x.zip) and a picture (called picture.png) that will hide everything.

place-zip-file-and-png-file[1]

Step 3: Open command prompt and drill down to the directory of folder that holds the zip file and image.

When the command prompt opens, you can use the cd command to change directory.

change-zip-file-directory-with-command[1]

Step 4: Enter command to merge zip file and image file into new image file.

copy /b picture.png+x.zip isunshare.png

hide-zip-file-in-picture-with-command[1]

Tips:

  1. The new image file is named isunshare.png.
  2. The new image file should be the same file type as the old image file. So it is PNG file.
  3. copy /b” command just makes a binary copy of the files picture.png and x.zip.
  4. The file you get at last can be opened with 7-zip, WinRAR or an image editor.

All is done. You have a new picture that has files hidden inside it now. You can delete the original files you wanted hidden.

successfully-hide-zip-file-in-a-picture[1]

From now on, besides you, probably there is no person knowing what are hidden in the image. But if even you forgot which files are hidden in it, how can you find hidden files in picture or unhide zip file in picture?

Part 2: How to Unhide ZIP File in Picture

At this moment, the best way to find hidden files in picture is to extract it with compression software, such as WinRAR. Now let’s see how to extract hidden files from image with WinRAR.

1. Open compression software, WinRAR.

2. Navigate to the directory of picture that hides files.

3. Select the picture and click Extract To button on WinRAR toolbar.

select-picture-to-extract-in-winrar[1]

4. Confirm the destination path of folder you would get after extraction. And click OK in Extraction path and optionswindow.

confirm-extraction-destination-path[1]

If the zip file has been encrypted before hiding in picture, a dialog would pop up now and ask for zip password. Just enter password and click OK, and it would successfully extract the picture you select. Suppose zip password forgot, you would need to recover zip password with iSunshare ZIP Password Genius at first.

enter-password-to-extact-encrypted-zip-file-in-pictures[1]

After successfully extracting hidden files from picture, go to destination path, you can see the files which has ever been saved in .zip file.

successfully-unhide-zip-file-in-picture[1]

viernes, junio 22, 2018

Cómo ocultar texto en una imagen


Open Notepad, leave the first two lines empty and then type the text you want to hide. Then save it to the folder you selected.

Now, also copy the JPG file you want to hide text in, in the same folder. The folder should now look something like this.

copy /b Name-of-initial-image.jpg + Name-of-file-containing-text-you-want-to-hide.txt Resulting-image-name.jpg

viernes, junio 15, 2018

Encriptamiento de carpetas y archivos–Windows, OneDrive, Google Drive, Dropbox

https://www.boxcryptor.com

https://www.axcrypt.net

Hay muchas alternativas para hacerlo.

Desde encriptar todo el disco con BitLocker, que me parece demasiado, hasta la berretada que hago yo. En mi caso no tengo muchos archivos que me "preocupan". Un Excel con mis passwords, otra con datos de cuantas de bancos y tarjetas y poca cosa más. Los tengo en .rar o podría ser un .zip o un .7z que tienen tiene contraseña (cuando le ponés contraseña se encripta). A su vez a los documentos que tengo adentro también les pongo contraseña. En ambos casos 123 como pass es cagada. Hay programas las desculan fácil, hay que usar contraseñas seguras. Claro, si te agarra un comando conjunto de la CIA, la KGB, el MI16 y el Mosad cagaste.

Para editar no los extraigo, si no que abro el .rar o lo que sea, doble click, lo edito y lo guardo.

De programas más específicos estuve leyendo un poco, no probé nada, me pareció muy interesante https://www.boxcryptor.com. Las dudan que me quedan es que parece no tener una App para Android y no me queda claro si podés editar los archivos e través de la web. La otra duda es si se puede encriptar sólo algunas carpetas o si hay que encriptar toda la carpeta OneDrive.

Otro que es similar, es https://www.axcrypt.net. Sí tiene App para Android e iOs. Las otras dudas también aplican a este.

Este está bueno también http://www.newsoftwares.net pero tiene Trial (que no aclara si al terminar se muere o qué) su no 39 us$

domingo, junio 03, 2018

Yandex Mail alias

Yandex.Mail

Domain alias
When you receive mail, you immediately receive it on different domains:
  1. @yandex.ru
  2. @yandex.ua
  3. @yandex.by
  4. @yandex.kz
  5. @yandex.com
  6. @ya.ru
That is, NAME@yandex.ru, NAME@ya.ru ... are the same, the letters will come to the same box.

lunes, mayo 28, 2018

8 Awesome WordPress Web Apps Paving the Way for WordPress as a SaaS Platform

De: https://www.elegantthemes.com/blog/resources/8-awesome-wordpress-web-apps-paving-the-way-for-wordpress-as-a-saas-platform

Posted on March 15, 2016 by Tom Ewer in Resources | 18 comments

8 Awesome WordPress Web Apps Paving the Way for WordPress as a SaaS Platform

Sometimes you need a web app and don’t have the time, skill, or budget to do custom development. Developing from scratch can be the solution for many problems, but it can take much longer than starting from an existing code base.

WordPress was originally designed as a blogging platform, and it continues to be well known for that. However, it has evolved into a fully fledged content management system (CMS) and, for some purposes, can even produce a solid web application – quickly, and at a significantly lower budget than custom development.

This article will introduce the idea of building a web app on WordPress, show you why you might consider it, examine some tools for building web apps in WordPress, then look at some great examples of what is possible.

Why Use WordPress for Web Apps?

Web apps can be custom coded from scratch, and many developers remain purists who feel that’s the only way to go. However, web application frameworks have been developed to help make the process of building web apps easier.

Ideally, building a web app would be quick to start, so you could get going and take advantage of some common built-in functionality. Wikipedia defines a Web Application Framework as:

…a software framework that is designed to support the development of web applications including web services, web resources and web APIs. Web frameworks aim to alleviate the overhead associated with common activities performed in web development. For example, many web frameworks provide libraries for database access, templating frameworks and session management, and they often promote code reuse.

With that in mind, it’s not hard to see how some people started to look at WordPress as a possible web application framework to help them build web apps. Though not specifically designed for that, WordPress has several features that make it a solid choice for your web apps, for example:

  1. Security, user registration and login: WordPress has user roles, which by default belong to one of five access levels, and can be assigned to different capabilities (e.g. edit posts).
  2. Database and URL mapping: WordPress enables you to easily connect to its database and run queries. You can modify how URLs are generated using pretty permalinks and add or modify the rewrite rules.
  3. Theming: WordPress themes offer a very flexible means of designing pages for your app.

WordPress isn’t always going to be the best tool for all types of web apps. It can work well for simple CRUD (Create, Read, Update, Delete) apps, and more complex functionality like calendar bookings, for example, can be done by integrating existing plugins. In general, projects related to publishing some form of content online may be possible candidates for using WordPress, especially where you want to use the same content across multiple products (e.g. website, mobile app etc.).

Tools for Building Web Apps in WordPress

While WordPress does offer built-in features we can use for web apps, you may require additional functionality. The built-in page and post structures can be used for a lot of things, but if you need custom data and fields to be added, searched or queried, manipulated, and displayed, some additional work is needed. Fortunately, tools do exist to help expand on WordPress’ native capabilities.

WordPress does have custom data capabilities in the form of custom fields, post types and taxonomies, but tools for working with them have been left up to plugins. Here are a few that have proven quite useful in moving WordPress away from simple blogging:
1. Advanced Custom Fields

Advanced Custom Fields plugin

Available for free in the WordPress repository, Advanced Custom Fields (ACF) has been a long-standing favorite of developers for adding custom data functionality to WordPress. It provides a way to visually create custom data fields of various types (e.g. checkboxes, images, relationships) and easily load data through a simple API. It uses the built-in custom post types and metadata and so is easy to use and fast. For more content types and the ability to add options pages, you’ll need to purchase a licence for ACF Pro (which starts at $25).

2. Piklist

Piklist Framework

Billed as a rapid development framework for WordPress, Piklist enables you to easily create custom post types and taxonomies, add metaboxes and metafields to all the WordPress data types (posts, pages, media etc.), and create settings pages and widgets. The Piklist Framework can be downloaded for free from the WordPress repository.
3. Gravity Forms

Gravity Forms

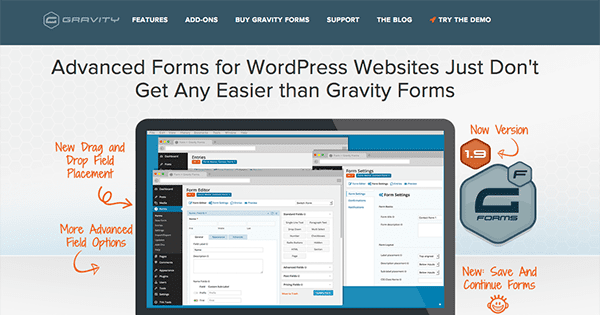
Gravity Forms is an advanced form builder, and includes a lot of functionality that can help with web apps. You can create forms to do CRUD operations on posts, pages and custom post types, as well as take advantage of functionality like commerce, scheduling and logic. Gravity Forms starts at $39 for a personal licence which doesn’t include any of the add-ons.

4. Toolset

Toolset Types plugin

Toolset enables you to add custom types and fields to the WordPress admin and create ‘parent/child’ relationships between different types, to build relational-type databases. You can create custom page templates and archives for displaying searchable custom data. It also includes built-in functionality for creating front end forms for submitting content and editing. The Types plugin is free, but access to more advanced functionality requires purchasing the full Toolset (starts at $149).

5. WordPress REST API

WordPress REST API plugin logo

No discussion about using WordPress for web apps would be complete without considering the REST API, especially with a non-WordPress front end. Finally moving from the outskirts as a plugin into WordPress core, the REST API is changing the way apps interact with the WordPress back end, as shown in the recently released Calypso desktop app. We will be seeing more development in this area going forward as the code matures.

8 Awesome Web Apps Built on WordPress

Now that you have a broad understanding of how WordPress can be used as a web app framework and have familiarised yourself with a few of the plugins that can make life a lot easier in the process, let’s explore six awesome web apps built on WordPress that showcase just how capable the world’s favorite CMS is!
1. Train.rs

Trainrs web app

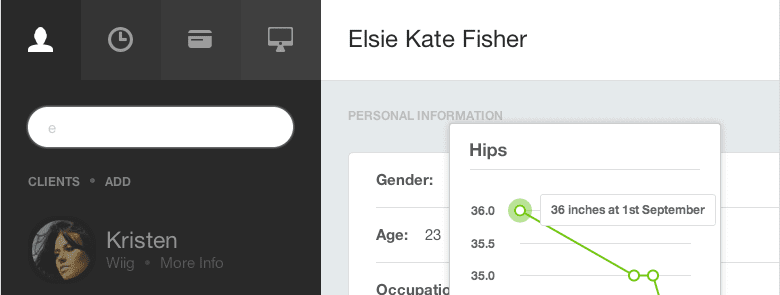
Train.rs provides a totally custom WordPress admin for managing personal trainers’ business.

Train.rs provides online business management for personal trainers. It uses WordPress as a foundation to give users hosted websites with customized administration of clients, training schedules, and billing. With the focus on users and custom data, WordPress makes easy work of this app.

2. YouTooCanRun

The YouTooCanRun homepage.

YouTooCanRun is a custom WordPress solution for managing the organization of marathon races, including paid registration of participants, generation of bib numbers and management of the event. It uses a combination of the Event Espresso and WooCommerce plugins to provide the needed functionality. As most of the functionality required was standard event and commerce behaviour, a WordPress solution combining plugins was perfect.

3. Pressbooks

Pressbooks web app

Pressbooks manages book content and prepares it for publishing.

Pressbooks is online book production software. They have both a hosted version and a WordPress plugin. You can create your book online and then export to various file formats for book publishing. The tool is built in WordPress using customized admin screens for managing book information, for example. Pressbooks focuses on content, so WordPress is a great tool for this.

4. Focused on Fit

The Focused On Fit homepage.

Focused on Fit is an online fitness community built on WordPress. Interesting features include a database of food and recipes with nutritional facts, and the ability to log your meals and exercise and track your progress towards your goals. It goes further and uses the REST API to pull that data into mobile apps for use on the go. The social aspect and user management makes this a good use case for WordPress.

5. StudyChurch

The StudyChurch homepage.

StudyChurch is a web app designed to help small church groups work through study materials together. It pieces together several WordPress plugins, such as BuddyPress, and a forum to enable users to write lessons that are available to group members who can then discuss and collaborate on the answers. With the focus on users management and content, this is a great use case for WordPress.

6. Nomadbase

NomadBase web app

The REST API powers this app as it pulls together location data for digital nomads.

Nomadbase is a real time map for digital nomads. Using location data from your social media apps (Facebook, Swarm, Twitter or Instagram), users’ past, present and future positions are shown on a city-level to other nomads to encourage connections and interactions. It is built using the REST API with a React and Leaf front end. This is an interesting use case for WordPress, focused on user data.

7. Code Cavalry

The Code Cavalry homepage.

Code Cavalry enables coding novices and web designers to connect with experts over Google Hangouts to solve problems. Though based in WordPress, the app interacts with Firebase through AngularJS. The developer outlines the approach taken in The Road to Code Cavalry. The focus of this app is the users and so using WordPress gave a good head start in development.

8. Hello Bar

The Hello Bar homepage.

Hello Bar is a ‘Software as a Service’ (SaaS) platform designed to help users monetize their websites by building an email list. It provides you with ways to promote content, get more subscribers and measure and test the effectiveness of your campaigns. For more detailed information on how the team approached the development of Hello Bar you can check out the series of articles they wrote. They took advantage of WordPress’ built-in user management with custom themes and plugins to provide an experience that looks nothing like WordPress.

Conclusion

While WordPress is not perfect or suited for all web application needs, it can be a very useful tool for certain types of web apps. Stop thinking of it just as a blogging platform and you can start to see the possibilities for using its existing structure to help bring a web app to life quickly and under budget.

We have provided you with several examples of web apps built on WordPress which should have provided some inspiration and food for thought as to how you can use WordPress for more than just basic websites.

Have you built a web app using WordPress? Please share your favourite tools and tips that we may have missed in the comments section below!

Article thumbnail image by ideyweb / shutterstock.com

WordPress + a Form Plugin

De: https://zapier.com/learn/forms-surveys/simple-database-app-builders/#wordpress


WordPress + a Form Plugin

for self-hosted internal tools integrated with your blog

WordPress form

Yes, it's a blog engine. Yes, it's not your typical app builder. It's not even your typical form builder. But WordPress is built on a MySQL database, and if you're running it on your own servers, you can turn a WordPress installation into a feature-filled app that might not even include a blog.

You'll first need to install a WordPress form builder plugin—Gravity Forms, Formidable, and Ninja Forms are all great options. You'll build a form with your form builder, and then whenever your form is filled out, your data will show up in your MySQL database. Now, you can use the form plugin's own features to display your form data in WordPress, or you can build your own MySQL queries or MySQL plugins to display your database info inside your own pages in WordPress.

It'll take a bit more work, but you'll end up with something almost as customizable as a hand-built MySQL app without the headaches of software development.

  • Price: Free, plus form plugin and hosting costs
  • Skill Level: Advanced—easy to make a basic form, but accessing the database will take more work

For a deeper look at features and pricing, see our WordPress review , then check our Gravity Forms review for info about a compatible form plugin.

miércoles, mayo 09, 2018

How to Record the Sound Coming From Your PC (Even Without Stereo Mix)

De: https://www.howtogeek.com/217348/how-to-record-the-sound-coming-from-your-pc-even-without-stereo-mix/

You don’t have to hold up a microphone to your computer’s speakers to record its audio. Even if you don’t have a Stereo Mix option on your PC, you can easily record the sound coming from any Windows PC.

You can record the sound coming from your PC in numerous ways, and we’re going to show you the three best we’ve found. The first two options use only software, and the third relies on an old trick that connects your computer’s audio output to its audio input with an audio cable.

Option 1: Stereo Mix

Stereo Mix is sometimes called “What U Hear.” It’s a special recording option that your sound drivers might provide. If it is included with your drivers, you can select Stereo Mix (instead of a microphone or audio line-in input), and then force any application to record the same sound that your computer is outputting from its speakers or headphones.

RELATED: How to Enable “Stereo Mix” in Windows and Record Audio from Your PC

On modern versions of Windows, Stereo Mix is generally disabled by default—even if your sound drivers support it. Follow our instructions to enable the Stereo Mix audio source on Windows. After enabling Stereo Mix, you can use any audio-recording program, and just select “Stereo Mix” as the input device instead of the usual “line-in” or “microphone” option.

On some devices, you may not have this option at all. There may be a way to enable it with different audio drivers, but not every piece of sound hardware supports Stereo Mix. It’s unfortunately become less and less common.

Option 2: Audacity’s WASAPI Loopback

Don’t have a Stereo Mix option? No problem. Audacity has a useful feature that can record the audio coming out of your computer—even without Stereo Mix. In fact, Audacity’s feature may be even better than Stereo Mix, assuming you’re willing to use Audacity to record the audio. This method takes advantage of a feature that Microsoft added in Windows Vista named the Windows Audio Session API (WASAPI). The feature also functions in Windows 7, 8, and 10, and helps make up for the lack of a Stereo Mix option on modern Windows PCs.

In Audacity, choose the “Windows WASAPI” audio host, and then choose an appropriate loopback device, such as “Speakers (loopback)” or “Headphones (loopback).”

RELATED: The How-To Geek Guide to Audio Editing: The Basics

Click the Record button to start recording the audio in Audacity, and then click Stop when you’re done. Because you’re using Audacity, you can easily trim and edit the sound file when you’re done.

Audacity’s tutorial website explains why this feature is actually better than Stereo Mix:

“WASAPI loopback has an advantage over stereo mix or similar inputs provided by the soundcard that the capture is entirely digital (rather than converting to analog for playback, then back to digital when Audacity receives it). System sounds playing through the device selected for WASAPI loopback are still captured, however.”

In other words, your recorded sound file will be higher-quality when using Audacity’s WASAPI loopback option.

Option 3: An Audio Cable

If neither of the first two options suit your needs, there’s always the low-tech solution—although it’s a bit of a hack. Just get an audio cable with a male 3.5mm connector on both ends. Plug one end into the line-out (or headphone) jack on your PC, and the other end into the line-in (or microphone) jack. You’ll stop hearing the sound your computer produces, but you can use any audio-recording program to record the “line in” or “microphone” input. To actually hear the sound, you could get a splitter, and then output the audio to headphones or speakers at the same time you direct it back into your computer.

Sure, this is inconvenient and silly compared to to the first two software-only options we talked about. But, if you desperately need to capture the audio coming out of your computer in an application that isn’t Audacity and you don’t have Stereo Mix, the cable trick allows you to do this.


Obviously, copyright laws may prevent you from distributing whatever recordings you make in this way, so don’t use these tricks for piracy! After all, even if you were going to pirate some audio, there’d be easier ways to do it than this.